
Throw pillows are the ultimate chameleon of interior styling, yet high-end retail options featuring rich architectural ribbing and tactile diamond relief often carry steep designer price tags. This modern textured crochet pillow cover bridges the gap—delivering deep waffle-like dimension, a removable button envelope flap, and relaxed Scandinavian comfort in an easy weekend project.
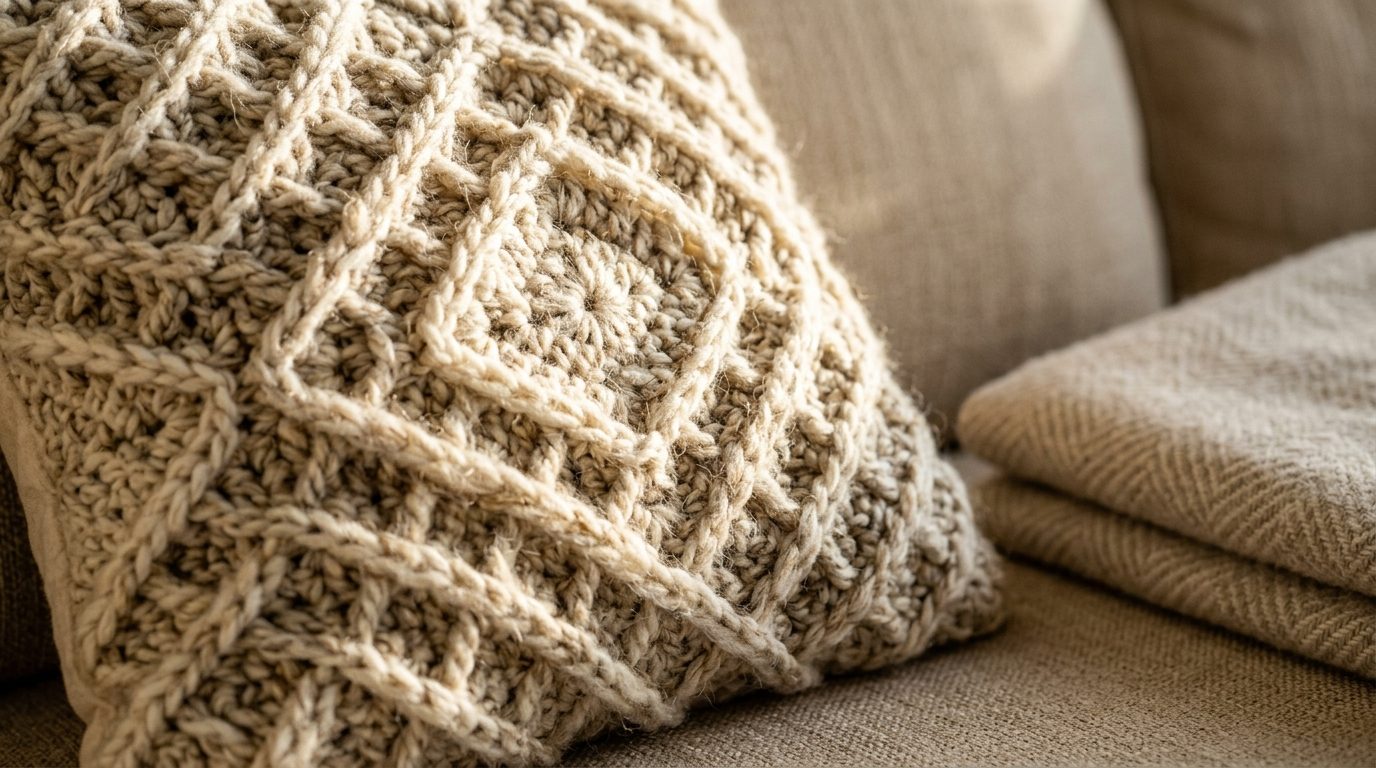
In modern living spaces, layering varied textile textures creates warmth without color clutter. Much like styling a warm minimalist bedroom, arranging a cozy reading nook, or pairing accents with a chunky crochet blanket, a handmade cushion grounds your sofa. Featuring an envelope button back closure, this cover can be slipped off in seconds to wash or swap out seasonally with zero zipper sewing required.
EXPLORE TEXTURED STITCHES: If you love tactile living room accents, check out our new chunky ribbed crochet cushion cover pattern featuring deep front-post ridges and an effortless wooden button envelope back.
Why You’ll Love This Crochet Cushion Pattern
Engineered for standard pillow inserts and effortless home laundering, here is why this tutorial stands out:
- Removable Button Envelope Closure: Large natural olive wood buttons make laundering simple without fiddling with metal zippers or seam-rippers.
- Rich Diamond Alpine Texture: Alternating front-post double crochets create an intricate waffle weave that conceals pillow insert fabric completely.
- Standard 18″ x 18″ Proportions: Fits universally available square down or synthetic pillow inserts found at any home goods retailer.
- No-Sew Construction: The front textured panel and two overlapping back panels are joined cleanly with an outer single crochet border.
Key Supplies & Sizing Guidelines
Choosing a bulky yarn with great stitch definition ensures the raised relief pops dramatically under indoor lighting.

- Bulky Weight #5 Yarn: Approximately 450–500 yards of wool-acrylic blend or heavy cotton-acrylic (such as Hue + Me, Lion Brand Wool-Ease Chunky, or Paintbox Chunky).
- Size K-10.5 (6.5 mm) Crochet Hook: Balances dense fabric opacity with comfortable wrist ease.
- 18″ x 18″ (45 x 45 cm) Pillow Insert: A feather-down blend provides that coveted interior designer “chop” aesthetic.
- Three Natural Olive Wood Buttons (1.25″ to 1.5″): Functional rustic closures that slip through natural stitch gaps without buttonholes.
- Tapestry Needle & Sharp Shears: For seaming and invisible tail management.
📋 Maker’s Project Blueprint
Step-by-Step Pillow Cover Construction Walkthrough
Finished cover dimensions: 17 inches by 17 inches (crochet pillow covers are deliberately made 1 inch smaller than the 18″ insert to ensure a plump, wrinkle-free fit).
Step 1: The Front Textured Panel: Chain 45 loosely. Turn.
Row 1: Double crochet (dc) in the 4th chain from hook and in each chain across. Turn. (43 stitches)
Row 2 (Wrong Side): Ch 1 (does not count as st). Single crochet (sc) in each stitch across. Turn.

Row 3 (Alpine Stitch Row): Ch 2 (counts as dc). *Work 1 Front Post Double Crochet (FPdc) around the dc post two rows below, skip the st behind it, work 1 dc in next sc.* Repeat from * to * across. Turn.
Row 4: Ch 1. Sc in each stitch across. Turn.
Row 5 (Offset Alpine Row): Ch 2. *1 dc in next sc, 1 FPdc around the dc two rows below.* Repeat across, staggering posts to form interlocking diamond ridges. Continue repeating Rows 2–5 until panel measures 17″ x 17″. Fasten off.
Step 2: The Two Back Panels: Crochet two simple single-crochet panels: Bottom Panel (17″ wide by 12″ high) and Top Button Panel (17″ wide by 9″ high with 3 button loops). Overlap them by 4 inches to match the 17″ front square.
Step 3: Joining & Finishing: Place front and back panels wrong-sides together. Single crochet evenly through both layers around all four edges, placing 3 sc in each corner. Sew three olive wood buttons onto the under-flap to secure.
3 Pro Secrets for Plump Designer Pillows
1. Always Size Down the Cover: Never make an 18-inch cover for an 18-inch insert! Crochet expands with pressure. Making the cover 17″ x 17″ forces the insert to expand into the corners, eliminating saggy hollow edges.
2. Steam Block Flat Before Assembly: Pin your front and back panels to exact 17″ square measurements on blocking mats and steam thoroughly. Assembling pre-blocked flat panels ensures perfectly straight outer seams.
3. Use Feather-Down Inserts: Synthetic poly-fill inserts remain stiff and rounded, whereas duck down or down-alternative feather inserts give your crochet pillow that relaxed, moldable luxury feel.
Living Room Styling & Color Combinations
Styling handmade cushions with modern furniture creates an inviting, balanced sanctuary.

- Sofa Layering: Pair two chunky textured pillows with a smooth velvet lumbar pillow and a folded wool blanket in warm earthy living spaces.
- Bed Dressing: Prop two finished crochet pillows upright against crisp linen shams at the head of the bed to introduce rich architectural height.
- Washing Instructions: Unbutton, remove insert, and hand wash or machine wash on gentle cycle in cold water. Lay flat to dry to preserve stitch texture.
Frequently Asked Questions
Can I use a regular 18″ pillow insert if my cover is 17″?
Yes! In fact, this is the interior designer standard. The crochet fabric easily stretches to fit, resulting in a plump, filled pillow with sharp, crisp corners.
Will the pillow insert show through the crochet stitches?
No. The alpine stitch and front-post double crochets create an exceptionally dense, textured textile that blocks the white pillow casing underneath from view.
Can I make this pillow with a zipper instead of buttons?
Yes. If you prefer a zipper, omit the back overlapping panels, crochet two equal 17″ x 17″ squares, and sew a nylon zipper into the bottom seam using a matching needle and thread.
Pin This Pillow Pattern for Later
Upgrading your living room or bedroom decor? Pin this modern textured crochet pillow tutorial to your Pinterest home decor or crochet board so you can make it anytime!
Leave a Comment