There is a distinct satisfaction in taking a single cake of yarn and turning it into a structured, functional home piece before the evening is over. This tested crochet hanging basket pattern delivers that exact payoff: worked in a seamless spiral using super bulky chenille yarn and dense split single crochet stitches, it yields thick, upright sidewalls that hold their shape effortlessly without flopping or sagging under daily use.
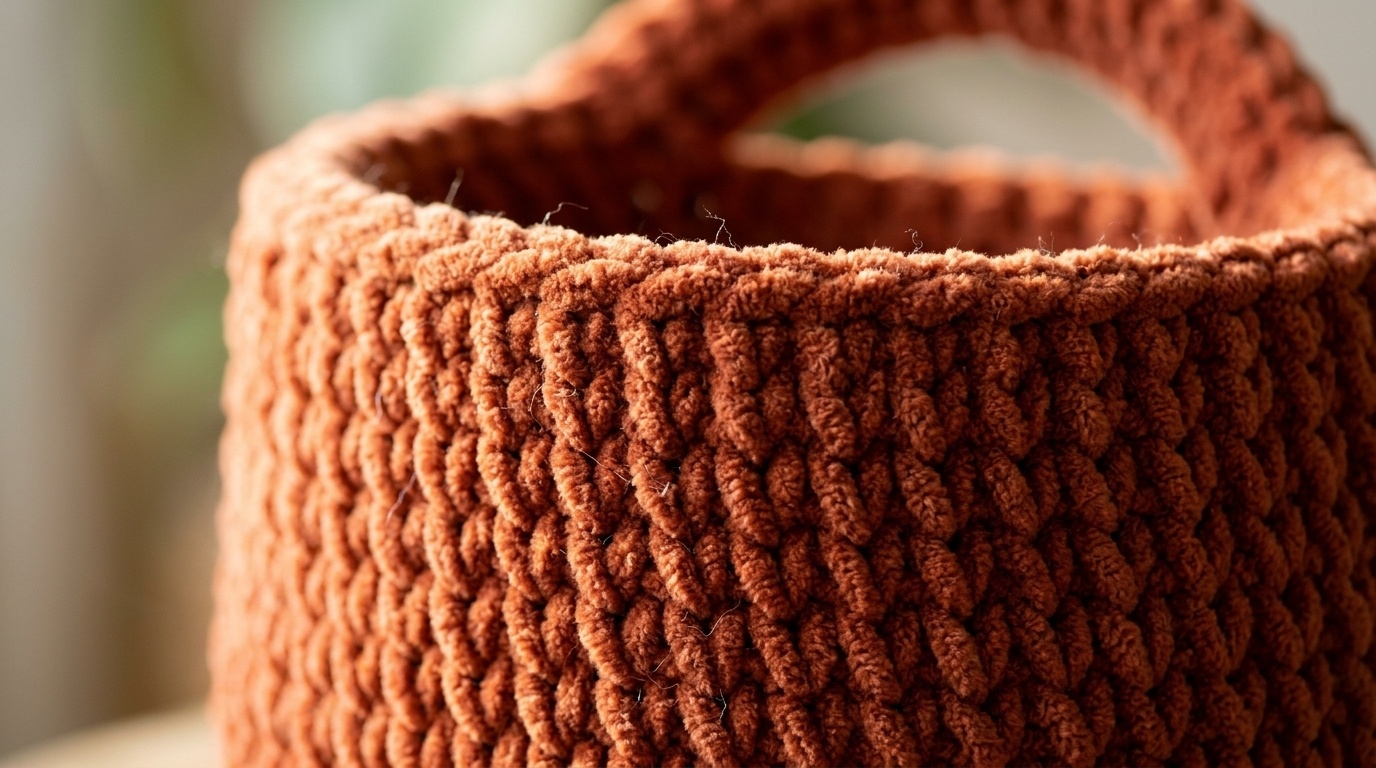
Most lightweight hanging baskets struggle the moment you load them with keys, hair accessories, or a potted plant: the fabric stretches downward, distorts into an oval, and looks tired within a week. By combining a 10 mm hook with the split single crochet stitch (often called the waistcoat or knit stitch), each round anchors directly through the vertical posts of the previous row rather than swinging loosely from top loops. The resulting fabric is nearly double the thickness of standard single crochet, making it sturdy enough to hold its basket profile whether hanging on a foyer peg or folded neatly onto a dresser.
Project Blueprint: Yarn Yardage, Sizing & Gauge Standards
Before casting on, having precise fiber measurements ensures you complete the basket without running short on your working yarn or ending up with an oversized rim that flares outward.

- Yarn Selection: 1 cake (approx 300 g / 220 yds) Bernat Blanket O’Go or equivalent Category 6 Super Bulky chenille yarn in warm earth tones (such as Fired Clay, Agave, or Plum).
- Hook Size: U.S. N/15 (10.0 mm) ergonomic or smooth wooden crochet hook. If you crochet tightly, a smooth aluminum or birch wood hook allows chenille fibers to glide without catching.
- Notions: 1 locking stitch marker, large eye steel tapestry needle (chunky yarn needle), sharp sewing snips, flexible cloth measuring tape.
- Finished Dimensions: Approximately 10 inches (25.5 cm) in base diameter and 11.25 inches (28.5 cm) tall unfolded, with a sturdy 14-stitch hanging strap loop.
- Verified Gauge: 7 split single crochet stitches and 8.5 rounds = 4 inches (10 cm). Meeting gauge guarantees your basket walls stand straight and finish within a single yarn cake.
The Anatomy of the Split Single Crochet (Waistcoat Stitch)
The entire structural integrity of this project relies on a single technique: the split single crochet (abbreviated splsc). Rather than inserting your hook beneath the standard two horizontal loops at the top of the stitch, you push the hook directly through the center of the stitch post, between the two vertical front legs (the “V”) and beneath the horizontal bar at the back.

Because you are stacking stitch centers directly over one another, this creates dense, interlocked vertical columns that mimic a classic stockinette knit fabric. Here are three critical rules to keep your split stitches effortless:
- Loosen Your Working Loop: When drawing up your loop through the split stitch, pull it up to the full height of your working round. If you choke the hook tight against the fabric, inserting into that stitch on the next round becomes unnecessarily difficult.
- Aim Slightly Below the Horizontal Bar: Feel the back of the stitch with your left index finger as the hook pushes through; you want the hook to emerge directly centered below the horizontal back bar.
- Maintain Continuous Spirals: Never join rounds with a slip stitch during the base or sidewalls. Continuous spiral rounds eliminate the unsightly diagonal join seam that often weakens basket walls.
Step-by-Step Foundation & Circular Base Sequence
The base expands smoothly using balanced 6-stitch increase rounds. Place your locking marker on the first stitch of each round and move it up after every rotation.
Setup & Center Ring: Ch 2. In the 2nd ch from hook, work 6 sc. Do not slip stitch to join. Place stitch marker in the first stitch. (6 sts)
Round 2: Work 2 splsc in each sc around. Move marker to first stitch. (12 sts)
Round 3: *2 splsc in next st, 1 splsc in next st. Repeat from * around. (18 sts)
Round 4: *2 splsc in next st, 1 splsc in each of next 2 sts. Repeat from * around. (24 sts)
Round 5: *2 splsc in next st, 1 splsc in each of next 3 sts. Repeat from * around. (30 sts)
Round 6: *2 splsc in next st, 1 splsc in each of next 4 sts. Repeat from * around. (36 sts)
Round 7: *2 splsc in next st, 1 splsc in each of next 5 sts. Repeat from * around. (42 sts)
Round 8: *2 splsc in next st, 1 splsc in each of next 6 sts. Repeat from * around. (48 sts)
Round 9: *2 splsc in next st, 1 splsc in each of next 7 sts. Repeat from * around. (54 sts)
At the end of Round 9, your flat circle should measure right at 10 inches in diameter. Gently press it flat on your tabletop; there should be zero ruffling or cup-like curling.
Building Upright Sidewalls & Crafting the Integrated Hanging Strap
With your base completed at 54 stitches, stop all increases. The transition into upright sidewalls happens naturally without any specialized bottom ridge round.
Rounds 10 to 29 (Sidewall Elevation): Work 1 splsc in each stitch around for 20 continuous rounds. Keep your tension relaxed and consistent. As the rounds stack up, the thick chenille fabric will naturally turn upward into clean vertical walls standing approximately 9 inches tall from the base seam. (54 sts per round)
Round 30 (Handle Bridge Creation): Ch 14 for the hanging loop. Skip each of the first 8 sts along the rim (this creates the sturdy handle opening). Taking care not to twist your chain, work 1 splsc in each of the remaining 46 sts around.
Round 31 (Reinforcing the Handle): Work 1 sc into each of the 14 chains of your handle loop. Continue around by working 1 splsc in each of the remaining 46 sts. (60 total sts)
Rounds 32 & 33 (Top Rim Border): Work 1 splsc in each stitch around across both the handle strap and the rim walls. On the final stitch of Round 33, join with an invisible slip stitch into the next stitch. Fasten off leaving an 8-inch yarn tail. Weave the tail through the interior fabric with your chunky tapestry needle to lock it permanently in place.
Custom Sizing Matrix: Scaling from Mini Pod to Entryway Tote
Whether you need a compact organizer for essential oils by your bedside or an oversized basket for entryway mail and winter scarves, you can easily adapt this stitch sequence using the sizing guide below:
| Size Option | Base Stitches & Diameter | Sidewall Rounds | Handle Chain | Approx Yarn Needed |
|---|---|---|---|---|
| Mini Catchall Pod | 30 sts (approx 6 in) | 12 rounds | Ch 10 (skip 5 sts) | Approx 95 yds |
| Standard Hanging Basket (Tested) | 54 sts (approx 10 in) | 20 rounds | Ch 14 (skip 8 sts) | Approx 215 yds |
| Deep Entryway Storage Tote | 66 sts (approx 12.5 in) | 26 rounds | Ch 16 (skip 10 sts) | Approx 340 yds (2 cakes) |
For more home craft patterns that combine functional organization with warm organic style, explore our tested guides on crafting sturdy cord-core coasters and styling a boho macrame plant hanger for natural everyday texture.
Interior Styling & Everyday Placement Ideas
Once finished, hang the basket by its reinforced strap and fold the upper front rim down by approximately 2 to 3 inches. This folded cuff exposes the rich interior stitch texture while making items inside easily accessible from the front.

Here are three practical ways to style and use your basket around the home:
- Bathroom Toiletries & Rolled Linens: Hang from a matte black towel peg to hold washcloths, dry brushes, or spare linen hand towels close at hand without taking up counter space.
- Hanging Pothos or Trailing Greenery: Place a waterproof plastic pot liner inside the basket and tuck in a leafy trailing indoor plant like a philodendron or English ivy for a warm bohemian accent.
- Foyer & Entryway Catchall: Mount near the front door to corral winter beanies, dog leashes, and everyday mail that otherwise clutters entry consoles.
Care, Washing & Steam Reshaping Protocol
Because this basket is crafted from super bulky polyester chenille yarn, keeping it pristine through years of daily use is straightforward and low-maintenance:
- Spot Cleaning First: For surface dust or lint, gently brush with a lint roller or dab with a damp microfiber cloth and mild eco dish soap.
- Machine Washing (If Needed): Wash on a gentle, cold cycle inside a zippered mesh laundry bag to prevent the thick fibers from rubbing against harsh drum edges. Never use fabric softener, which can coat and mat chenille yarn.
- Reshaping & Air Drying: Lay flat or stuff with dry terry towels to restore its crisp cylindrical shape, then allow to air dry completely in an open, ventilated room. Chenille dries quickly without retaining dampness.
Common Maker Questions & Troubleshooting Q&A
Why are my split single crochet stitches so tight and hard to pierce?
This is the most common hurdle when first trying the waistcoat stitch. When completing each single crochet, ensure you draw your working loop up to the full height of the current round before yarning over and pulling through. Keeping your loops tall prevents the stitch legs from clamping shut.
Can I substitute 100% cotton yarn instead of super bulky chenille?
Yes, but because worsted weight cotton is significantly thinner, you will need to hold 3 to 4 strands of cotton yarn together simultaneously to achieve a similar 10 mm gauge. Multi-strand cotton creates an even firmer, structured basket wall.
How do I prevent the basket base from curling or forming a bowl too early?
If your base begins curling upward before Round 9, your hook size may be slightly too small for your natural tension, or your increase spacing may be too tight. Switch up to an 11 mm hook for the base rounds, or make sure you are relaxing your working hands.
Will the hanging handle stretch out over time under heavy weight?
Rounds 31 through 33 specifically build multiple layers of split single crochet through and around the handle chain. This creates a dense, reinforced band that minimizes sagging even when loaded with potted greenery or bathroom accessories.
Save This Hanging Basket Pattern to Pinterest
Planning your next weekend fiber arts project? Save this pin to your Crochet Patterns or DIY Home Decor board so you have the round-by-round instructions and sizing matrix ready whenever you want to make one!
Pattern was so clear to follow! Worked up in about 40 minutes while sitting on the porch. Love how practical and sturdy it is.
Do you recommend wet blocking or steam blocking for kitchen cotton projects?
For 100% cotton, a quick pin and gentle steam with an iron (held 2 inches away, never touching the yarn!) works wonders in 5 minutes flat. It relaxes the fibers and locks the edges completely square!