
Few things break the visual rhythm of modern handmade home decor quite like a lumpy knot or a loose strand of yarn working its way through your clean color stripes. Whether you are crocheting a striped kitchen dishcloth, a warm color-blocked placemat, or a chunky living room throw, introducing a new yarn shade should look deliberate, crisp, and entirely seamless. In our studio, we rely on the gold-standard maker technique: changing colors during the final yarn-over of the preceding stitch, eliminating hard knots entirely while creating a reversible, durable join that holds up through years of everyday use and machine washing.
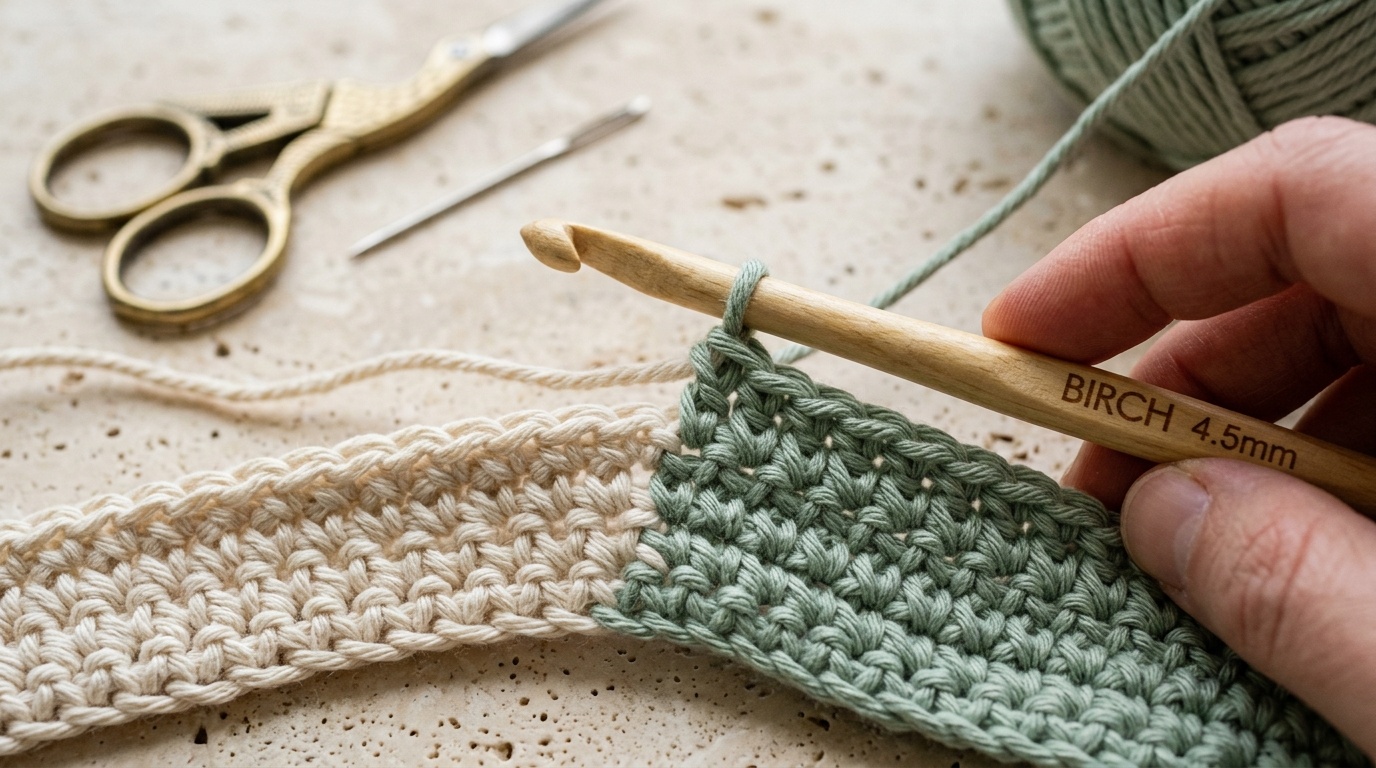
Traditional beginner advice often suggests tying the two yarn tails into a tight square knot or knotting directly onto the working yarn strand. While this feels secure at first, hard knots inevitably work their way to the front of flat home textiles, create uncomfortable bumps under dinnerware or sofa cushions, and can come untied in the laundry. Understanding the basic anatomy of a crochet stitch reveals why the knotless method works: the loops on your hook form the top “V” of the next stitch, which means the new color must already be on your hook before that stitch begins.
Maker’s Technique Blueprint: Seamless Knotless Color Changes
- Skill Level: Beginner-friendly (foundational maker skill for clean striping).
- Compatible Stitches: Single Crochet (sc), Half Double (hdc), Double Crochet (dc), and Treble Crochet (tr).
- Recommended Fiber: 100% worsted weight cotton (such as Oak & Thread, Dishie, or Lion Brand 24/7 Cotton) for defined stitch clarity.
- Essential Studio Tools: 4.5 mm blonde birch crochet hook, vintage brass craft scissors, and a bent-tip steel tapestry needle.
- Tail Length Standard: Minimum 6 inches (15 cm) for both colors to allow secure 3-way directional weaving.
- Julian’s Studio Testing Note: Tested across 20 striped rows in worsted cotton and rustic wool. The knotless method maintains 100% natural fabric flexibility with zero hard spots when pressed flat under hot bakeware or styled on tabletops.
Why You’ll Love This Knotless Method
- Zero Hard Bumps: Eliminates uncomfortable lumps from living room throws, pillow covers, and kitchen dishcloths so your textiles lay completely flat.
- Crisp Horizontal Color Boundaries: Ensures the top “V” loops match the lower stitch posts perfectly without the previous color bleeding into the next row.
- Completely Reversible Finish: Creates front and back sides that look equally professional, essential for reversible table runners and dining placemats.
- Wash-Tested Durability: Paired with a proper 3-way diagonal tail weave, yarn ends remain locked inside the stitches even through heavy machine laundering cycles.
Essential Supplies & Workbench Setup

Working with high-contrast, clean-plied cotton allows you to see the exact loop placement as you transition colors. Having the proper finishing tools ready before you reach the end of your row keeps your tension steady:
- Two Contrasting Yarn Shades: We recommend 100% unmercerized or low-sheen worsted weight cotton. Cotton fibers provide excellent grip when woven into one another, preventing slipping without adhesive or knots.
- Smooth Wooden or Ergonomic Hook: A 4.5 mm or 5.0 mm birch hook provides tactile control, preventing the new yarn loop from sliding loose while completing the pull-through.
- Sharp Embroidery Scissors: Clean cuts prevent yarn fraying at the tail cut point, making needle threading straightforward.
- Bent-Tip Steel Tapestry Needle: The gentle upward angle of a bent-tip tapestry needle glides under dense cotton stitches without snagging or piercing individual plies.
Step-by-Step Color Change Walkthrough
This technique applies universally across all standard basic crochet stitches. The core rule to remember is: begin the stitch in Color A, but complete the final pull-through in Color B.
Step 1: Work the Stitch Until the Final Pull-Through
Work your stitch as normal up to the very last movement. For a standard single crochet, insert your hook into the next stitch, yarn over with Color A (cream), and pull up a loop. You now have two loops of Color A resting on your hook. Do not complete the final yarn-over with Color A.
Step 2: Drop Color A & Position Color B
Drop the working strand of Color A behind your work. Take the new strand of Color B (muted sage green), leaving a generous 6-inch (15 cm) working tail extending downward. Fold the yarn gently over your index finger to set your tension.

Step 3: Complete the Pull-Through with the New Shade
Hook Color B and pull it directly through the two loops of Color A on your hook. You now have a single clean loop of Color B on your hook, while the posts of the stitch underneath remain pure Color A. Gently tug on the tail of Color A to snug up the loops so they sit level with the neighboring stitches.
Step 4: Cut Color A & Work the Next Row
If you are creating wide blocks of color or changing shades permanently, snip Color A, leaving a matching 6-inch tail. Chain 1 (or turn, according to your pattern) using Color B, and begin working your next row. The first stitch will now emerge cleanly in Color B with zero color contamination along the upper edge.
3 Studio Secrets for Clean Stripes & Secure Tails
1. The 6-Inch Tail Rule (Never Cut Short): Cutting tails shorter than 4 inches makes thorough needle weaving nearly impossible. A generous 6-inch tail ensures you can weave through multiple directional passes, distributing yarn tension evenly across the fabric so ends never pop out when the piece stretches.
2. Weaving vs. Crocheting Over Tails: Many crocheters simply lay the tail over the previous row and crochet around it. While convenient, this often allows the blunt cut end to poke out through the right side of the fabric after gentle handling. For home decor items like square crochet coasters or table linens, always finish tails with a dedicated tapestry needle.
3. The 3-Way Diagonal Needle Lock: Thread your 6-inch tail onto a bent-tip steel needle. Weave horizontally through 4 to 5 stitches on the wrong side of the same color block. Change direction and weave diagonally through the dense center posts of the row below. Finally, reverse direction once more through 3 stitches, splitting a strand of cotton fiber as you pull through. This triple-directional friction locks the yarn tail permanently in place without a single knot.
Styling Modern Color-Blocked Home Textiles

Mastering clean color transitions opens up endless possibilities for organic modern home styling. Consider these thoughtful ways to coordinate your color-blocked textiles across your living space:
- Two-Tone Dining Coordinates: Pair crisp cream-and-sage striped placemats with our guide on how to block crochet placemats completely flat to give your tabletop restaurant-grade structure and crisp corners.
- Texture & Color Harmony: Combine bold horizontal color bands with intricate textural patterns, such as the thermal crochet stitch or our curated 8 textured crochet stitches for home decor.
- Troubleshooting Edge Tension: If changing colors causes your borders to pull inward or ripple, consult our breakdown on why crochet curls and 7 simple fixes.
- The Gathering Bridge: When setting an intimate dinner party table with handmade color-blocked runners, complement the natural fibers with Claire Montgomery’s styling ideas for budget natural autumn table centerpieces.
Care & Laundering for Striped Crochet Textiles
- Machine Washing: Wash color-blocked cotton pieces in cold water on a gentle cycle. Placing delicate handmade items inside a mesh laundry wash bag prevents other items from snagging the woven ends.
- Color Bleed Prevention: For the very first wash of contrasting yarns (like deep forest green or terracotta against white cream), add half a cup of distilled white vinegar or a color-catcher sheet to the drum to lock the dyes.
- Reshaping & Drying: Lay flat to dry on a clean towel or foam blocking board. Gently smooth the color boundary line with your fingertips while damp to ensure the stripes stay square and true.
Frequently Asked Questions
Does this knotless technique work for double crochet and half double crochet?
Yes, the rule is identical across all standard stitches. For half double crochet, work until you have three loops on your hook, then yarn over with the new color and pull through all three. For double crochet, work until two loops remain after the first yarn-over pull-through, then complete the stitch with the new shade.
Will the yarn unravel if I do not tie a knot?
No. Mechanical friction between the yarn plies and the dense surrounding stitches holds the fiber securely. When tails are woven in three distinct opposing directions using a tapestry needle, the fibers interlock naturally. Knots, by contrast, concentrate stress in a single point and can easily loosen in the wash.
Should I carry the unused yarn up the side or cut it every time?
If you are working narrow stripes of 1 or 2 rows, carrying the unused yarn loosely along the selvedge edge saves time and eliminates dozens of tails, especially if you plan to add a solid border (such as a single crochet or crab-stitch border) to encase the carried strands. For color blocks wider than 2 rows, cutting the yarn and weaving tails yields a significantly cleaner, flatter edge.
Pin This Crochet Technique Guide for Later
Planning your next striped blanket or color-blocked table runner? Save this step-by-step tutorial to your Modern Crochet or DIY Home Crafts Pinterest board so you have the needle-weaving instructions ready whenever you change yarn shades!
Attempted this as my first ever home decor crochet project! My tension was a little tight at the beginning, but your photos made following along so straightforward. Already picking yarn colors for a full set!
Hi Julian! Quick yarn question: can I use mercerized cotton for this or will it make the surface too slick for hot mugs?
Hey there! Mercerized cotton has a lovely sheen and works great for structured baskets, but for coasters and hot pads, unmercerized matte kitchen cotton (like Dishie or Sugar’n Cream) is much better because it absorbs condensation without letting mugs slide. Happy hooking!
Pulling the new yarn color through on the very last yarn-over of the previous stitch was the ultimate lightbulb moment for me! My color changes used to look jagged and uneven, but this method made my striped kitchen towel look completely seamless.
That last yarn-over trick is the absolute secret to crisp, professional color transitions! It locks the new color right at the top of the next stitch with zero jogs. So thrilled your stripes came out clean and crisp!