
A floppy crochet basket that slumps into a shapeless bowl the moment you fill it is one of the most frustrating disappointments in fiber craft. After testing three structural iterations on our studio worktable, we refined this tested pattern for nesting round storage baskets with integrated cutout handles that stand upright, hold their crisp cylindrical geometry under real daily use, and feel substantial in hand.
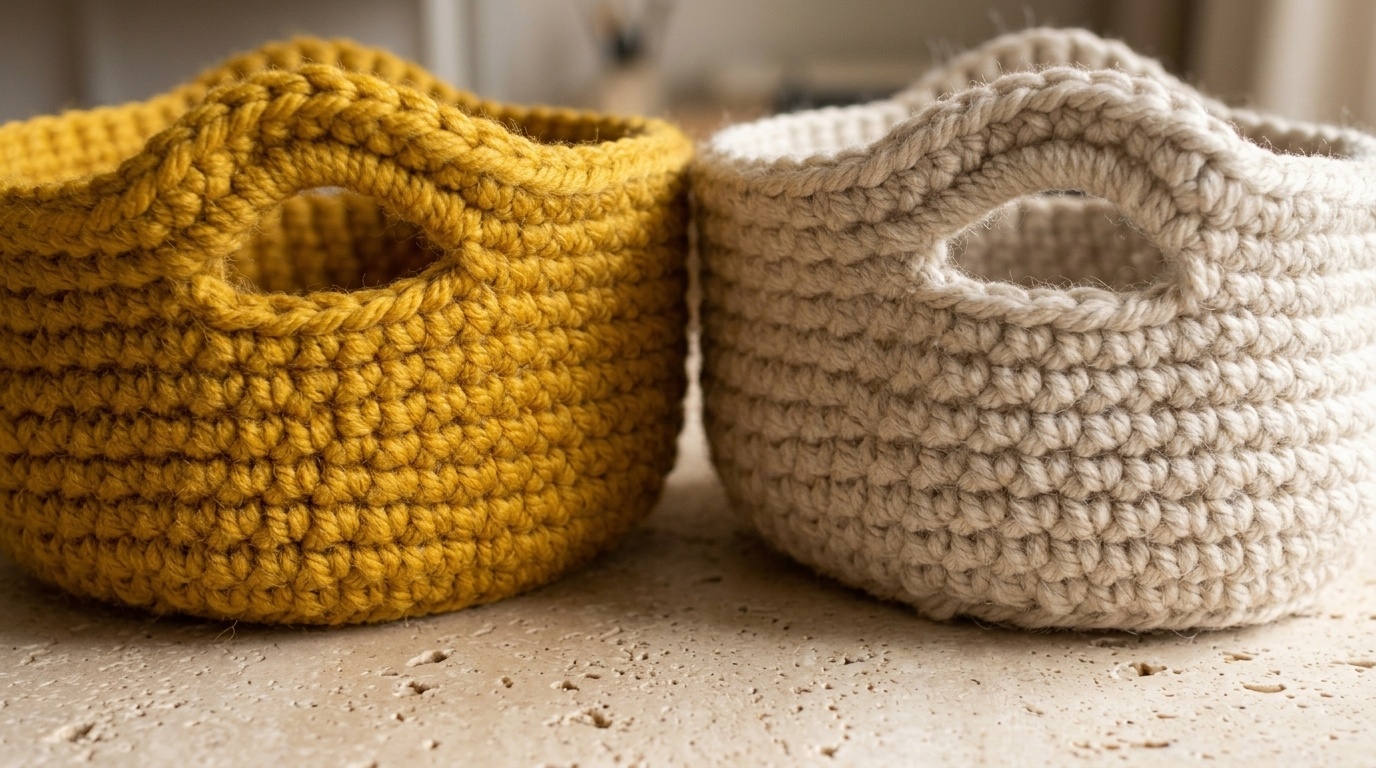
The engineering secret to a self-supporting basket does not rely on fabric stiffeners, hidden plastic canvas, or wire armature. It comes down to two foundational mechanics: pulling a tight gauge with super bulky yarn (or two strands of bulky yarn held together) and executing a dedicated back-loop-only turning round that anchors the horizontal base to the vertical sidewall at a clean, perpendicular ninety-degree angle.
LIVING ROOM TEXTILE PAIRING: Style your handmade storage alongside handcrafted comfort with our tested masterclass on how to crochet a buttoned ribbed pillow cover featuring knit-look ridges and wooden buttons.
Why Most Crochet Baskets Collapse (And How Dense Gauge Creates Rigid Walls)
Most commercial yarn ball bands suggest using a 12mm or 15mm crochet hook for category 6 super bulky yarns. While that loose hook size yields wonderful drape for oversized scarves and throws, it creates too much open air space between stitch posts when building a three-dimensional container. Without dense horizontal compression, the sheer weight of the upper rows causes the sidewalls to buckle inward under gravity.
For this project, we deliberately downsize to a 10.0mm (US N/15) crochet hook. By forcing thick yarn through smaller loop openings, each single crochet stitch physically locks against its neighbors. The resulting fabric behaves more like woven felt or molded rope than loose knitwear, providing structural integrity that supports heavy contents like rolled linens, skeins of wool, or children’s wooden blocks without bowing outward.
PROJECT PAIRING: If you enjoy functional textured storage, explore our companion pattern on how to crochet a chunky square basket with reinforced corner increases, or our tested crochet market tote bag for durable grab-and-go carryalls.
Materials & Sizing Blueprint: Small, Medium, and Large Dimensions

This master pattern is written for three versatile sizes that nest neatly inside each other when stored empty. All three versions use the same gauge and construction method, making it easy to build a coordinated set for bathroom shelving, nursery changing tables, or entryway drop zones.
| Basket Size | Finished Diameter | Finished Height | Yarn Requirement | Recommended Use |
|---|---|---|---|---|
| Small | 11 inches (28 cm) | 12 inches (30.5 cm) | 3 balls (approx. 192 yds / 175 m) | Vanity towels, hair accessories, nursery essentials |
| Medium | 13.5 inches (34.5 cm) | 14 inches (35.5 cm) | 5 balls (approx. 320 yds / 292 m) | Skein yarn storage, living room throws, plush toys |
| Large | 15 inches (38 cm) | 16 inches (40.5 cm) | 6 balls (approx. 384 yds / 351 m) | Laundry hampers, entryway shoe bins, chunky blankets |
- Yarn: Category 6 Super Bulky yarn such as Bernat Mega Bulky (10.5 oz / 300 g; 64 yds / 58 m per ball) or Bernat Blanket Extra. Alternatively, you can hold two strands of Category 5 bulky yarn together to achieve identical density.
- Crochet Hook: Size U.S. N/15 (10.0 mm). Choose an ergonomic handle with a wide elastomer or silicone grip to distribute palm pressure during tight tension work.
- Notions: 1 locking stitch marker to track the beginning of each round, a steel bent-tip tapestry needle for weaving bulky tails, and a durable tape measure.
- Gauge: 6 single crochet (sc) stitches and 6 rows = 4 inches (10 cm) in unblocked single crochet worked firmly. Take time to measure your base swatch; if your circle is loose or ripples, drop to a 9.0mm hook.
Foundation Rounds: Crocheting a Flat Base Without Ruffling or Cupping
A stable basket requires a completely flat base that rests flush against flat surfaces without a central cone or wavy edges. Ruffling happens when you add too many increase stitches per round; cupping happens when increases are spaced too far apart or tension tightens abruptly. By adhering to a steady six-stitch increase rhythm per round, the base expands evenly outward.
Step-by-Step Base Instructions:
Chain 2 loosely.
Round 1: Work 6 sc into the 2nd chain from the hook. Join with a slip stitch (sl st) into the first sc. Place your locking marker into the first stitch. (6 stitches)
Round 2: Ch 1 (does not count as a stitch here and throughout). Work 2 sc into each sc around. Join with a sl st in the first sc. (12 stitches)
Round 3: Ch 1. *Work 2 sc in the next sc, then 1 sc in the following sc. Repeat from * around. Join with a sl st in the first sc. (18 stitches)
Round 4: Ch 1. *Work 2 sc in the next sc, then 1 sc in each of the next 2 sc. Repeat from * around. Join with a sl st in the first sc. (24 stitches)
Round 5: Ch 1. *Work 2 sc in the next sc, then 1 sc in each of the next 3 sc. Repeat from * around. Join with a sl st in the first sc. (30 stitches)
Round 6: Ch 1. *Work 2 sc in the next sc, then 1 sc in each of the next 4 sc. Repeat from * around. Join with a sl st in the first sc. (36 stitches)
Round 7: Ch 1. *Work 2 sc in the next sc, then 1 sc in each of the next 5 sc. Repeat from * around. Join with a sl st in the first sc. (42 stitches)
Round 8: Ch 1. *Work 2 sc in the next sc, then 1 sc in each of the next 6 sc. Repeat from * around. Join with a sl st in the first sc. (48 stitches)
For the Small basket, stop here. Your base diameter should measure approximately 11 inches across.
Round 9 (Medium & Large only): Ch 1. *Work 2 sc in the next sc, then 1 sc in each of the next 7 sc. Repeat from * around. Join with a sl st in the first sc. (54 stitches)
Round 10 (Medium & Large only): Ch 1. *Work 2 sc in the next sc, then 1 sc in each of the next 8 sc. Repeat from * around. Join with a sl st in the first sc. (60 stitches)
For the Medium basket, stop here. Your base diameter should measure approximately 13.5 inches across.
Round 11 (Large only): Ch 1. *Work 2 sc in the next sc, then 1 sc in each of the next 9 sc. Repeat from * around. Join with a sl st in the first sc. (66 stitches)
Round 12 (Large only): Ch 1. *Work 2 sc in the next sc, then 1 sc in each of the next 10 sc. Repeat from * around. Join with a sl st in the first sc. (72 stitches)
For the Large basket, stop here. Your base diameter should measure approximately 15 inches across.
The Back-Loop Turning Ridge: Creating the Crisp 90-Degree Base Edge
Once your circular base reaches its final diameter, continuing in standard two-loop single crochet would cause the edges to curl gradually upward in a rounded bowl shape. To create a crisp ninety-degree floor edge that keeps the bottom completely flat while lifting the sidewalls straight up, we execute one single transition round worked exclusively through the back loop.
Transition Round (All Versions): Ch 1. Do not turn your work. Working into the back loops only (the loop furthest away from you), work 1 sc into each sc around. Join with a slip stitch to the first sc. (Small: 48 sc; Medium: 60 sc; Large: 72 sc).
This single row leaves the unworked front loops exposed along the exterior perimeter, forming a visible horizontal ridge that acts as a structural hinge. This ridge functions like the welt on a quality boot: it locks the flat disc firmly to the tabletop and prevents the sidewalls from collapsing inward under weight.
Working the Sidewalls and Seamless Reinforced Cutout Handles

After completing the back-loop transition round, switch back to working through both loops to build maximum wall thickness. Do not add any more increase stitches; working an even stitch count around automatically builds vertical height.
Sidewall Rounds: Ch 1. Working through both top loops, work 1 sc in each sc around. Join with a sl st in the first sc. Repeat this round until the wall measures 10 inches from the turning ridge for Small, 12 inches for Medium, or 14 inches for Large. Do not fasten off.
Constructing the Integrated Handles:
Flimsy handles attached after the fact often tear away under heavy loads. This pattern builds integrated cutout handholds directly into the final three rounds of the basket rim, distributing lifting stress across the entire top edge.
- Handle Round 1 (Creating the Openings): Ch 1. Work 1 sc in each of the next 9 (12, 15) sc. Chain 6 loosely, then skip the next 6 sc (this creates the first handle bridge). Work 1 sc in each of the next 18 (24, 30) sc. Chain 6 loosely, then skip the next 6 sc (this creates the opposite handle bridge). Work 1 sc in each of the remaining 9 (12, 15) sc. Join with a sl st to the first sc.
- Handle Round 2 (Encasing the Chains): Ch 1. Work 1 sc in each of the first 9 (12, 15) sc. When you reach the chain-6 bridge, do not work into the chain loops; instead, insert your hook completely under the chain bridge and work 10 sc directly over the chain space. This bundles the chain core and doubles handle thickness. Work 1 sc in each of the next 18 (24, 30) sc across to the opposite handle. Work 10 sc directly into the second chain-6 space. Work 1 sc in each of the last 9 (12, 15) sc. Join with a sl st to the first sc. (Small: 56 sc; Medium: 68 sc; Large: 80 sc).
- Handle Round 3 (Reinforced Rim Finish): Ch 1. Work 1 sc in each sc all the way around, maintaining firm, consistent tension over the handle arches and body stitches alike. Join with a clean slip stitch to the first sc. Fasten off, leaving an 8-inch yarn tail for invisible finishing.
Finishing Touches, Invisible Joins & Styling in Organic Modern Spaces

To eliminate the stepped bump that often marks the final round of crochet in the round, finish with an invisible needle join rather than a standard knot:
- Thread the 8-inch yarn tail onto your large bent-tip tapestry needle.
- Skip the first single crochet after the join and insert the needle from back to front under both top loops of the second stitch.
- Bring the needle back around and insert it downward through the center of the very last stitch you created, catching the horizontal bar behind it.
- Gently pull the working tail until the formed loop matches the size and tension of your surrounding stitches. Weave the remaining tail securely down the inside of the wall along three alternating vertical post rows.
In modern living spaces, these baskets provide practical texture without visual clutter. Place the Small version beside a bathroom sink holding rolled linen face towels, or position the Medium and Large baskets beside an armchair or media console to corral extra throw blankets, magazines, or ongoing knitting projects. If your baskets ever lose their crisp cylinder shape after being packed away for travel, gently steam the interior walls with a handheld garment steamer and stuff them with rolled towels for one hour to restore their firm posture.
EXPLORE MORE HANDMADE HOME ESSENTIALS: After finishing your storage baskets, protect your tabletop finishes with our step-by-step masterclass on how to crochet double-thick textured hot pads featuring raised cotton bobbles.
Maker Workshop Q&A: Troubleshooting Slouching Walls & Loose Tension
Why are the sidewalls of my basket slouching inward instead of standing upright?
Slouching almost always points to a tension mismatch or using a hook that is too large for the yarn. If your single crochet stitches feel spongy or you can easily push your finger through the gaps between posts, downsize your hook by 1.0mm (from 10.0mm to 9.0mm). Working stitches firmly is what generates the self-supporting vertical column strength.
Why is the base of my basket wobbling or bulging in the center instead of lying flat?
A center bulge indicates you are placing too many increase stitches in the early rounds or crocheting your beginning chain too tightly. Ensure your starting chain 2 is worked loosely, and verify your stitch counts at the end of every round (6, 12, 18, 24, 30, 36, 42, 48). If your base still domes slightly, press it with your hands on a firm table before starting the back-loop transition round.
Can I wash this chunky crochet storage basket?
Yes. Most polyester and acrylic-blend super bulky yarns are machine washable. For best results and to preserve structural firmness, hand wash in lukewarm water with mild wool wash, press out excess water between clean dry bath towels (never wring or twist), reshape the basket over a round bucket or bowl, and allow it to dry completely in open air.
Save This Sturdy Crochet Basket Pattern to Pinterest
Planning your next weekend craft project? Save this pin to your Crochet Home Decor or DIY Storage board on Pinterest so you have the sizing chart, stitch math, and handle tutorial ready whenever you need it!
Finished hooking this round basket yesterday afternoon using kitchen cotton held double! Working into the center of the single crochet stitches (waistcoat stitch) gave the sidewalls incredible structure—it stands completely upright on its own without slumping. The integrated handles are so sturdy for holding rolled washcloths in our guest bathroom!
Hi Julian! My round base started to ruffle slightly around round 5. Should I frog back and decrease increases, or does it flatten out once I start the straight sidewalls?
Hey there! If the base ruffles, your tension is likely relaxing as the circle grows! I recommend frogging back to round 4 and dropping half a hook size, or spacing increases evenly without doubling up in the same spot. A flat base is crucial because once you work the sidewalls, any ruffles will keep the bottom wobbly. Happy hooking!