
When crafting kitchen potholders, casserole trivets, or heavy-duty oven pads, standard crochet stitches often fall short because their open post spaces let radiant heat reach your fingers. The thermal crochet stitch solves this problem completely by interlocking two consecutive rows into a dense, solid fabric measuring nearly 8 mm thick. Worked with #4 worsted 100% cotton yarn and a 4.5 mm hook, this versatile stitch builds an opaque, double-layered barrier with zero pinprick holes, making it the most reliable stitch in fiber arts for functional kitchen protection.
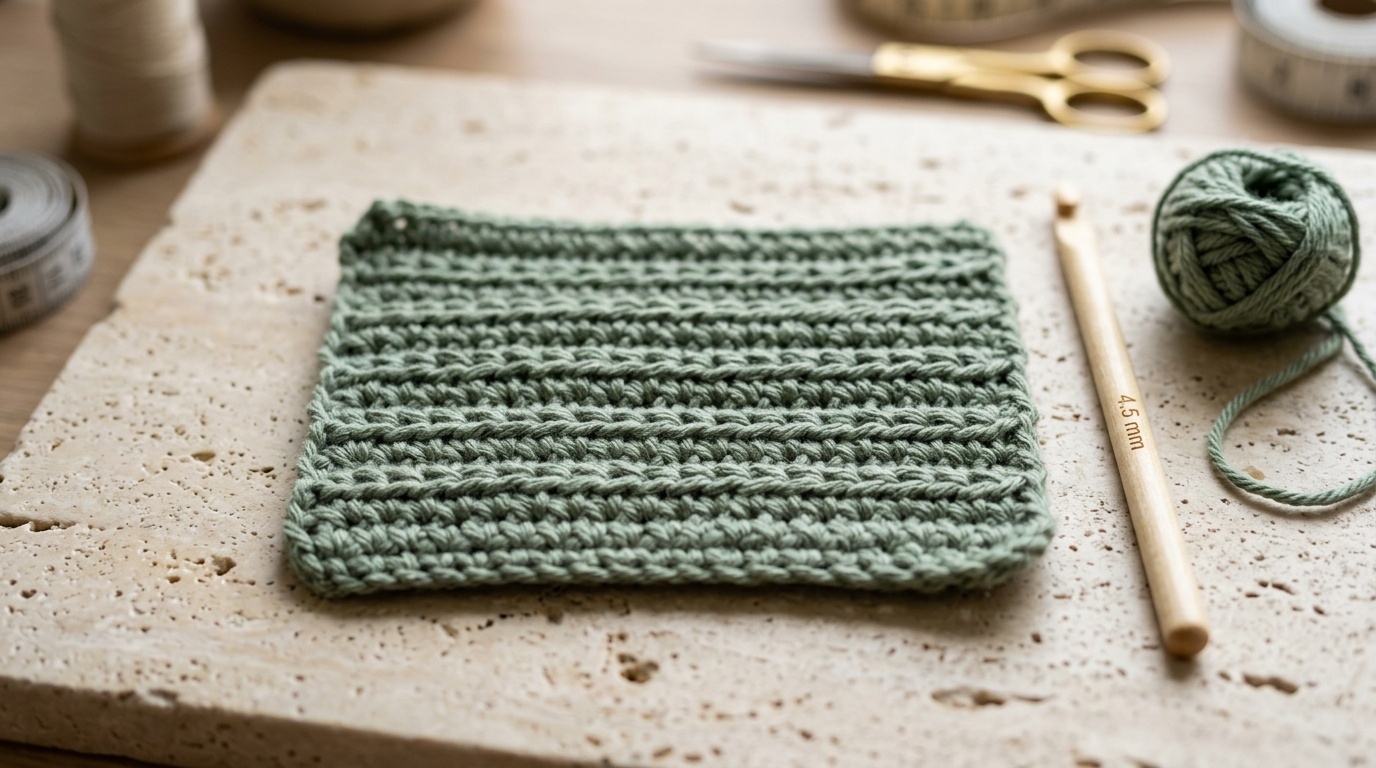
Unlike basic single crochet where you insert your hook under the top loops of the row directly beneath, thermal crochet reaches deeper. By working through the back loop of your current stitch AND the parallel unworked loop from the row below, each new stitch compresses against the previous tier. This creates an internal accordion cushion that behaves like two separate layers of crochet joined seamlessly on the hook, producing exceptional thermal insulation without having to sew two pieces together.
Maker’s Technique Blueprint: The Thermal Single Crochet Stitch
- Skill Level: Confident Beginner (comfortable with standard single crochet and working in back loops).
- Finished Swatch Dimensions: 7 × 7 inches (18 × 18 cm) square for a standard kitchen hot pad, with a solid 8 mm cross-section thickness.
- Yarn Requirements: ~140 yards (120 g) of #4 Worsted Weight 100% natural unmercerized cotton yarn (shown in muted sage green).
- Hook & Hardware: 4.5 mm (US 7) blonde birch wooden or ergonomic crochet hook, wooden folding ruler, brass scissors, and steel tapestry needle.
- Working Gauge: 16 thermal single crochet stitches × 28 rows = 4 inches (10 cm). Note that thermal stitch row counts appear twice as dense as standard crochet.
- Julian’s Studio Testing Note: Tested in my kitchen using hot cast-iron handles fresh from a 400°F oven. The interlocking two-loop structure creates a firm, heat-diffusing pad that protects fingertips and granite countertops from hot cookware surfaces. Always use 100% cotton—never acrylic, which melts instantly under oven heat.
Why You’ll Love the Thermal Stitch
- True Integrated Double Thickness: Yields a thick, padded fabric directly from the hook without sewing separate panels or adding batting liners.
- Completely Hole-Free Surface: The dual-loop insertion fills all negative space, creating an opaque shield that blocks direct contact with hot metal pans.
- Sturdy, Flat Structural Hold: Does not curl at the edges like basic single crochet or slip-stitch ribbing, staying square and flat over everyday use.
- Reversible Textural Finish: Both sides feature an identical, handsome micro-ribbed waffle texture that looks tailored on kitchen counters.
Key Materials & Fiber Safety

When making items destined for kitchen heat, your choice of fiber is a critical safety consideration:
- 100% Natural Unmercerized Cotton: Unmercerized cotton is heat-resistant, highly absorbent, and will not melt or scorch under everyday cooking temperatures. Review our side-by-side absorption and wear analysis in cotton vs acrylic yarn for kitchen crochet.
- Strictly Zero Synthetics: Never use acrylic, polyester, or nylon blends for potholders. Synthetic fibers are petroleum-based plastics that melt onto skin when exposed to hot oven bakeware.
- 4.5 mm Wooden or Ergonomic Hook: Sizing down from the usual 5.0 mm hook packs the dual cotton loops tightly together, maximizing structural thickness while preventing hand strain.
Step-by-Step Thermal Stitch Walkthrough
Mastering this stitch requires understanding where your hook enters on Row 2 and beyond. Follow these clear steps to build your first double-thick sample:
Step 1: Foundation Chain & Row 1
1. Foundation: Chain 25 loosely using your 4.5 mm hook.
2. Row 1 (Back Loop Foundation): Insert hook into the back loop only (BLO) of the 2nd chain from hook. Yarn over, pull up a loop, yarn over, and pull through both loops (standard single crochet in BLO). Work 1 sc in the back loop of each chain across. (24 sts). Ch 1, turn.
Step 2: Row 2 (Establishing the Thermal Hook Path)

This is where the magic happens. Look at your working edge:
1. Locate the Two Loops: On your hook’s side, identify the back loop of the current row. Directly behind and slightly below it, you will see the unused horizontal front loop left over from the foundation chain.
2. Execute the Thermal Stitch: Insert your hook from front to back through the back loop of the current stitch, then continue pushing the hook through the unworked loop from the row below. You now have two distinct loops on your hook before yarning over.
3. Complete the Stitch: Yarn over and pull a loop through both lower loops on the hook (2 loops remain on hook). Yarn over and pull through both loops. Repeat across all 24 stitches. (24 thermal sc). Ch 1, turn.
Step 3: Continuing Rows (The Working Rhythm)
For Row 3 and all subsequent rows, repeat Step 2: insert your hook through the back loop of the active stitch AND the unworked loop visible directly beneath it from the previous row. Work until your piece reaches a square 7-inch height (approximately 48 to 50 rows). The fabric will feel heavy, flexible, and completely opaque in your hands.
Step 4: Sealing the Final Edge
On your final row, work through both top loops of the active stitch PLUS the unworked loop below. Working through three total strands finishes the top edge completely flat, matching the solid appearance of the starting foundation chain. Fasten off and weave in ends securely.
3 Studio Secrets for Clean Thermal Stitches
1. Maintain Relaxed Chain Tension: Your initial foundation chain must be worked loosely. If the starting chain is tight, finding and inserting into the leftover foundation loops on Row 2 becomes frustrating and pinches the bottom edge.
2. Turn Your Work Counterclockwise: Always turn your piece in the same direction at the end of every row. This aligns the unworked loops consistently behind your hook, allowing you to catch both strands smoothly in one fluid motion.
3. Don’t Skip the Last Stitch: The final stitch on every thermal row angles slightly downward along the edge. Always count your stitches every few rows to ensure you haven’t missed the end stitch, keeping your borders perfectly vertical.
Kitchen Utility & Practical Heat Safety

Thermal crochet is the premier stitch choice for high-wear kitchen utility textiles:
- Cookware Protection: Use this square pad to rest hot enameled cast iron pans directly onto wood dining tables without scorching the tabletop. Compare our circular design in the farmhouse crochet trivet pattern.
- Full Potholder Project: For a complete project tutorial featuring an integrated hanging loop, explore our double-thick thermal crochet potholder pattern.
- Tabletop Harmony: Coordinate your kitchen linens with our crochet bread basket with fabric liner for a cohesive, handcrafted dining presentation.
- The Gathering Bridge: When serving hot casseroles or artisan soups at a dinner party, pair these sturdy hot pads with Claire Montgomery’s welcoming cozy fall soup dinner party plan.
Care & Laundering Instructions
- Washing: Machine wash in cold or warm water with like colors using a mild laundry detergent. Because the fabric is double-thick, allow ample water circulation in the machine.
- Drying: Tumble dry on medium heat or reshape the square pad by hand and lay flat on a dry towel. Cotton fibers will tighten slightly after the first wash, making the thermal barrier even denser.
- Stain Care: For tomato sauce or skillet grease, pre-treat stains with warm water and baking soda or mild dish soap before laundering.
Frequently Asked Questions
Why does thermal crochet take longer to work up than regular single crochet?
Because you are catching stitches from two separate tiers simultaneously, each row adds approximately half the vertical height of a standard single crochet row while doubling the horizontal density. You are effectively crocheting two layers at once!
Can I use thermal crochet with half double or double crochet?
Yes! The thermal half double crochet (thermal hdc) creates an even thicker, spongier fabric with distinct diagonal ridges. It works wonderfully for oversized baking pan mats.
Does thermal crochet curl at the corners?
No. Because the two interlocking loops balance tension evenly across the front and back faces of the fabric, thermal crochet naturally lies completely flat without aggressive wet blocking.
Pin This Thermal Crochet Tutorial for Later
Looking for a truly heat-safe crochet stitch for your kitchen? Save this step-by-step thermal single crochet tutorial to your Pinterest Crochet Stitches or DIY Kitchen Crafts boards so you have the two-loop insertion photos and tension tips ready for your next cozy weekend make!
Leave a Comment