
There is a simple, quiet satisfaction in replacing disposable plastic cling wrap with handmade, washable kitchen covers that smell faintly of honey and warm pine. Crafting your own DIY beeswax wraps at home is one of the most rewarding low-waste home projects you can tackle in an afternoon. With just four wholesome materials—cotton fabric, cosmetic beeswax pellets, crushed pine rosin, and a splash of jojoba oil—you can create pliable, naturally tacky food wraps that mold smoothly over ceramic bowls, seal half-cut vegetables, and keep artisan bread loaves fresh on your kitchen counter.
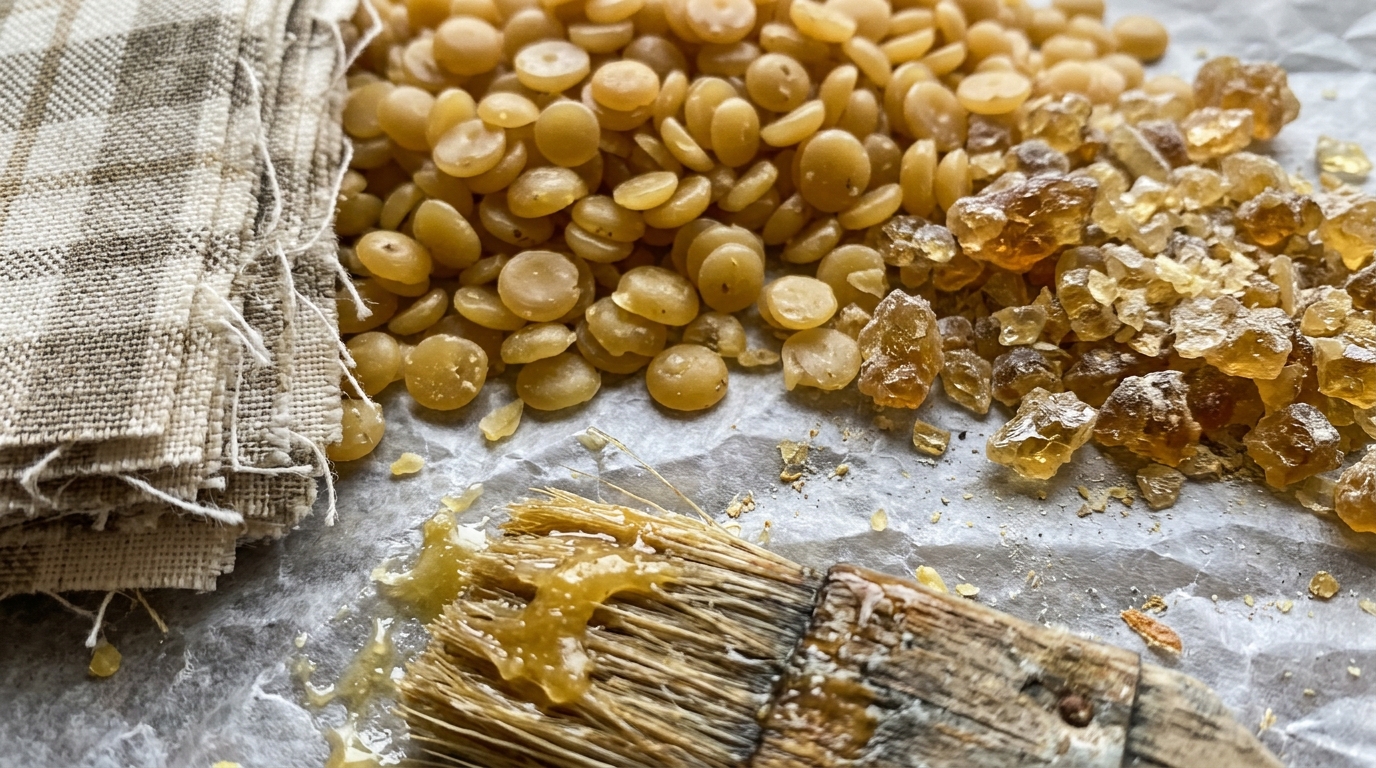
Many first-time crafters attempt to make reusable food wraps using beeswax alone, only to find that the cooled wraps crack when folded and slip off bowls without gripping. The secret used by professional artisanal makers lies in balancing three complementary elements: beeswax for structure and moisture resistance, pine rosin for natural tackiness, and jojoba oil for flexibility. By melting these ingredients together on a parchment-lined baking sheet in a low-temperature oven, the molten blend saturates the cotton fibers evenly without the uneven wax buildup of an iron. Here is everything you need to master this simple oven technique at home.
The Secret Triad Formula: Beeswax, Pine Rosin & Jojoba Oil
Creating wraps that are flexible, washable, and genuinely sticky requires a tested balance of three natural materials. Each ingredient plays a specific role in how the wrap behaves in daily kitchen use:
- Beeswax Pellets (Approx. 70%): The protective foundation. Pure yellow beeswax creates a natural water-resistant seal that prevents food from drying out. Using cosmetic-grade pellets makes measuring and melting significantly faster than grating whole blocks. For more about natural beeswax care, explore our beeswax candle care guide.
- Pine Rosin / Colophony (Approx. 20%): The crucial gripping agent. Pure tree resin provides natural tackiness. Without rosin, wraps will fold around food but will not seal or stick to smooth ceramic, glass, or stainless steel bowls.
- Golden Jojoba Oil (Approx. 10%): The softening plasticizer. A small splash of liquid plant wax lowers the brittleness of the cooled beeswax, allowing the wraps to bend, fold, and twist around bowl rims without flaking or developing white stress cracks.
Pliable & Grippy Food Wrap Blend (Yields 4 to 6 Assorted Wraps)
- 100 grams (approx. 3.5 oz): Pure yellow beeswax pellets
- 25 grams (approx. 0.9 oz): Finely crushed pine rosin powder
- 15 ml (1 tablespoon): Pure golden jojoba oil or sweet almond oil

Choosing the Right Organic Cotton Fabric & Cutting Practical Sizes
The type of fabric you choose determines how evenly the wax saturates the fibers. Always look for 100% lightweight quilting cotton or cotton poplin. Avoid heavy canvas, linen, or synthetic polyester blends; heavy fabrics absorb excessive wax and become stiff, while synthetics will not absorb melted wax properly.
Before cutting, pre-wash and iron your fabric to remove sizing residues. When cutting your squares, use pinking shears (zigzag craft scissors). The serrated edge prevents the fabric threads from fraying during repeated washings. Here are the three most practical sizes for home food storage:
- Small (7 × 7 inches / 18 × 18 cm): Ideal for covering half an avocado, wrapping a cut lemon, capping small condiment jars, or bundling snack nuts.
- Medium (10 × 10 inches / 25 × 25 cm): The most versatile kitchen workhorse. Perfect for standard cereal bowls, wedges of cheddar or gouda, sandwiches, and half cantaloupes.
- Large (13 × 13 inches / 33 × 33 cm): Great for covering large salad bowls, casserole dishes, or wrapping fresh half-loaves of crusty artisan bread.

Step-by-Step Oven Melting & Saturation Walkthrough
The oven method is far cleaner and more consistent than using an iron, as it distributes heat across the entire sheet simultaneously. Follow these four simple stages:
1. Prepare the Baking Sheet: Preheat your oven to a low setting of 200°F to 215°F (95°C to 100°C). Line a large, rimmed baking sheet with unbleached parchment paper. Lay one cut fabric square completely flat in the center of the sheet.
2. Scatter the Wax Blend: In a small bowl, pre-mix your beeswax pellets, crushed rosin, and jojoba oil. Sprinkle approximately 2 to 3 tablespoons of the mixture evenly across the fabric square, paying special attention to the corners and perimeter.
3. Melt & Brush (4 to 5 Minutes): Slide the sheet into the warm oven for 4 to 5 minutes until the wax and rosin are fully liquid. Remove the sheet carefully. Using a dedicated natural-bristle pastry brush, quickly brush the molten wax outward toward all four edges. The fabric should look translucent and evenly soaked, with no dry patches and no heavy puddles.
4. Lift & Air Cool (30 Seconds): Working quickly before the wax hardens, pick up the top two corners of the fabric with your fingertips. Hold it up in the room air and wave it gently for 15 to 30 seconds. The wax cools almost instantly into a supple, semi-matte, flexible sheet. Lay it flat on a clean cooling rack for 5 minutes before its first use.

How to Shape, Seal & Store Fresh Produce, Bread & Bowls
Beeswax wraps activate through the natural warmth of your hands. Place the wrap over the top of a bowl or around a block of cheese, and cup your hands firmly over the edges for 5 seconds. Your body heat gently softens the wax and rosin, allowing the fabric to conform tightly and create an airtight bond as it cools.
To keep your kitchen routine clean and safe, follow these practical food storage guidelines:
- Wonderful For: Covering bowls of leftover pasta or salads, wrapping cut squashes and cabbages, bundling fresh leafy herbs, packing sandwiches for day hikes, and keeping crusty sourdough loaves from drying out.
- What to Avoid: Never wrap raw meat, raw poultry, or hot greasy foods directly in beeswax wraps. Because wraps cannot be washed in hot water, raw meat juices cannot be sanitized safely. Allow hot leftovers to cool to room temperature before covering.
Washing, Maintenance & Re-Waxing Worn Wraps
With proper care, a set of handmade beeswax food wraps will last between 8 to 12 months of regular weekly kitchen use. The cardinal rule of maintenance is simple: never expose wraps to hot water or direct heat sources.
- Washing: Rinse under cold or lukewarm tap water. Use a soft sponge and a drop of gentle, alcohol-free dish soap if needed. Never scrub with abrasive wire pads or wash in the dishwasher.
- Drying: Pat dry with a clean dish towel or drape over a wooden drying rack. Store rolled up in a clean kitchen drawer or tucked in a basket on the counter. Make this part of your mindful Sunday reset routine.
- Refreshing Worn Wraps: When wraps eventually lose their stickiness or show white crease lines after months of use, do not throw them away! Simply place them back onto a parchment-lined baking sheet, sprinkle a single teaspoon of fresh wax pellets, and bake for 3 minutes. Brush smooth, lift, and they are good as new.
Troubleshooting Sticky Fingers, Flaking Wax & Cracking Edges
Why do my wraps leave a sticky residue on my fingers or bowls?
If your wraps feel overly gummy or transfer resin to your glassware, the mixture had slightly too much pine rosin. You can easily fix this by placing the wrap back into the warm oven on parchment paper, adding 1 teaspoon of pure beeswax pellets, and brushing it across the surface to rebalance the wax-to-rosin ratio.
Why is the wax flaking off the fabric?
Flaking happens when the wax layer is too thick or the fabric did not absorb it fully. Always use lightweight cotton and avoid piling on excess pellets. If flaking occurs, place the wrap between two sheets of clean parchment paper and pass a warm iron quickly over it, allowing excess wax to seep onto the paper.
Can I freeze food wrapped in beeswax wraps?
Yes, beeswax wraps can be stored in the freezer for up to 3 to 4 weeks (great for freezing loaves of bread or baked goods). When you pull them out of the freezer, let them sit at room temperature for 5 minutes before unfolding so the cold wax does not crack along the fold lines. Pair this with our fall night routine habits for a calmer home rhythm.
Save This DIY Beeswax Wraps Guide to Pinterest
Easy DIY Beeswax Food Wraps Tutorial
Save this sustainable kitchen guide to your Pinterest zero-waste or DIY craft board. Learn how to make pliable, washable beeswax wraps in your oven in under 15 minutes.
Leave a Comment