

Building the 5 Star Points & Sharp Picot Tips
Round 2 transforms the flat circle into a five-point star by staggering stitch heights from short single crochets up to tall double trebles, finishing each summit with an anchored chain picot.
Point Sequence (Repeat 5 times around):
1. Stitch 1 (Ascending Shoulder): In the next stitch from your join, work 1 single crochet, 1 half double crochet, and 1 double crochet all into that single stitch.
2. Stitch 2 (The Peak & Picot): In the following stitch, work 1 treble crochet, 1 double treble crochet, chain 2, slip stitch into the front loop and front vertical bar of the double treble just worked (forming a sharp picot point), then work another treble crochet into that same base stitch.
3. Stitch 3 (Descending Shoulder & Valley): In the third stitch, work 1 double crochet, 1 half double crochet, and 1 single crochet. Slip stitch into the junction between stitches to define the valley between star points.
Repeat steps 1 through 3 four more times around the circumference. After your final valley slip stitch, fasten off with an invisible join and pull the working loop to the back of the work.
If you love creating functional, textured cotton projects for the home, explore our step-by-step tutorial on how to crochet a waffle stitch dishcloth or try our tested lace crochet bookmark pattern for another satisfying afternoon craft.
Clean Finish, Tassel Loop & Wooden Bead Assembly
A well-tailored hanging loop elevates a simple crochet star into a polished artisan ornament suitable for gift-giving or holiday markets:
- Weaving Center Tails: Thread the initial magic ring tail onto a blunt tapestry needle. Weave clockwise around the foundation circle through three stitches, reverse direction for three stitches, and trim close.
- Jute Hanging Loop: Cut a 10-inch length of natural 2-ply jute twine. Fold the twine in half and thread the loop end through the picot hole of any top star point from back to front.
- Adding the Wooden Bead: Thread both cut ends of the twine through a 12 mm raw birch wooden bead using a piece of scrap thread as a needle threader. Push the bead down snugly against the star tip.
- Top Knot: Tie an overhand knot 2.5 inches above the bead to form the hanging loop, trimming any stray fibers with sharp tailor snips.

Steam Blocking & Stiffening Techniques for Flat Points
While cotton holds its shape well, a quick 2-minute steam blocking gives your star razor-sharp edges that will never droop while hanging on the tree:
1. Pinning the Points: Place the star flat on an EVA foam blocking mat. Insert a stainless steel T-pin into the center ring, then place individual pins through each of the five picot tips, gently pulling each point taut to open the geometric angle.
2. Hovering Steam: Hold a household steam iron approximately 1 inch above the cotton, releasing 2 to 3 generous bursts of steam across the star. Never press the hot iron plate directly onto the yarn, which flattens the textured ridges.
3. Optional Natural Stiffener: If you plan to hang your stars in humid rooms or outdoor porches, dissolve 1 teaspoon of cornstarch in 1 cup of boiling water, let cool, and lightly brush over the back of the blocked star before drying.
To style these rustic ornaments alongside other handmade home accents, take a look at our guide on how to crochet round cotton placemats or make a cozy entryway accessory with our textured cotton kitchen towel pattern.
Maker Q&A: Common Star Crochet Troubleshooting
Why is the center of my star cupping like a small bowl?
Cupping in Round 1 occurs when the double crochet stitches are worked with overly tight tension, restricting the circumference. Keep your working loops relaxed, and ensure you have exactly 15 double crochets in the ring before joining.
How do I prevent the picot tips from twisting sideways?
Twisting happens when the slip stitch for the picot is anchored only under one strand of yarn. By inserting your hook under both the front loop and the left vertical collar of the double treble, the picot stays upright and symmetrical.
Can I make a miniature version for gift tags?
Yes! Switch to sport weight cotton (Category 2) or size 10 crochet thread with a 2.25 mm hook. The exact same stitch sequence will produce a charming 2.25-inch star that fits cleanly onto wrapped parcels.
Pin This Tested Star Ornament Pattern for Later
Love this quick holiday project? Save this pin to your crochet patterns or Christmas crafts board on Pinterest so you have the stitch sequence ready for your seasonal decorating!


- Worsted Cotton (Recommended): Firm, breathable plant fiber that naturally holds sharp creases and responds reliably to light steam shaping without melting.
- Acrylic Yarn: Softer hand-feel, but tends to pill and curl at pointed tips; cannot tolerate household steam without going limp and shiny (“killing” the acrylic).
- Mercerized Perle Cotton: Beautiful gloss, but lighter weights yield a much smaller motif unless held double, requiring finer steel hooks.
- Wool Blend: Beautiful organic look, but prone to stretching over time under the weight of decorative hanging loops.
Step-by-Step Foundation Magic Ring & Center Circle
The foundation round creates the structural wheel from which all five star arms branch. Working into an adjustable magic ring allows you to cinch the center completely shut so no light leaks through.
1. Magic Ring Setup: Wrap cream cotton yarn around two fingers, insert your 3.75 mm hook, and pull up a loop. Chain 2 (this acts as a height guide, not a stitch).
2. Working Round 1: Work 15 double crochet stitches directly into the ring. Take care not to split your cotton yarn plies as you pull through.
3. Cinching the Core: Pull the yarn tail firmly until the center hole closes completely. Slip stitch into the first double crochet (not the turning chain) to complete the round. You now have an exact circle of 15 stitches, which divides evenly into 5 star points (3 stitches per point).
Building the 5 Star Points & Sharp Picot Tips
Round 2 transforms the flat circle into a five-point star by staggering stitch heights from short single crochets up to tall double trebles, finishing each summit with an anchored chain picot.
Point Sequence (Repeat 5 times around):
1. Stitch 1 (Ascending Shoulder): In the next stitch from your join, work 1 single crochet, 1 half double crochet, and 1 double crochet all into that single stitch.
2. Stitch 2 (The Peak & Picot): In the following stitch, work 1 treble crochet, 1 double treble crochet, chain 2, slip stitch into the front loop and front vertical bar of the double treble just worked (forming a sharp picot point), then work another treble crochet into that same base stitch.
3. Stitch 3 (Descending Shoulder & Valley): In the third stitch, work 1 double crochet, 1 half double crochet, and 1 single crochet. Slip stitch into the junction between stitches to define the valley between star points.
Repeat steps 1 through 3 four more times around the circumference. After your final valley slip stitch, fasten off with an invisible join and pull the working loop to the back of the work.
If you love creating functional, textured cotton projects for the home, explore our step-by-step tutorial on how to crochet a waffle stitch dishcloth or try our tested lace crochet bookmark pattern for another satisfying afternoon craft.
Clean Finish, Tassel Loop & Wooden Bead Assembly
A well-tailored hanging loop elevates a simple crochet star into a polished artisan ornament suitable for gift-giving or holiday markets:
- Weaving Center Tails: Thread the initial magic ring tail onto a blunt tapestry needle. Weave clockwise around the foundation circle through three stitches, reverse direction for three stitches, and trim close.
- Jute Hanging Loop: Cut a 10-inch length of natural 2-ply jute twine. Fold the twine in half and thread the loop end through the picot hole of any top star point from back to front.
- Adding the Wooden Bead: Thread both cut ends of the twine through a 12 mm raw birch wooden bead using a piece of scrap thread as a needle threader. Push the bead down snugly against the star tip.
- Top Knot: Tie an overhand knot 2.5 inches above the bead to form the hanging loop, trimming any stray fibers with sharp tailor snips.
Steam Blocking & Stiffening Techniques for Flat Points
While cotton holds its shape well, a quick 2-minute steam blocking gives your star razor-sharp edges that will never droop while hanging on the tree:
1. Pinning the Points: Place the star flat on an EVA foam blocking mat. Insert a stainless steel T-pin into the center ring, then place individual pins through each of the five picot tips, gently pulling each point taut to open the geometric angle.
2. Hovering Steam: Hold a household steam iron approximately 1 inch above the cotton, releasing 2 to 3 generous bursts of steam across the star. Never press the hot iron plate directly onto the yarn, which flattens the textured ridges.
3. Optional Natural Stiffener: If you plan to hang your stars in humid rooms or outdoor porches, dissolve 1 teaspoon of cornstarch in 1 cup of boiling water, let cool, and lightly brush over the back of the blocked star before drying.
To style these rustic ornaments alongside other handmade home accents, take a look at our guide on how to crochet round cotton placemats or make a cozy entryway accessory with our textured cotton kitchen towel pattern.
Maker Q&A: Common Star Crochet Troubleshooting
Why is the center of my star cupping like a small bowl?
Cupping in Round 1 occurs when the double crochet stitches are worked with overly tight tension, restricting the circumference. Keep your working loops relaxed, and ensure you have exactly 15 double crochets in the ring before joining.
How do I prevent the picot tips from twisting sideways?
Twisting happens when the slip stitch for the picot is anchored only under one strand of yarn. By inserting your hook under both the front loop and the left vertical collar of the double treble, the picot stays upright and symmetrical.
Can I make a miniature version for gift tags?
Yes! Switch to sport weight cotton (Category 2) or size 10 crochet thread with a 2.25 mm hook. The exact same stitch sequence will produce a charming 2.25-inch star that fits cleanly onto wrapped parcels.
Pin This Tested Star Ornament Pattern for Later
Love this quick holiday project? Save this pin to your crochet patterns or Christmas crafts board on Pinterest so you have the stitch sequence ready for your seasonal decorating!
There is something grounding about filling your home with handmade holiday details that lean on natural texture rather than plastic glitz. This simple crochet star ornament works up in just 15 minutes, using a tidy two-round sequence that creates five distinct points with sharp picot tips. Finished with a raw wooden bead and a rustic jute hanging loop, these lightweight stars bring a calm Scandinavian warmth to evergreen trees, gift packages, and mantel garlands.
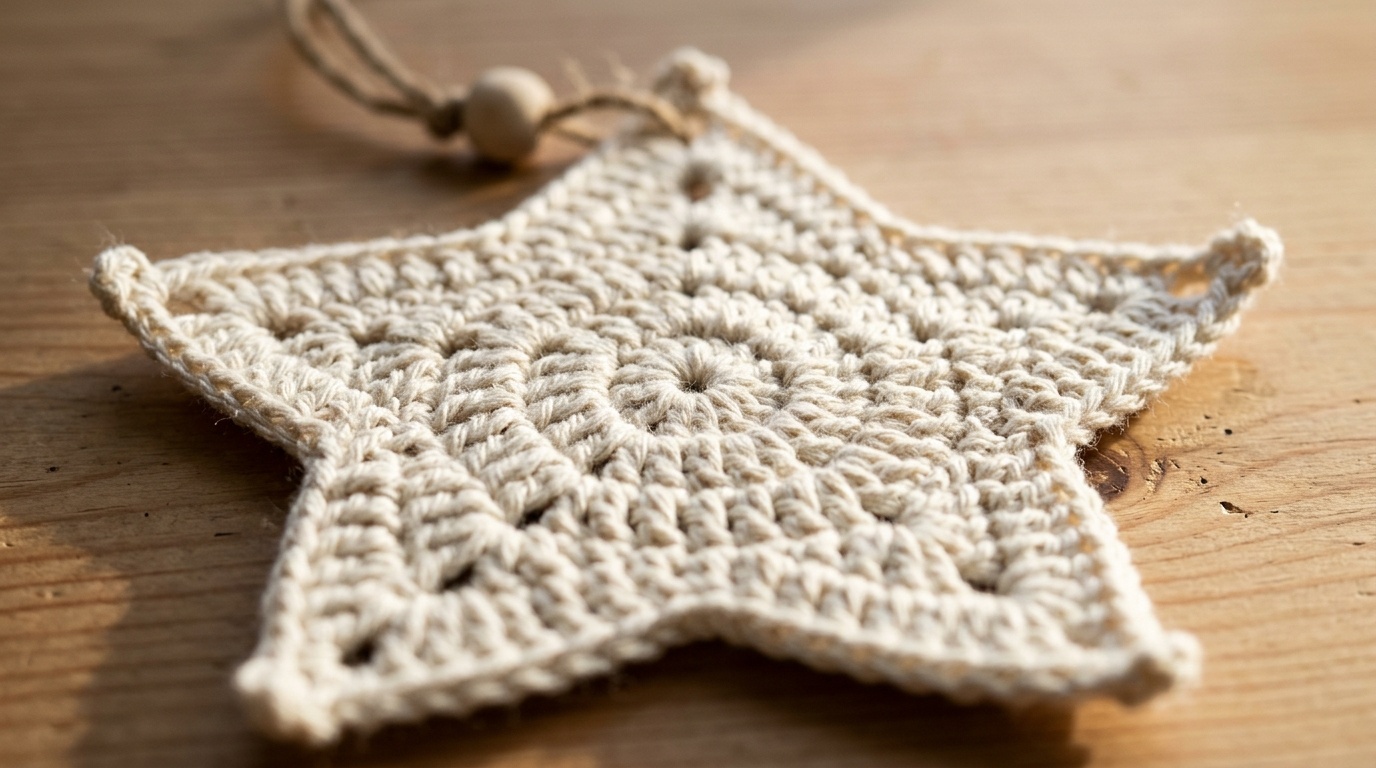
Many beginner star patterns suffer from floppy points that curl inward or puffy centers that cup like small bowls. The secret to keeping a crochet star crisp and flat lies in pairing a dense double crochet foundation ring with graduated stitch heights—traveling from single crochet to double treble and anchoring with a tidy chain picot. Because cotton holds its structure without stretching, your finished stars retain their clean geometric silhouette season after season.
Maker’s Project Blueprint: Hook Gauge, Yarn Choice & Dimensions
Before casting on, choosing the right yarn weight and hook pairing ensures your star maintains enough density to hang vertically without drooping. Here are the exact studio specifications tested for this pattern:
| Specification | Studio Tested Benchmark | Craft Purpose |
|---|---|---|
| Crochet Hook | 3.75 mm (US Size F/5) | Creates tight, dense stitches that resist curling at the points |
| Yarn Type | Worsted Weight 100% Cotton (Category 4) | Provides matte, non-stretch structure with sharp stitch definition |
| Yardage per Star | Approx. 12–15 yards (11–14 m) | Ideal stash-busting project for leftover cotton skeins |
| Finished Diameter | 4.25 inches (11 cm) point-to-point | Perfect scale for Christmas trees, bottle toppers, and garlands |
| Hanging Accent | Natural jute twine & 12 mm unvarnished wood bead | Adds organic Scandinavian weight and holds loop open cleanly |
Yarn Fiber Comparison: Why Worsted Cotton Wins for Crisp Star Tips
The choice between acrylic yarn and natural cotton dramatically impacts how your ornament behaves once suspended from a pine branch. Here is how common fiber types compare for small geometric motifs:
- Worsted Cotton (Recommended): Firm, breathable plant fiber that naturally holds sharp creases and responds reliably to light steam shaping without melting.
- Acrylic Yarn: Softer hand-feel, but tends to pill and curl at pointed tips; cannot tolerate household steam without going limp and shiny (“killing” the acrylic).
- Mercerized Perle Cotton: Beautiful gloss, but lighter weights yield a much smaller motif unless held double, requiring finer steel hooks.
- Wool Blend: Beautiful organic look, but prone to stretching over time under the weight of decorative hanging loops.
Step-by-Step Foundation Magic Ring & Center Circle
The foundation round creates the structural wheel from which all five star arms branch. Working into an adjustable magic ring allows you to cinch the center completely shut so no light leaks through.
1. Magic Ring Setup: Wrap cream cotton yarn around two fingers, insert your 3.75 mm hook, and pull up a loop. Chain 2 (this acts as a height guide, not a stitch).
2. Working Round 1: Work 15 double crochet stitches directly into the ring. Take care not to split your cotton yarn plies as you pull through.
3. Cinching the Core: Pull the yarn tail firmly until the center hole closes completely. Slip stitch into the first double crochet (not the turning chain) to complete the round. You now have an exact circle of 15 stitches, which divides evenly into 5 star points (3 stitches per point).
Building the 5 Star Points & Sharp Picot Tips
Round 2 transforms the flat circle into a five-point star by staggering stitch heights from short single crochets up to tall double trebles, finishing each summit with an anchored chain picot.
Point Sequence (Repeat 5 times around):
1. Stitch 1 (Ascending Shoulder): In the next stitch from your join, work 1 single crochet, 1 half double crochet, and 1 double crochet all into that single stitch.
2. Stitch 2 (The Peak & Picot): In the following stitch, work 1 treble crochet, 1 double treble crochet, chain 2, slip stitch into the front loop and front vertical bar of the double treble just worked (forming a sharp picot point), then work another treble crochet into that same base stitch.
3. Stitch 3 (Descending Shoulder & Valley): In the third stitch, work 1 double crochet, 1 half double crochet, and 1 single crochet. Slip stitch into the junction between stitches to define the valley between star points.
Repeat steps 1 through 3 four more times around the circumference. After your final valley slip stitch, fasten off with an invisible join and pull the working loop to the back of the work.
If you love creating functional, textured cotton projects for the home, explore our step-by-step tutorial on how to crochet a waffle stitch dishcloth or try our tested lace crochet bookmark pattern for another satisfying afternoon craft.
Clean Finish, Tassel Loop & Wooden Bead Assembly
A well-tailored hanging loop elevates a simple crochet star into a polished artisan ornament suitable for gift-giving or holiday markets:
- Weaving Center Tails: Thread the initial magic ring tail onto a blunt tapestry needle. Weave clockwise around the foundation circle through three stitches, reverse direction for three stitches, and trim close.
- Jute Hanging Loop: Cut a 10-inch length of natural 2-ply jute twine. Fold the twine in half and thread the loop end through the picot hole of any top star point from back to front.
- Adding the Wooden Bead: Thread both cut ends of the twine through a 12 mm raw birch wooden bead using a piece of scrap thread as a needle threader. Push the bead down snugly against the star tip.
- Top Knot: Tie an overhand knot 2.5 inches above the bead to form the hanging loop, trimming any stray fibers with sharp tailor snips.
Steam Blocking & Stiffening Techniques for Flat Points
While cotton holds its shape well, a quick 2-minute steam blocking gives your star razor-sharp edges that will never droop while hanging on the tree:
1. Pinning the Points: Place the star flat on an EVA foam blocking mat. Insert a stainless steel T-pin into the center ring, then place individual pins through each of the five picot tips, gently pulling each point taut to open the geometric angle.
2. Hovering Steam: Hold a household steam iron approximately 1 inch above the cotton, releasing 2 to 3 generous bursts of steam across the star. Never press the hot iron plate directly onto the yarn, which flattens the textured ridges.
3. Optional Natural Stiffener: If you plan to hang your stars in humid rooms or outdoor porches, dissolve 1 teaspoon of cornstarch in 1 cup of boiling water, let cool, and lightly brush over the back of the blocked star before drying.
To style these rustic ornaments alongside other handmade home accents, take a look at our guide on how to crochet round cotton placemats or make a cozy entryway accessory with our textured cotton kitchen towel pattern.
Maker Q&A: Common Star Crochet Troubleshooting
Why is the center of my star cupping like a small bowl?
Cupping in Round 1 occurs when the double crochet stitches are worked with overly tight tension, restricting the circumference. Keep your working loops relaxed, and ensure you have exactly 15 double crochets in the ring before joining.
How do I prevent the picot tips from twisting sideways?
Twisting happens when the slip stitch for the picot is anchored only under one strand of yarn. By inserting your hook under both the front loop and the left vertical collar of the double treble, the picot stays upright and symmetrical.
Can I make a miniature version for gift tags?
Yes! Switch to sport weight cotton (Category 2) or size 10 crochet thread with a 2.25 mm hook. The exact same stitch sequence will produce a charming 2.25-inch star that fits cleanly onto wrapped parcels.
Pin This Tested Star Ornament Pattern for Later
Love this quick holiday project? Save this pin to your crochet patterns or Christmas crafts board on Pinterest so you have the stitch sequence ready for your seasonal decorating!
Leave a Comment