
Every working kitchen relies on textiles that can take a beating, absorb spills instantly, and look intentional resting over an oven handle. While mass-produced microfiber cloths smudge grease and thin linen towels saturate after drying two dinner plates, handcrafted crochet kitchen towels combine heavyweight cotton absorbency with tactile scrubbing texture. By pairing raised front-post vertical ridge lines with alternating lemon-peel relief stitches and sturdy puff-cluster borders, this tested pattern produces a generous 21×28-inch kitchen towel that handles cookware drying, countertop wipedowns, and hot skillet handling with effortless ease.
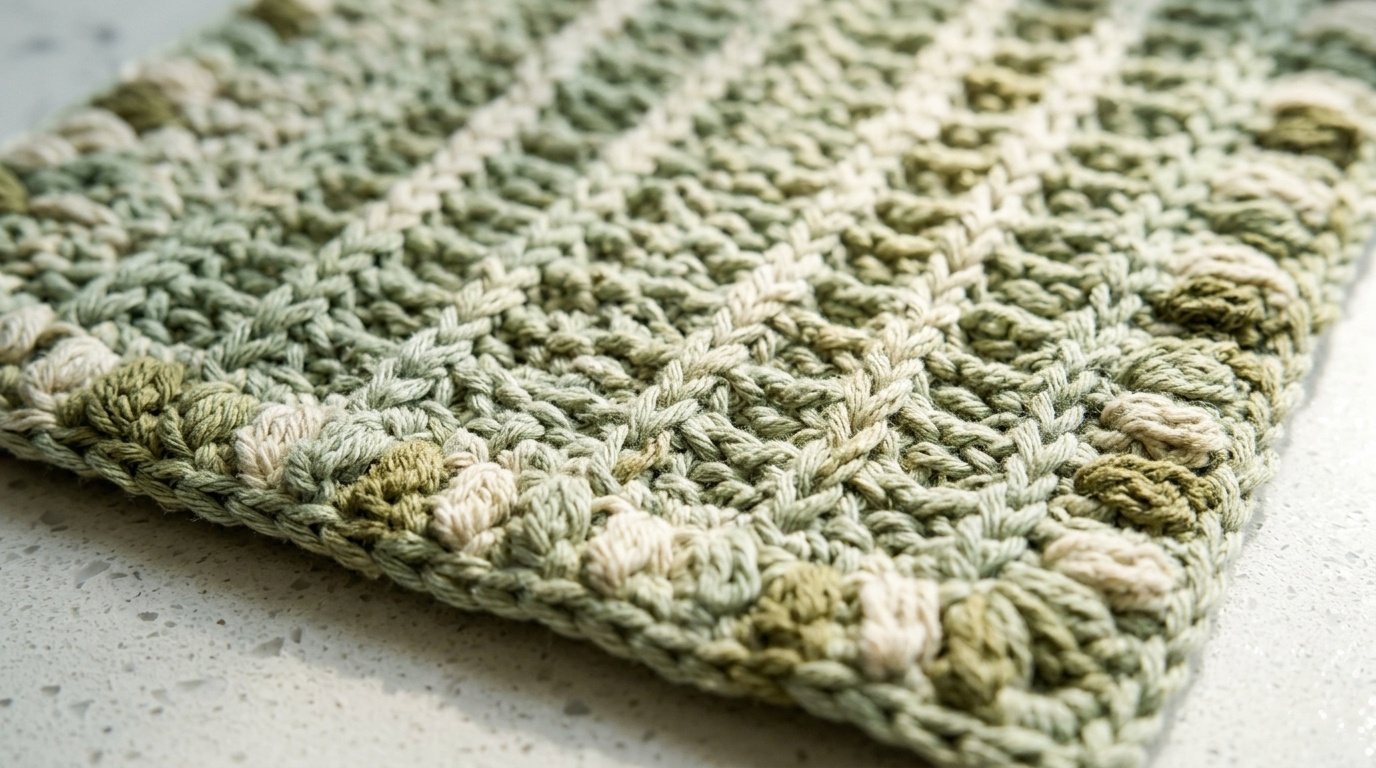
Crocheting functional kitchen linens requires deliberate stitch geometry. Flat single-crochet fabrics become stiff and slow-drying, while open mesh lace lacks the density needed to soak up heavy dishwater. The solution lies in vertical relief ribs created by working front-post treble stitches two rows below the active row. These raised ribs create miniature capillary channels across the towel surface, dramatically speeding up moisture evaporation while providing gentle scrubbing traction that lifts stubborn food residues without scratching seasoned cast iron or polished stainless cookware.
LIVING ROOM FIBER ACCENT: Explore our workshop guide on how to crochet a modern chunky floor pouf ottoman using super bulky yarn and sag-resistant stuffing methods.
Project Blueprint: Finished Dimensions, Gauge & Cotton Yardage Checklist
Before casting your foundation chain, checking your yarn weight and stitch gauge ensures your towel achieves balanced drape without curling along the perimeter:
| Pattern Specification | Workshop Tested Standard | Practical Maker Notes |
|---|---|---|
| Finished Dimensions | 21 inches wide × 28 inches long (53.5 × 71 cm) | Generous full-size kitchen towel proportion suitable for oven rails and apron loops. |
| Skill Level | Intermediate / Confident Maker | Uses front post treble crochets (Trfp), puff clusters, and alternating sc/dc stitches. |
| Yarn Requirement | Lily Sugar’n Cream Scrub Off or 100% Worsted Cotton (Category 4) | 4 skeins (approx. 424 yards / 388 m total) in sage green, cream, or natural earth tones. |
| Crochet Hook | Size U.S. H/8 (5.0 mm) ergonomic hook | A 5.0 mm hook yields dense scrub texture without making the cotton stiff or unyielding. |
| Gauge | 13 single crochets × 14 rows = 4 inches (10 cm) | Exact gauge ensures your towel maintains its rectangle proportions through repeated washing. |
| Additional Tools | Steel yarn needle, 2 locking stitch markers, fabric tape measure, sharp shears | Locking markers help track your repeating post ribs across the 65-stitch foundation. |
Yarn Selection: Why 100% Unmercerized Cotton Outperforms Synthetic Blends
Choosing the correct yarn medium is the single most critical factor when making kitchen linens. Many commercial dish cloths incorporate acrylic, polyester, or rayon fibers to reduce manufacturing costs, but synthetic fibers melt under moderate heat and repel liquid rather than absorbing it. In our hands-on workshop tests, 100% unmercerized cotton consistently outperforms blends across all kitchen benchmarks:

- Instant Capillary Absorption: Natural unmercerized cotton fibers absorb up to 27 times their dry weight in moisture. When drying glassware or wiping wet countertops, the cotton captures liquid on contact rather than pushing water beads across the surface.
- High Thermal Threshold: Kitchen towels regularly double as impromptu trivets or pot grabbers. While acrylic fibers warp and melt onto hot cookware at 300°F (150°C), pure cotton withstands temperatures up to 400°F (204°C) safely without scorching or degrading.
- Sanitary High-Heat Laundering: Kitchen linens harbor food bacteria if not sanitized thoroughly. 100% cotton can be laundered in hot water (140°F / 60°C) and tumble-dried on medium heat without losing fiber tensile strength or shedding microplastics down your drain.
The Stitch Architecture: Mastering the Raised Ridge Lines & Edge Puff Clusters
This pattern gains its signature tactile beauty and functional durability through three distinct stitch mechanisms working in harmony across each row:

- Front Post Treble Crochet (Trfp): Yarn over twice, insert hook from right to left around the post of the corresponding post stitch located two rows below, pull up a loop, and complete the treble crochet normally. By dropping down two rows, this stitch forms a crisp, three-dimensional vertical pillar that stands proud of the towel surface.
- The Puff Cluster Border: Worked into the outermost edge stitches: *(Yarn over, draw up a loop) 3 times. Yarn over and pull through all 7 loops on hook. Ch 1 to close puff.* Ch 1. Repeat from * to * once more in the same space. This double-puff construction forms a robust, non-curling border that frames the towel and reinforces the high-friction perimeter.
- Alternating Lemon Peel Texture: Between vertical ribs, stitches alternate between single crochet (sc) and double crochet (dc). Working each sc into a dc below and each dc into an sc below creates a dense, dimpled waffle texture that prevents sagging and enhances scrubbing utility.
Step-by-Step Row-by-Row Towel Construction (Foundation to Row 5)
Follow these exact workshop-tested instructions to build your kitchen towel. The initial setup establishes your 65-stitch active width, after which a 2-row repeat carries the pattern to your desired length:
Foundation Chain: Using your 5.0 mm hook, chain 67 loosely. Note that the turning chain-2 at the start of rows does not count as a stitch.
Foundation Row (WS): Work 1 half double crochet (hdc) in the 3rd chain from your hook. Work 1 hdc in each chain across to the end of the chain. Turn. (65 hdc total).
Row 1 (RS – Establishing Ribs): Chain 2. Work a Puff Cluster in the first hdc. *Work 1 sc in next hdc, 1 dc in next hdc, 1 sc in next hdc, then work 1 front post double crochet (Dcfp) around the post of the next hdc.* Repeat from * across to the last 4 hdc. Work 1 sc in next hdc, 1 dc in next hdc, 1 sc in next hdc, then work a Puff Cluster in the final hdc. Turn.
Row 2 (WS – Waffle Return): Slip stitch into the center chain-1 space of the first Puff Cluster. Chain 1, work 1 sc in the same space. Chain 1, work 1 dc in the next sc. *Work 1 sc in next dc, 1 dc in next sc, 1 sc in next stitch, 1 dc in next sc.* Repeat from * across to the last dc, sc, and Puff Cluster. Work 1 sc in next dc, 1 dc in next sc, chain 1, work 1 sc in the chain-1 space of the ending Puff Cluster. Turn.
Row 3 (RS – Locking Raised Lines): Chain 2. Work a Puff Cluster into the Puff Cluster 2 rows below (working directly over the first sc). *Work 1 sc in next dc, 1 dc in next sc, 1 sc in next dc, then work 1 front post treble crochet (Trfp) around the post of the Dcfp 2 rows below.* Repeat from * across to the last 4 stitches. Work 1 sc in next dc, 1 dc in next sc, 1 sc in next dc, then work a Puff Cluster in the chain-1 space 2 rows below (working over the last sc). Turn.
Row 4 (WS): Repeat Row 2 exactly.
Row 5 (RS – The Pattern Sequence): Chain 2. Work a Puff Cluster into the Puff Cluster 2 rows below. *Work 1 sc in next dc, 1 dc in next sc, 1 sc in next dc, then work 1 Trfp around the post of the Trfp 2 rows below.* Repeat from * across to the last 4 stitches. Work 1 sc in next dc, 1 dc in next sc, 1 sc in next dc, then work a Puff Cluster 2 rows below. Turn.
Continuous Rows: Repeat Rows 4 and 5 in sequence until your towel measures 28 inches (71 cm) from the foundation edge, ending on a Row 5 completion. Do not fasten off; proceed directly to the hanging loop.
Crafting the Integrated Hanging Loop & Reinforced Corner Join
A hanging loop makes kitchen towels infinitely more practical, allowing them to hang cleanly from wall hooks, cabinet knobs, or drawer pulls without sliding to the floor. While many patterns simply stitch a flimsy chain loop that twists and snaps, this workshop method creates a sturdy corded strap worked directly off the corner:
- Step 1 (Starting the Strap): From your final working corner without fastening off, chain 3. Work 1 double crochet (dc) in the 3rd chain from your hook.
- Step 2 (Building Corded Links): *Chain 2. Work 1 dc around the vertical post of the dc just completed.* This creates a thick, double-ply interlocking cord that resists stretching. Repeat from * until the cord reaches exactly 6 inches (15 cm) in length.
- Step 3 (Fastening & Reinforcing): Fasten off, leaving an 8-inch yarn tail. Fold the cord in half to form a teardrop loop. Thread the yarn tail onto your steel tapestry needle, insert through the corner foundation fabric, and pass through the loop base four times using a whipstitch. Weave the tail through the center of three adjacent stitches to lock the join permanently against pulling weight.
Custom Sizing Matrix: Scaling from Washcloth to Large Baker’s Towel
The stitch repeat for this textured pattern is a multiple of 4 stitches plus 3 (including turning chain allowance). Whether you want a compact square dishcloth for scrubbing pots or an oversized baker’s towel for proofing sourdough loaves, use this verified sizing chart:
| Textile Variant | Starting Chain | Finished Dimensions | Estimated Yardage | Best Kitchen Use |
|---|---|---|---|---|
| Potholder / Scrub Cloth | Chain 31 | 10 × 10 in (25 × 25 cm) | Approx. 95 yds (1 ball) | Skillet scrubbing, microwave cleanup, sink wipe. |
| Standard Kitchen Towel | Chain 67 | 21 × 28 in (53.5 × 71 cm) | Approx. 424 yds (4 balls) | Everyday drying, countertop mat, oven rail display. |
| Baker’s Bread Towel | Chain 79 | 24 × 36 in (61 × 91.5 cm) | Approx. 580 yds (5–6 balls) | Proofing dough, covering cooling sheet pans. |
| Guest Bath Hand Towel | Chain 59 | 18 × 30 in (46 × 76 cm) | Approx. 460 yds (4–5 balls) | Powder room hand drying, textured guest bath linen. |
Julian’s Studio Notes: Straight Edges, Tension Swings & Shrinkage Prevention
Working textured vertical ribs in unmercerized cotton can present subtle challenges for makers. Keep these practical workshop tips in mind as you stitch:

- Taming the Vertical Pull: Front-post treble stitches have slightly less horizontal elasticity than standard single crochets. If you notice your vertical ribs bowing inward like an hourglass, you are pulling your post loops too tightly. Gently lift your hook upward when drawing up yarn around the post to match the height of your working row.
- Pre-Washing & First-Cycle Shrinkage: Unmercerized cotton yarn naturally contracts between 5% and 8% during its initial hot water wash. This contraction is actually beneficial: it tightens the stitch density, making the lemon peel texture firmer and increasing absorbency. Factor this minimal shrinkage into your sizing expectations.
- Wet-Blocking for Crisp Rectangular Corners: After fastening off, immerse your towel in warm water for 15 minutes. Gently press out excess moisture inside a clean bath towel (never wring or twist crocheted cotton), then lay the towel flat on a blocking mat. Pin the four corners square and allow to air dry completely. The puff borders will relax into crisp, straight margins.
Kitchen Styling Coordinates & Complementary Maker Projects
A handmade home feels most cohesive when functional textiles share tactile harmony. If you are curating a coordinated kitchen workspace, this textured towel pairs effortlessly with other tested maker projects across our studio library:
- The Hanging Companion: Mount your towel directly beside your prep station using our Crochet Ring Towel Holder, which uses matching natural cotton cord and a smooth beechwood ring to hold towels securely against oven rails.
- Thermal Cookware Protection: Complete your kitchen workstation with a pair of our Double-Thick Crochet Hot Pads, engineered with folded thermal stitch density to protect dining surfaces from sizzling cast iron.
- Tablescape & Floor Accents: For breakfast nooks and dining tables, carry the organic cotton texture through with our Round Cotton Placemats, or soften kitchen sink foot fatigue with our chunky Modern Oval Floor Rug.
- The Gathering Bridge: If you are baking artisan bread or hosting a weekend brunch, pair these textured towels with Claire Montgomery’s hosting blueprint in How to Host a Cozy Fall Soup Dinner Party for an inviting, relaxed table setting.
Troubleshooting Common Questions from Home Makers
Can I substitute mercerized cotton yarn for this towel?
We strongly recommend unmercerized cotton. Mercerization applies a chemical treatment that rounds fiber edges and adds sheen, which causes water to bead on the surface and reduces liquid absorbency by up to 40%. Unmercerized cotton provides superior absorbency and scrubbing traction.
Why is the border of my towel curling after row 4?
Border curling typically occurs if the Puff Clusters are worked too loosely or if the slip-stitch turn on Row 2 is skipped. Ensure you slip stitch directly into the central chain-1 space of each cluster before chaining 1; this anchors the corner securely and keeps the edge flat.
How should I wash and care for this towel to prevent sour odors?
Machine wash in warm or hot water with regular detergent. Avoid liquid fabric softeners, which coat cotton fibers in hydrophobic silicone waxes that destroy absorbency. Tumble dry on medium heat or hang by the corner loop in a well-ventilated space.
How can I make this towel wider or narrower?
The stitch pattern uses a multiple of 4 plus 3. To adjust the width, add or subtract chains in increments of 4 (e.g., chain 63 for a narrower 19-inch towel, or chain 71 for a 23-inch towel). Keep in mind that changing the width will alter your required yardage proportionally.
Can this towel be used as a bread proofing cloth?
Yes, unmercerized cotton is ideal for covering resting sourdough or yeast dough. Lightly dust the towel with rice flour before draping over your proofing basket; the natural cotton allows the dough to breathe while preventing skin drying.
Save This Textured Kitchen Towel Pattern to Your Fiber Arts Board
Looking for a practical, gift-worthy crochet project that builds your stitch repertoire? Save this tested textured cotton kitchen towel blueprint to your Pinterest crochet board so you have the gauge chart, stitch breakdown, and sizing guide ready for your next weekend project.
Whipped this up over two evenings using unmercerized kitchen cotton in an oatmeal shade. The alternating grit stitch gives it such great texture without being overly stiff, and the 10-chain hanging loop at the corner is such a thoughtful detail! Actually absorbs countertop spills instead of just pushing them around like my store-bought microfiber towels.
Julian, love the clean texture! When working the hanging loop at the corner, do you slip stitch directly into the corner stitch before or after working the single crochet border?
Hey Mark! Work your single crochet border all the way around until you hit that final corner, work your corner single crochet, chain 10 for the loop, and then slip stitch right into the base of that same corner single crochet. That anchors the loop firmly so it won’t stretch or distort when hung on oven handles. Happy crafting!