
The iconic fenestrated foliage of Monstera deliciosa makes it the undisputed centerpiece of modern organic living spaces, yet expanding your collection does not require spending thirty dollars at a boutique plant nursery. Propagating a mature, leggy monstera from stem cuttings is one of the most rewarding botanical projects you can tackle at home, provided you locate the correct vegetative growth joint before taking your snips. Placing a leaf stem directly into water without a node will keep the cutting green for weeks, but it will never produce roots. In this hands-on studio guide, we break down exact node anatomy, sanitized cutting angles, oxygenated water schedules, and how to safely transition fragile water roots into chunky aroid soil.
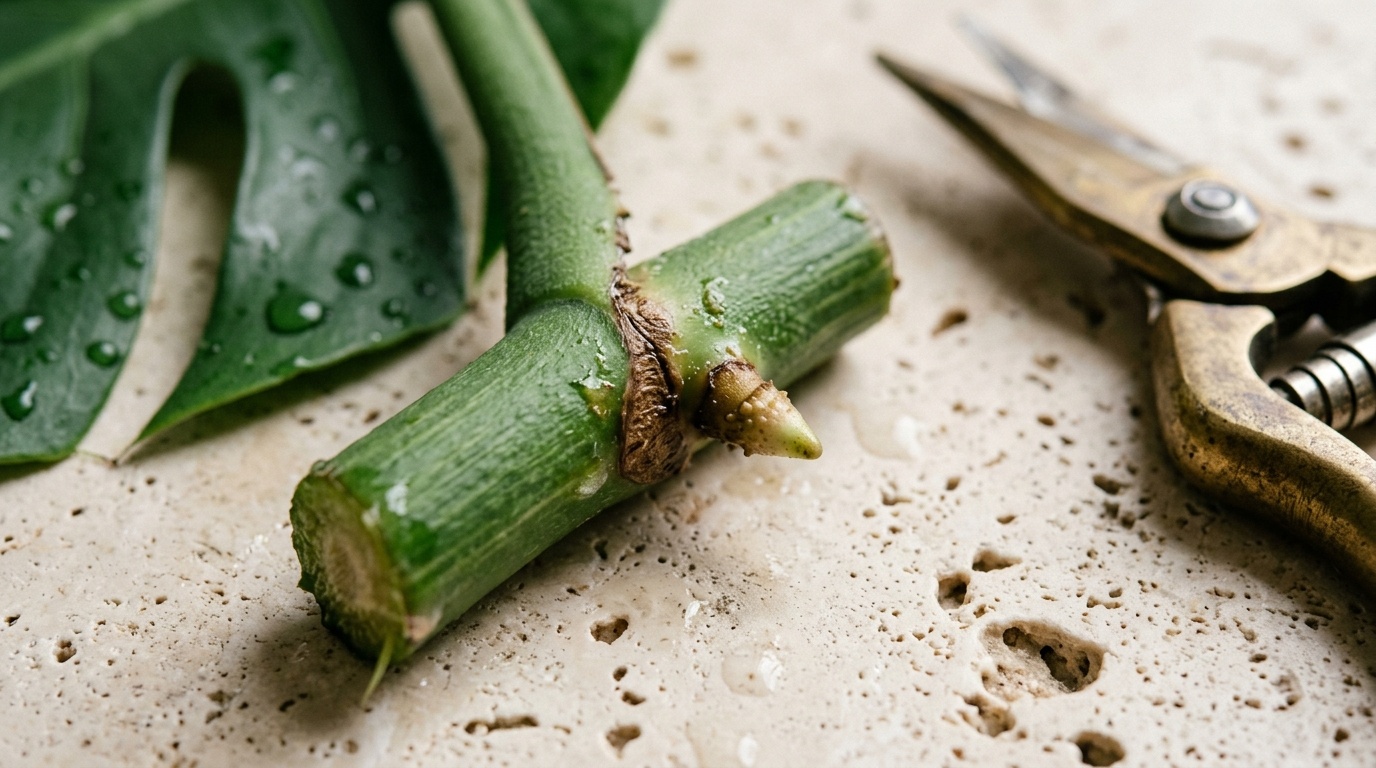
Unlike succulent propagation where individual leaves readily sprout pups, tropical aroids depend entirely on stem nodes to produce adventitious roots. Understanding the difference between a simple leaf petiole and a true stem node is the fundamental divide between an indefinitely stalled cutting and an actively rooting houseplant that produces new unfurling leaves within eight weeks.
Node Anatomy: Identifying the Growth Joint on Monstera Deliciosa
Before bringing out your pruning shears, inspect your mother plant under bright, direct light. The structure of a monstera vine consists of three distinct anatomical zones:
- The Petiole (Leaf Stem): The long, slender stalk connecting the broad green leaf blade to the central vine. While a severed petiole can survive in a vase of water for months through simple capillary hydration (often called a “zombie leaf”), it completely lacks the meristematic tissue needed to form roots or grow new shoots.
- The Node (Growth Joint): A thick, circular ring or swelling along the main woody vine where a petiole emerges. You will frequently notice a small brown bump, a slight ridge, or an aerial root nub poking out directly adjacent to this joint. This node contains the plant’s active hormonal engine.
- The Internode: The smooth section of stem running between two consecutive nodes. Your cutting will include a small section of internode tissue to act as an anchor, but roots will originate exclusively from the node itself.
Water vs Perlite vs Chunky Soil: Rooting Medium Comparison

Indoor gardeners debate whether water, perlite, or direct soil produces stronger root development. After testing all three methods across identical vine cuttings, here is how they perform:
Maker’s Propagation Medium Comparison
- Water Propagation (Best for Beginners): Allows 100% visual monitoring of root progression and early rot detection. Water roots are slightly more delicate, but routine water changes keep bacterial counts low.
- Coarse Perlite in Reservoirs: Perlite provides exceptional oxygenation and physical support for heavy stems. However, monitoring root moisture requires frequent cup checks to prevent accidental drying.
- Direct Chunky Soil Planting: Eliminates water-to-soil shock, but carries a 30% higher risk of stem rot because home growers cannot visually check whether the buried node is callusing or decaying.
- Studio Recommendation: Water rooting remains the gold standard for monstera cuttings because it allows you to intervene immediately if bacterial film develops.
Step-by-Step Cutting, Sanitizing & Callusing Method

Executing a clean, surgical cut prevents pathogens from invading the fresh wound before roots can emerge:
- Step 1: Sanitize Your Cutting Blade: Wipe your shears thoroughly with 70% isopropyl alcohol or wash them with antibacterial dish soap and hot water. Dull or dirty blades crush plant vascular bundles and introduce fungal spores.
- Step 2: Locate the Cut Line: Measure approximately 1/2 to 3/4 inch below the selected node along the internode. Never cut flush against the node ring, as minor cut dieback can damage the meristematic root cells.
- Step 3: Make a Decisive 45-Degree Snip: Slice through the green vine in a single, fluid motion at a 45-degree angle. An angled cut increases the exposed surface area for moisture uptake and prevents the stem cut from sealing flat against the bottom of your glass vessel.
- Step 4: The 20-Minute Air Callus: Lay the fresh cutting on a clean paper towel on your workstation for 20 to 30 minutes. Allowing the wet wound surface to air-dry and form a protective callus barrier drastically reduces the risk of waterborne bacterial rot. A light dusting of organic ground cinnamon onto the cut end acts as a proven natural antifungal seal.
Light Requirements & Water Change Schedule During Root Development
Once your callused cutting is placed into a clean glass cylinder filled with room-temperature tap or filtered water, positioning and hygiene dictate your rooting speed:
- Bright, Filtered Sunlight: Place the propagation vessel within 3 to 5 feet of an east-facing or north-facing window where it receives abundant ambient daylight without direct scorching afternoon rays. Direct sun overheats glass containers, cooking delicate root buds and triggering rapid green algae blooms.
- Node Submersion Depth: Ensure the node and any aerial root nubs are submerged 1 to 2 inches beneath the water line, but keep the junction where the leaf petiole meets the stem dry above the surface. Submerging petiole sheaths invites localized rot.
- The 4-to-5 Day Water Refresh: Stagnant water quickly depletes dissolved oxygen, creating an anaerobic breeding ground for harmful bacteria. Empty the vessel every 4 to 5 days, rinse the stem gently under lukewarm running water, and refill with fresh room-temperature water.
- Root Timeline Milestones: By Day 10 to 14, you will observe the brown node swelling and small white root tips pushing through the epidermis. By Week 3 to 4, primary roots will extend 2 to 3 inches with secondary lateral root hairs branching outward.
Potting Up: Transitioning Water Roots into Chunky Aroid Soil

The transition from water to soil is the most vulnerable stage of propagation. Water roots are structurally adapted to liquid immersion and will collapse if packed into dense, suffocation-prone standard potting soil:
- Formulate an Airy Aroid Substrate: In their native jungle habitats, monsteras are epiphytic climbers whose roots breathe open forest air. Blend a chunky, fast-draining potting medium consisting of:
- 40% coarse Douglas fir or orchid bark (provides structural air pockets)
- 30% horticultural perlite or pumice (ensures rapid drainage)
- 20% premium coco coir or peat moss (holds gentle, non-compacting moisture)
- 10% horticultural charcoal (filters impurities and buffers soil acidity)
- Select a Breathable Pot: Choose a 5-inch or 6-inch terracotta or plastic nursery pot equipped with multiple drainage holes. Terracotta is ideal because its porous clay walls allow moisture to evaporate evenly, preventing bottom saturation.
- Gentle Backfilling Technique: Hold the cutting upright in the center of the pot with the node positioned 1 inch below the rim. Gently spoon the chunky mix around the roots without firmly tamping down. Tamping crushes delicate lateral root hairs. Tap the pot base lightly on your table to settle the bark naturally.
- The First-Week Hydration Bridge: Water roots need time to develop soil-adapted root hairs. Keep the chunky substrate lightly moist (not soggy) for the first 10 days by giving small, frequent drinks. Once new vertical shoot growth appears, transition to normal monstera watering rhythms (allowing the top 2 inches of bark to dry completely between saturations).
Troubleshooting Stem Rot, Yellowing & Stalled Rooting
Even under careful monitoring, cuttings occasionally experience setbacks. Here is how to diagnose and rescue struggling propagations:
- Black, Mushy Stem Base (Stem Rot): If the cut end turns dark brown or black and feels slimy to the touch, immediate intervention is required. Remove the cutting from water, slice away all discolored mushy tissue with a sanitized blade until you reach clean green stem, dip the fresh cut in ground cinnamon, allow it to dry for 1 hour, and place it in fresh water with 1 drop of 3% hydrogen peroxide.
- Lower Leaf Yellowing: A single lower leaf turning pale yellow while roots are developing is completely normal; the cutting is reallocating stored nitrogen and carbohydrates from older foliage to fuel new root development. If multiple leaves turn yellow simultaneously, the cutting is receiving insufficient light or water temperatures are below 65°F (18°C).
- Stalled Growth with No Roots (After 3 Weeks): If the stem remains firm and green but shows zero root development after 21 days, move the vessel to a warmer location (72°F to 78°F / 22°C to 25°C) or place it on a gentle seedling heat mat. Root cell division slows dramatically in cool rooms.
- Coordinating Botanical Home Styling: To display your thriving indoor jungle vertically in small spaces, hang your trailing specimens using our tested crochet hanging plant hammock pattern or mount accent greenery with our crochet wall pocket plant hanger.
- Companion Plant Propagation: For expanding other popular indoor species, explore our beginner masterclass on how to propagate houseplants in water and our curated guide to the best low-light indoor plants for dark rooms.
- The Gathering Bridge: When staging your living room for autumn gatherings with lush green botanical accents, pair your tabletop monstera displays with Claire Montgomery’s candlelit styling advice in our moody candlelit fall dinner table setting guide.
Save This Monstera Propagation Guide to Pinterest
Pin This Plant Care Masterclass to Your Houseplant Board
Expand your indoor jungle for free with tested stem cutting techniques. Save this guide to your Houseplant Care, Plant Propagation, or Urban Jungle Decor boards on Pinterest so you have the node diagrams and aroid soil recipes ready whenever your monstera needs a seasonal pruning reset.
Leave a Comment