
Few things are more frustrating in fiber arts than spending hours hooking a beautiful set of dining table placemats, only to watch the edges curl, ruffle, or bow outward the moment you lay them on a table. Because worsted cotton yarn possesses natural stitch torque and tension pull, handmade rectangular placemats require proper blocking to relax the twist and set the finished 12×18-inch dimensions. Using a 1-inch foam grid board, rust-proof T-pins, and a handheld garment steamer, this tested blocking method permanently resets your cotton fiber memory so your placemats lie 100% flat under dinnerware.
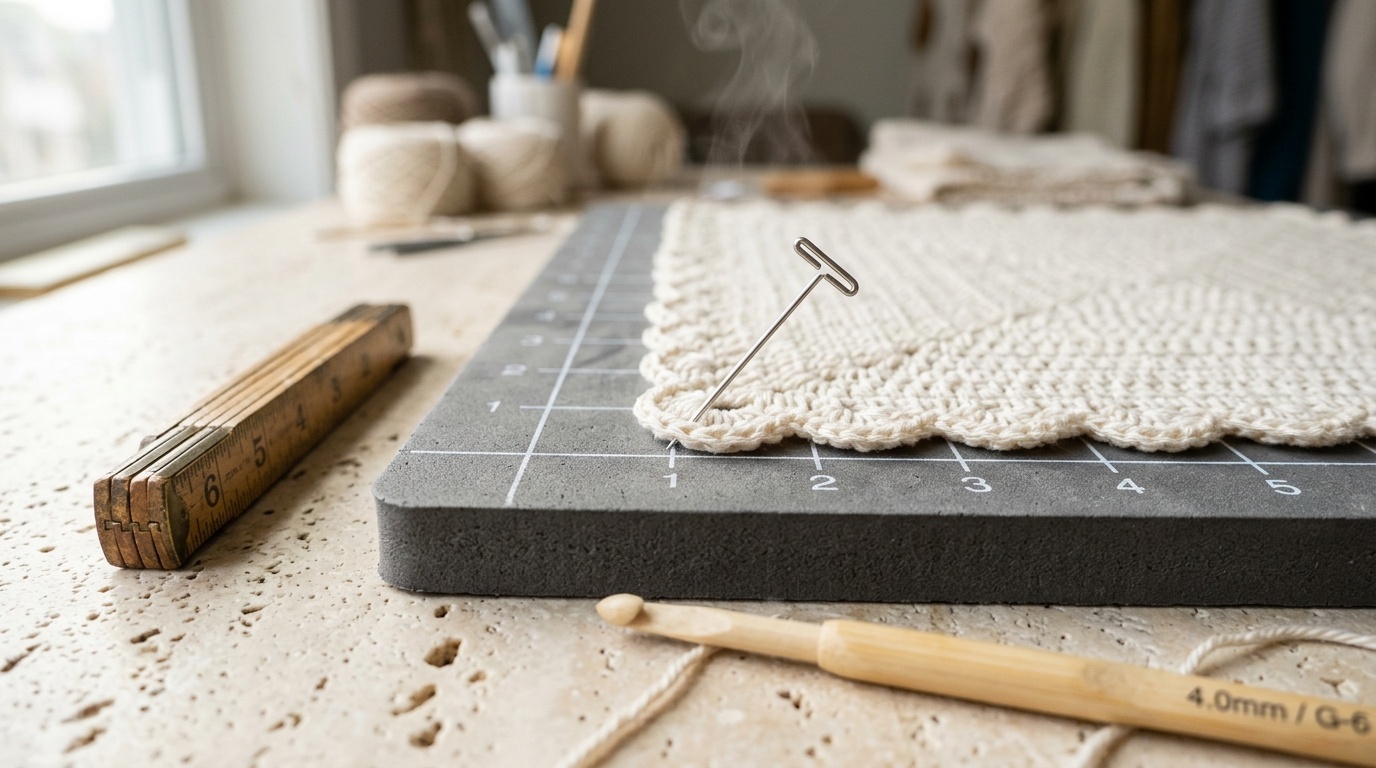
Unlike animal fibers like wool that can be wet-soaked and aggressively stretched, 100% natural cotton behaves differently. When saturated with water, cotton becomes heavy, inelastic, and prone to losing its raised stitch texture. Steam-blocking is the ideal technique for table placemats because it introduces controlled moisture and gentle heat without saturating the plies, allowing you to square the corners, straighten the scalloped border, and eliminate edge waves in less than fifteen minutes of active work.
Maker’s Technique Blueprint: Steam-Blocking Crochet Placemats
- Skill Level: Beginner Friendly (straightforward finishing technique required for all kitchen textiles).
- Standard Target Dimensions: 12 × 18 inches (30.5 × 46 cm) rectangular dining placemat; or 14-inch (35.5 cm) circular mat.
- Essential Blocking Equipment: Interlocking 1-inch foam grid blocking mats, box of stainless steel rust-proof T-pins, handheld garment steamer (or iron with vertical burst steam), wooden folding ruler, and dry pressing towel.
- Optimal Steamer Distance: 1.5 to 2 inches (4 to 5 cm) above the fabric surface; never press a hot metal soleplate directly onto cotton crochet stitches!
- Drying & Setting Time: 2 to 4 hours on the foam mat until completely cool and dry to the touch before removing pins.
- Julian’s Studio Testing Note: Tested across 6 handmade cotton placemats in my workshop. Pinning the perimeter under moderate, uniform tension along the printed grid lines before applying steam allows the cotton plies to relax without thinning out your textured stitches. The placemats stay completely flat on the dining table even after weeks of regular family dinner use.
Why You’ll Love This Blocking Method
- Zero Corner Curl: Straightens edge torque and permanently prevents placemat corners from curling upward around dinner plates.
- Uniform Place Setting Sizes: Guarantees that every placemat in your 4- or 6-piece dining set shares identical, tailored 12×18-inch dimensions.
- Preserves 3D Stitch Valleys: Unlike heavy pressing with a dry iron, contactless steam opens the fiber twists without flattening raised puff, bobble, or ribbed textures.
- Fast Afternoon Turnaround: Because the cotton is only lightly dampened with steam rather than fully soaked in a water bath, the mats dry and set in just a few hours.
Key Materials & Blocking Hardware

Investing in reliable blocking supplies ensures your finished dining accessories retain professional, square proportions:
- Interlocking Foam Grid Boards: High-density EVA foam boards featuring printed 1-inch and centimeter grid lines allow you to measure borders visually without constantly holding a tape measure. For smaller drinkware mats, compare our techniques in how to block crochet coasters.
- Rust-Proof Stainless Steel T-Pins: Never use standard sewing dressmaker pins on damp cotton. Standard pins oxidize quickly, leaving permanent orange rust dots on your handmade textiles. Stainless steel T-pins will never rust and provide a wide top bar to hold tension.
- Handheld Garment Steamer: A compact garment steamer delivers continuous, diffused steam that penetrates deep into double-stranded or worsted cotton stitches without soaking the foam underneath.
Step-by-Step Placemat Blocking Walkthrough
Follow this precise sequence to take your handmade cotton placemat from wavy and curled to crisp, flat, and dinner-ready:
Step 1: Measuring & Pinning the Corners First
Lay your dry crochet placemat right side up onto your assembled foam grid mats. Align one long edge along a bold horizontal grid line. Push a rust-proof T-pin through the first corner stitch at a 45-degree angle pointing outward away from the work. This outward angle prevents the pin from bending inward under fiber pull.
Gently pull the opposite corner across to meet your target measurement (e.g., 18 inches / 46 cm) along the same grid line, and insert the second pin. Repeat for the bottom two corners, ensuring the vertical height measures exactly 12 inches (30.5 cm) on both left and right sides.
Step 2: Securing the Perimeter Along Grid Lines
Working from the corners inward, insert T-pins every 1 to 1.5 inches along all four perimeter edges. Pull the cotton just taut enough to smooth out rippled waves and create straight borders, but avoid over-stretching the stitches so far that the internal fabric thins out. Ensure your pins follow the printed grid lines precisely.
Step 3: The Steam-Relaxing Technique

Fill your garment steamer with distilled water and allow it to come to full temperature until emitting a steady plume of steam:
1. Distance Control: Hold the steamer nozzle exactly 1.5 to 2 inches (4 to 5 cm) above the surface of the cotton placemat. Never touch the hot metal plate directly onto the yarn, as concentrated contact heat can scorch the fibers or glaze unmercerized cotton.
2. Systematic Coverage: Move the steamer slowly across the placemat from left to right in smooth, overlapping passes. Focus special attention along the pinned edges and corners where stitch tension is concentrated. You will visibly see the cotton fibers soften and relax into straight alignment as the warm vapor penetrates the plies.
3. Moisture Check: Touch the fabric gently with the back of your hand. The cotton should feel distinctly warm and lightly damp to the touch, but never wet or dripping.
Step 4: The Cool-Down & Memory Lock
This is the most critical step of the entire blocking process: do not remove the pins while the cotton is still warm or damp! Cotton fibers reset their molecular shape as they cool and dry. Leave the placemat pinned to the foam board for 2 to 4 hours in a well-ventilated room. Once completely cool and dry to the touch, gently pull the T-pins straight out.
3 Studio Secrets for Crisp, Flat Edges
1. Fix Curling Early in Your Stitch Counts: If your placemat curls dramatically while still on the hook, blocking will help, but row tension is often the culprit. Read our comprehensive studio guide on why crochet curls and 7 simple border fixes.
2. Always Angle T-Pins Outward: Inserting pins straight down at a 90-degree angle allows the fabric tension to gradually pull the pinhead inward, creating scalloped edges. Angling pins outward at 45 degrees anchors them solidly into the high-density foam.
3. Use a Dry Cotton Pressing Cloth for Difficult Borders: If you must use a standard household iron instead of a steamer, place a clean, dry cotton dishcloth over your placemat and hover the iron with burst-steam enabled. Never place a dry iron plate directly on exposed crochet.
Dining Table Styling & Setting Harmony

A crisply blocked placemat elevates everyday meals and coordinates effortlessly across your dining room decor:
- Pair with Table Patterns: Block your handmade mats to complement our original modern farmhouse crochet placemat pattern.
- Bread & Dinner Roll Presentation: Coordinate your dining table setting with our handmade crochet bread basket with removable linen liner.
- Tabletop Protection: Combine with textured dining pieces like our double-thick thermal crochet potholders.
- The Gathering Bridge: When styling a cozy autumn dinner party or holiday tablescape, pair these crisp cotton place settings with Claire Montgomery’s budget-friendly guide to rustic Thanksgiving tablescapes.
Care & Re-Blocking Instructions
- Machine Washing: Wash blocked cotton placemats in cold water on a gentle cycle in a mesh laundry bag to prevent agitation twisting.
- Reshaping Out of the Wash: Remove from the wash while damp. Give the placemat a gentle diagonal snap between both hands, smooth the borders flat against a clean countertop, and allow to air dry flat on a towel.
- When to Re-Block: Under normal dining use, placemats only require full pin-blocking once or twice a year or after heavy laundering. A quick 30-second handheld steam touch-up over the table keeps the edges pristine between washes.
Frequently Asked Questions
Can I wet block cotton placemats instead of steam blocking?
Yes, but wet blocking takes significantly longer to dry (often 24 to 36 hours for dense worsted cotton) and can cause saturated colors to bleed. Steam-blocking relaxes the fibers instantly while drying in under three hours, making it far more practical for everyday tabletop sets.
Why did my placemat pull inward after I removed the pins?
If the placemat springs back or narrows after unpinning, the cotton was likely still damp or warm when the pins were removed. Always ensure the fiber is 100% dry and cooled to room temperature before taking out your T-pins.
What can I use if I don’t own foam blocking mats?
You can use interlocking children’s EVA play mats, a clean yoga mat, or several thick bath towels folded flat over an ironing board. However, grid-marked foam boards make squaring the 12×18-inch borders significantly faster and more accurate.
Pin This Placemat Blocking Guide for Later
Tired of wavy, curling crochet placemats on your dinner table? Save this step-by-step steam-blocking tutorial to your Pinterest DIY Home Decor or Crochet Tips boards so you have the pinning angles, steam distances, and drying times ready for your next handmade table set!
Leave a Comment