
Adding trailing greenery to vertical wall space instantly softens a room, but traditional hanging plant ropes often swing away from drywall or crowd busy window corners. This modern crochet wall pocket plant hanger mounts flush against your wall using a smooth birch dowel and dense, textured unmercerized cotton stitches that support a standard four-inch terracotta pot securely without stretching or sagging under everyday soil weight.
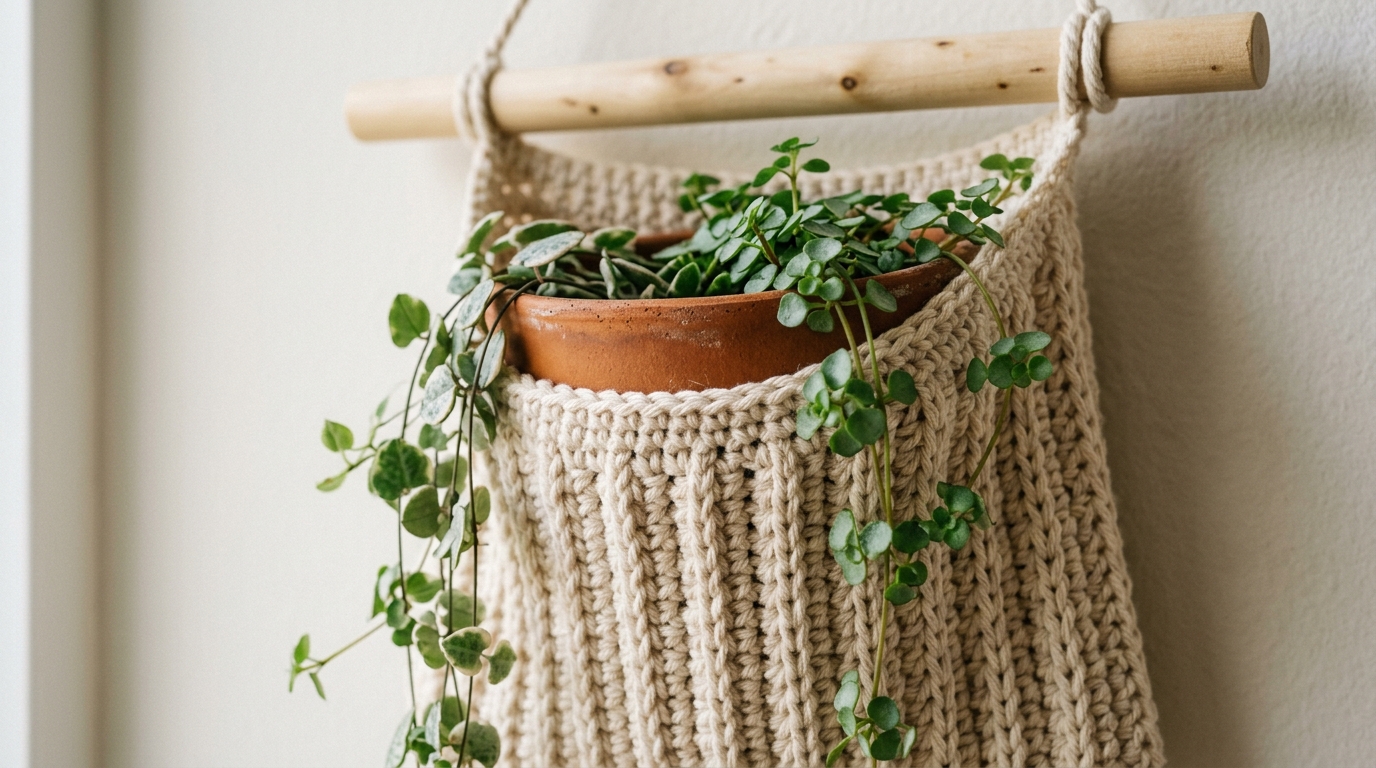
Unlike loose macramé slings that require ceiling hooks and open air clearance, a wall-mounted crochet pocket functions like functional textile architecture. By anchoring the foundation stitches directly across an eight-inch wooden dowel and utilizing back-loop single crochet ribs, the fabric builds structural vertical tension. When you slip a potted trailing pothos or philodendron inside, the weight transfers evenly along the wooden dowel rather than pulling down the center of the textile.
Maker’s Project Blueprint: Modern Wall Pocket Planter
- Skill Level: Advanced Beginner (comfortable with basic single crochet, working into back loops, and seaming).
- Finished Dimensions: Pocket is 5.5 inches (14 cm) wide by 6.5 inches (16.5 cm) deep; hanging cord drops 10 inches (25 cm) above the dowel. Sized specifically for standard 3.5 to 4-inch terracotta pots.
- Yarn Requirements: ~110 yards (65 g) of #4 worsted weight 100% unmercerized kitchen cotton (shown in natural ecru).
- Hook & Hardware: 5.0 mm (US H-8) crochet hook, 8-inch (20 cm) smooth birch wooden dowel (1/2-inch diameter), tapestry needle, and tape measure.
- Working Gauge: 15 single crochet stitches × 17 rows = 4 inches (10 cm) in unblocked back-loop single crochet.
- Julian’s Studio Testing Note: Tested in my studio with a 4-inch standard terracotta pot containing a healthy heartleaf philodendron. Using dense back-loop single crochet stitches worked at firm tension prevents the basket casing from stretching forward, keeping the pot perfectly vertical against the wall.
Why You’ll Love This Pattern
- Flush Wall Alignment: Sits flat against drywall, hallways, and gallery walls where ceiling-hung planters would bump into traffic.
- Zero-Sag Tension: The combination of unmercerized cotton and dense stitch geometry holds standard clay pots without elongating over months of display.
- Quick 90-Minute Build: A straightforward afternoon maker project that requires only basic stitches and accessible craft supplies.
- Effortless Plant Care: The open top allows you to lift the nursery pot out easily for watering at the kitchen sink without taking down the hanging hanger.
Key Materials & Hardware Selection

Selecting the right materials directly impacts whether your finished wall pocket hangs crisply or slouches forward once loaded with a pot:
- 100% Unmercerized Kitchen Cotton: Unmercerized cotton retains its natural matte, grippy texture. Unlike synthetic acrylic yarn which stretches under load, or slick mercerized threads, sturdy kitchen cotton provides firm dimensional stability. If you are comparing fiber brands, review our guide to the best cotton yarns for crochet to understand how plies and spinning affect textile strength.
- Smooth Birch Wooden Dowel (1/2-Inch Diameter): An 8-inch length provides roughly 1.25 inches of exposed wood on either side of the 5.5-inch pocket, creating a balanced Scandinavian aesthetic while preventing the rod from bowing under weight.
- 5.0 mm Ergonomic Crochet Hook: Pairing a 5.0 mm hook with #4 worsted cotton creates a dense, opaque fabric that conceals the terracotta pot while maintaining enough flexibility to curve around cylindrical shapes.
Step-by-Step Pattern Walkthrough
This pattern is worked in two integrated sections: first, anchoring the back panel directly onto the wooden dowel, then working the front dimensional pocket and securing the base.
Phase 1: Mounting Directly to the Dowel
Instead of crocheting a separate tab and sewing it around the wood, working single crochet stitches directly over the dowel creates an immovable foundation with zero slippage:
1. Foundation Slip Knot: Make a slip knot on your 5.0 mm hook, leaving a 6-inch tail. Hold the 8-inch dowel horizontally in your non-dominant hand.
2. Casting Around the Dowel (Row 1): Place your hook over the top of the dowel, reach under and yarn over, pulling a loop to the top of the dowel (2 loops on hook). Yarn over above the dowel and pull through both loops. This forms your first single crochet anchored directly around the wood. Repeat until you have worked 21 single crochet stitches evenly across the center 5.5 inches of the dowel. Ch 1, turn.

Phase 2: Working the Back Wall Panel
Rows 2–24: Sc in the back loop only (BLO) across all 21 stitches. Ch 1, turn. (21 sts). Working in the back loop creates subtle horizontal ridges that add vertical stiffness and prevent the panel from curling inward. Once Row 24 is complete, your back panel will measure approximately 6 inches in height.
Phase 3: Shaping the Three-Dimensional Pocket
To give the pocket enough volume to enclose a 4-inch pot, we introduce strategic increases before forming the front casing:
Row 25 (Increase Row): Sc in first 2 sts, 2 sc in next st. *Sc in next 3 sts, 2 sc in next st; repeat from * across to last 2 sts, sc in last 2 sts. Ch 1, turn. (26 sts).
Rows 26–40: Sc in each st across. Ch 1, turn. (26 sts). The extra fabric created by the 5 increase stitches will balloon outward naturally to form the pot pocket.
Row 41 (Base Shaping): Sc in first st, *sc2tog, sc in next 2 sts; repeat from * across to last st, sc in last st. Ch 1, turn. (20 sts).
Row 42: Sc2tog across all sts. (10 sts). Fasten off, leaving an 18-inch tail for seaming.
Phase 4: Side Seaming & Base Closure
Fold the wider front fabric upward so Row 42 aligns with the base of the back panel. Using your tapestry needle and the yarn tail, whipstitch the lower 10 stitches together to create a flat circular base. Next, seam the sides of Rows 26–40 to the corresponding edges of the back panel (Rows 10–24), easing the slight fullness evenly. Weave in all loose yarn ends thoroughly on the interior side.
Phase 5: Attaching the Hanging Cord
Cut two 30-inch strands of unmercerized cotton yarn. Hold them together and tie a secure double clove hitch knot around each exposed end of the wooden dowel, leaving approximately 10 inches of hanging drop above the dowel. Trim the yarn tails neatly to 1/2 inch and tuck them toward the back.
3 Studio Secrets for Sag-Free Wall Planters
1. Maintain Firm Stitch Tension: If you naturally crochet loosely, drop down to a 4.5 mm (US 7) hook. A dense textile weave provides the structural integrity needed to support potting soil and clay without bagging down over time.
2. Always Nest a Plastic Nursery Pot Inside: Terracotta pots are naturally porous and absorb moisture from moist soil. To keep damp soil from saturating the cotton wall pocket and touching your drywall, keep your houseplant in a standard plastic nursery pot nestled inside the decorative terracotta pot, or slip a thin clear plant saucer into the base of the pocket.
3. Steam-Block the Back Panel Flat Before Hanging: Before inserting your plant, steam-block the back panel lightly on a blocking board using stainless T-pins. As detailed in our studio tutorial on steam vs wet blocking crochet, gentle steam relaxes the cotton fibers and locks the rectangular shape so the hanger hangs perfectly straight against the wall.
Best Plants & Wall Styling Ideas

When styling your wall pocket, pairing the textured ecru cotton and warm clay pot with cascading foliage creates an organic modern focal point:
- Heartleaf Philodendron (Philodendron hederaceum): Highly tolerant of lower indoor light, with smooth, deep green heart-shaped leaves that drape naturally over the pocket’s front edge.
- Golden Pothos (Epipremnum aureum): Fast-growing and resilient, variegated pothos leaves brighten neutral wall colors beautifully.
- Pairing with Other Fiber Decor: For a cohesive botanical gallery wall, pair this wall pocket with our modern crochet plant hanger and our crochet hanging basket to vary heights and textures across your living room or craft corner. If you are building your foundational home crochet skills, consult our complete modern crochet home decor beginner’s guide.
Care & Spot Cleaning Instructions
- Spot Cleaning: If dust or stray soil marks appear on the ecru cotton, wipe gently with a damp cotton cloth and mild plant-based soap. Avoid submerging the wooden dowel in water.
- Full Hand Washing: If the textile requires thorough washing, gently slide the wooden dowel out of Row 1, hand wash the cotton pocket in cool water, reshape, and lay flat to dry before re-inserting the dowel.
- Sunlight Considerations: Natural unbleached cotton holds up well to bright indirect room light, but avoid direct south-facing window glare to prevent fiber brittleness over multiple years.
Frequently Asked Questions
Can I use acrylic yarn instead of cotton for this wall pocket?
Acrylic yarn is not recommended for hanging planters. Synthetic acrylic fibers have significant mechanical elasticity and will stretch downward under the weight of a potted plant, causing the pocket to sag. Sturdy unmercerized kitchen cotton maintains its structural shape under weight without sagging.
Can I resize this pattern to fit a 6-inch pot?
Yes. To accommodate a 6-inch pot, increase your foundation row on a 10-inch dowel to 27 single crochet stitches and work the back panel for 30 rows. Increase by 7 stitches in Phase 3 to give the front casing sufficient volume.
Will the terracotta pot stain the ecru cotton over time?
Raw terracotta can release mineral salts (efflorescence) or moisture when wet. Using a thin plastic nursery pot or a clear saucer inside the terracotta pot prevents water and minerals from transferring to the cotton yarn.
Pin This Wall Pocket Pattern for Later
Love this modern plant craft? Save this free pattern to your crochet or home decor board on Pinterest so you have the measurements and stitch guide ready for your next weekend project!
Leave a Comment