
There is a quiet, transformative magic in seeing your own name handwritten at a holiday table. While store-bought paper tent cards can feel like a generic afterthought, crafting DIY mini pumpkin place card holders infuses your Thanksgiving or autumn dinner party with bespoke tactile charm. In less than thirty minutes and for under $15, you can turn humble miniature gourds into sculptural, Instagram-worthy place settings that make every guest feel deeply celebrated.
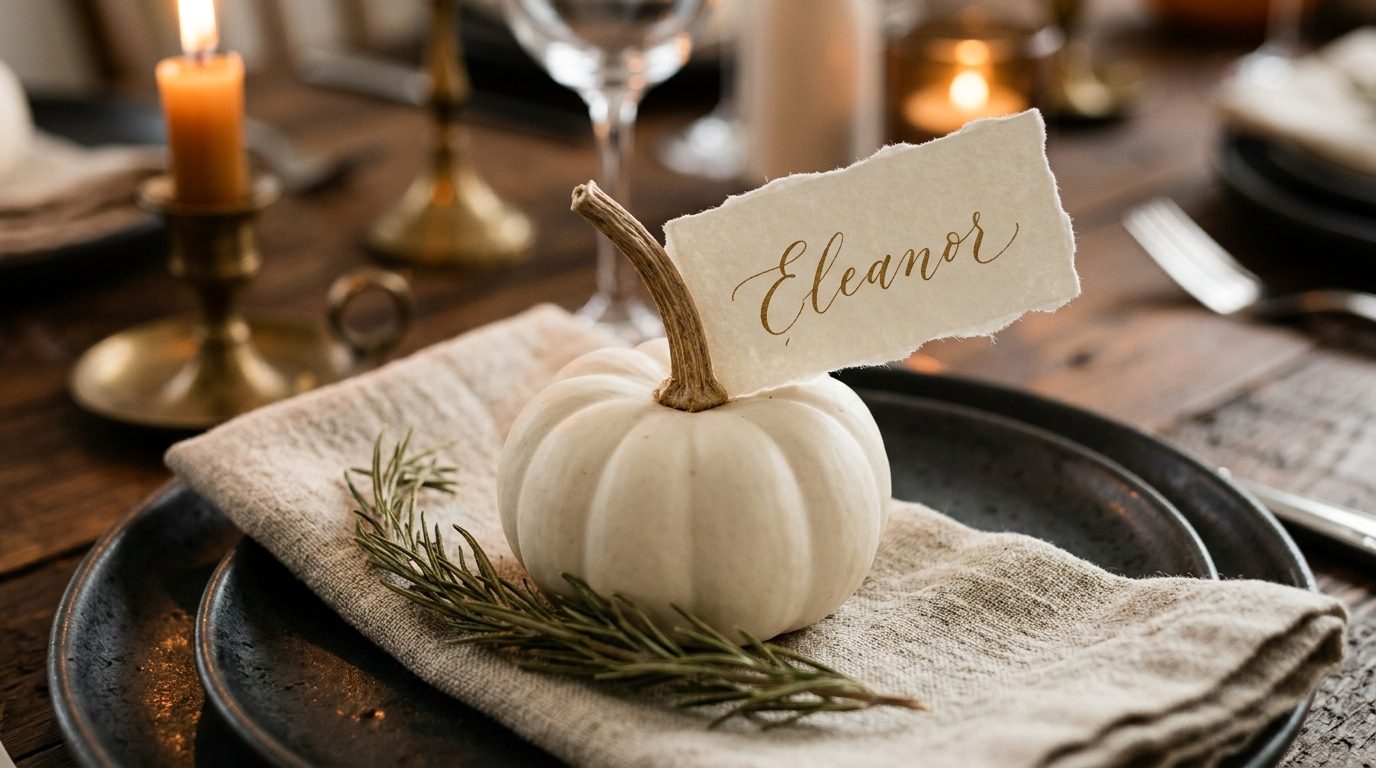
The beauty of this project lies in its organic versatility. Whether your tablescape leans toward rustic dark-wood moody drama, clean Scandinavian minimalism, or warm transitional neutrals, mini pumpkins serve as the ultimate natural canvas. Paired with deckle-edge cotton rag paper and earthy velvet ribbons, they double as an enchanting party favor that guests will eagerly take home at the end of the night.
Why You’ll Love This Quick DIY Project
- Budget-Friendly Luxury: A batch of 8 to 10 customized place card holders costs less than $15 total (roughly $1.50 per guest).
- Completed in Under 30 Minutes: Requires zero specialized craft skills, hot glue guns, or messy power tools.
- Doubles as a Take-Home Favor: Guests adore tucking these adorable mini gourds into their coats as a seasonal keepsake.
- Four Adaptable Styles: From modern metallic gold leaf to rustic velvet ribbon wraps, pick the aesthetic that matches your exact table theme.
Planning your dessert spread? These spiced drinks pair magnificently with Sarah Jenkins’s viral Dubai chocolate pistachio knafeh brownies.
Supplies & Budget Sourcing Breakdown
Miniature pumpkins are widely available from late September through November at grocery stores (Trader Joe’s, Whole Foods), local pumpkin patches, and farmers markets. Here is your itemized supply list for an 8-guest dinner party:

| Craft Material | Recommended Type | Quantity Needed | Approx. Cost |
|---|---|---|---|
| Mini Pumpkins | ‘Baby Boo’ white pumpkins or mini tiger-stripe heirloom gourds | 8 pumpkins ($0.79–$0.99 each) | $6.50 – $8.00 |
| Paper Stock | Handmade 100% cotton deckle-edge paper (or heavy kraft cardstock) | 1 pack of 2×3.5″ place cards | $3.50 – $5.00 |
| Cutting Tool | X-Acto hobby blade or small fine-serrated paring knife | 1 tool (household pantry item) | $0.00 (On hand) |
| Writing Instrument | Fine-tip metallic gold gel pen or calligraphy ink brush | 1 pen | $2.00 – $3.50 |
| Optional Ribbon | 1/4-inch silk velvet ribbon in forest moss or terracotta | 1 spool (3 yards) | $3.00 |
| TOTAL | Complete 8-Piece Set | Full Supply Kit | $12.00 – $16.50 |
4 Chic Mini Pumpkin Place Card Styles
Choose the variation that harmonizes best with your dining room decor, or mix two complementary styles for playful textural interest:
Style 1: The Minimalist Stem-Slit (Clean & Organic)
This is the gold standard for effortless designer tables. Select miniature white Baby Boo pumpkins with sturdy, upright dried stems. Using a sharp X-Acto blade, make a clean horizontal incision roughly 1/4-inch deep directly into the woody base of the stem. Slide your calligraphed deckle-edge name card snugly into the slit. The natural wood grain holds the card firmly in place at an upright, legible reading angle.

Style 2: The Dip-Dyed Gold Leaf Gourd (Luxe Glamour)
For candlelit evening dinner parties where you want maximum light reflection, give your mini pumpkins a gilded treatment. Dip the bottom third of each white pumpkin into liquid gold leaf craft paint, or apply metal gilding adhesive with a foam brush and press sheets of mottled gold leaf around the lower perimeter. When placed beside glowing tapers, the reflective metallic rim sparkles brilliantly.
Style 3: The Velvet Ribbon Collar (Rustic Farmhouse)
If your pumpkin stems are fragile or missing entirely, this style is your savior. Tie a 10-inch strip of narrow (1/4-inch) silk velvet ribbon around the crown of a striped heirloom pumpkin, securing it into a delicate bow. Punch a 1/8-inch hole into a small kraft paper name tag and thread it onto the ribbon before knotting. The tactile velvet adds warmth and cozy texture.
Style 4: Direct Skin Calligraphy (Modern Typography)
Skip the paper altogether and use the smooth, ribbed skin of the pumpkin as your writing canvas. Wipe the rind thoroughly with rubbing alcohol to remove natural oils. Using an extra-fine-tip metallic gold or black acrylic paint pen, hand-letter each guest’s name across the fluted ribs of the pumpkin in flowing cursive calligraphy. Simple, contemporary, and strikingly uncluttered.

3 Stylist Secrets for Flawless Pumpkin Place Cards
1. Level the Bottom for Zero Wobble: Miniature pumpkins often have uneven, rounded bases that cause them to roll off the plate. Before styling, inspect each pumpkin. If it wobbles, use a sharp chef’s knife to shave a paper-thin slice off the very bottom rind. This creates a flat, steady pedestal that sits flush against ceramic plates.
2. The Bleach Bath Longevity Hack: Mini pumpkins rot quickly in warm home environments due to surface mold spores. Soak your newly bought pumpkins for 15 minutes in a bucket of cold water mixed with 1 tablespoon of household bleach. Dry thoroughly with a clean cloth. This simple step eliminates bacteria and keeps your pumpkins pristine for up to four full weeks.
3. Use Deckle-Edge Paper for Instant Heritage: Don’t cut your paper cards with clean scissors. Tear heavy watercolor paper along the metal edge of a ruler, or purchase pre-torn deckle-edge cotton rag cards. The feathered, organic edges soften the table aesthetic and make your handwriting look tenfold more artisanal.
How to Style Your Place Cards on the Table
To give each place setting a cohesive, layered presence, nestle the mini pumpkin within thoughtful textural accents:
- The Plate Presentation: Center a matte charcoal or creamy stoneware plate on your table runner. Place a loosely folded oatmeal linen napkin horizontally across the plate, and set the pumpkin directly in the middle.
- The Botanical Frame: Curve a single 4-inch sprig of fresh rosemary or clipped olive branch around the base of the pumpkin. The fresh greenery frames the white gourd and releases a subtle, welcoming fragrance.
- Lighting Integration: Position a low glass votive candle 2 inches behind each place card so the candlelight gently backlights the guest’s name throughout dinner.
The “No-Stress” Crafting Timeline
- 3 Days Before: Buy your mini pumpkins. Give them a quick bleach-water soak, dry them, and shave any wobbly bottoms.
- The Day Before: Write out all guest name cards. If using gold paint pen or calligraphy ink, let dry for 2 hours before handling.
- Morning Of (3 Hours Prior): Slice stems and slot the name cards into place. (Or tie velvet bows and place cards).
- 30 Minutes Prior: Position the finished pumpkin place card holders onto each plate atop the folded linen napkins and tuck in fresh rosemary sprigs.
Frequently Asked Questions
What should I do if a pumpkin stem snaps off during carving?
Don’t toss the pumpkin! Simply switch to Style 3 (Velvet Ribbon Wrap) or Style 4 (Direct Calligraphy). Alternatively, poke a decorative brass wire card holder pick into the top flesh of the gourd where the stem used to sit.
Can I use faux mini pumpkins instead of real ones?
Yes! Lightweight foam or resin faux pumpkins from craft stores work wonderfully. Because foam stems are soft, carving a card slot is even easier, and you can pack them away in tissue paper to reuse year after year.
What type of pen works best for writing directly on pumpkin skin?
Use an oil-based paint marker (such as Posca or Sharpie Oil-Based Paint Pen). Standard water-based markers will bead up and smear on the pumpkin’s waxy natural rind, while oil-based paint adheres cleanly and dries in minutes.
📌 Save This DIY Pumpkin Place Card Tutorial to Pinterest
Planning your Thanksgiving tablescape or autumn dinner party? Pin this easy 15-minute craft tutorial to your Thanksgiving Table Decor or Fall Crafts board on Pinterest so you have these styling secrets ready when dinner prep begins!
Save To PinterestSmall Details, Memorable Gatherings
Hospitality lives in the small, tactile gestures that tell your guests they were anticipated and cherished. By bringing natural miniature pumpkins to your table with handwritten personal touches, you transform an ordinary dining setting into an intimate, heartwarming celebration of season and community.
Made 12 of the white pumpkin slit card holders with torn kraft paper for our Thanksgiving table rehearsal. So simple and took less than 20 minutes total. Several guests already asked if they could take theirs home!
Hi Amanda! That’s the best part—they double as such a charming, organic party favor that guests always cherish taking home. Love the torn kraft paper choice!