
Keeping kitchen hand towels from sliding onto the floor or bunching awkwardly over appliance handles is a small daily irritation that a handmade wooden ring towel holder solves with clean, organic elegance. By combining durable unmercerized worsted cotton with a smooth natural beechwood ring and a functional wooden button clasp, this tested pattern creates a sturdy, modern kitchen accent that snaps securely over oven handles, dishwasher bars, or cabinet knobs in under an hour.
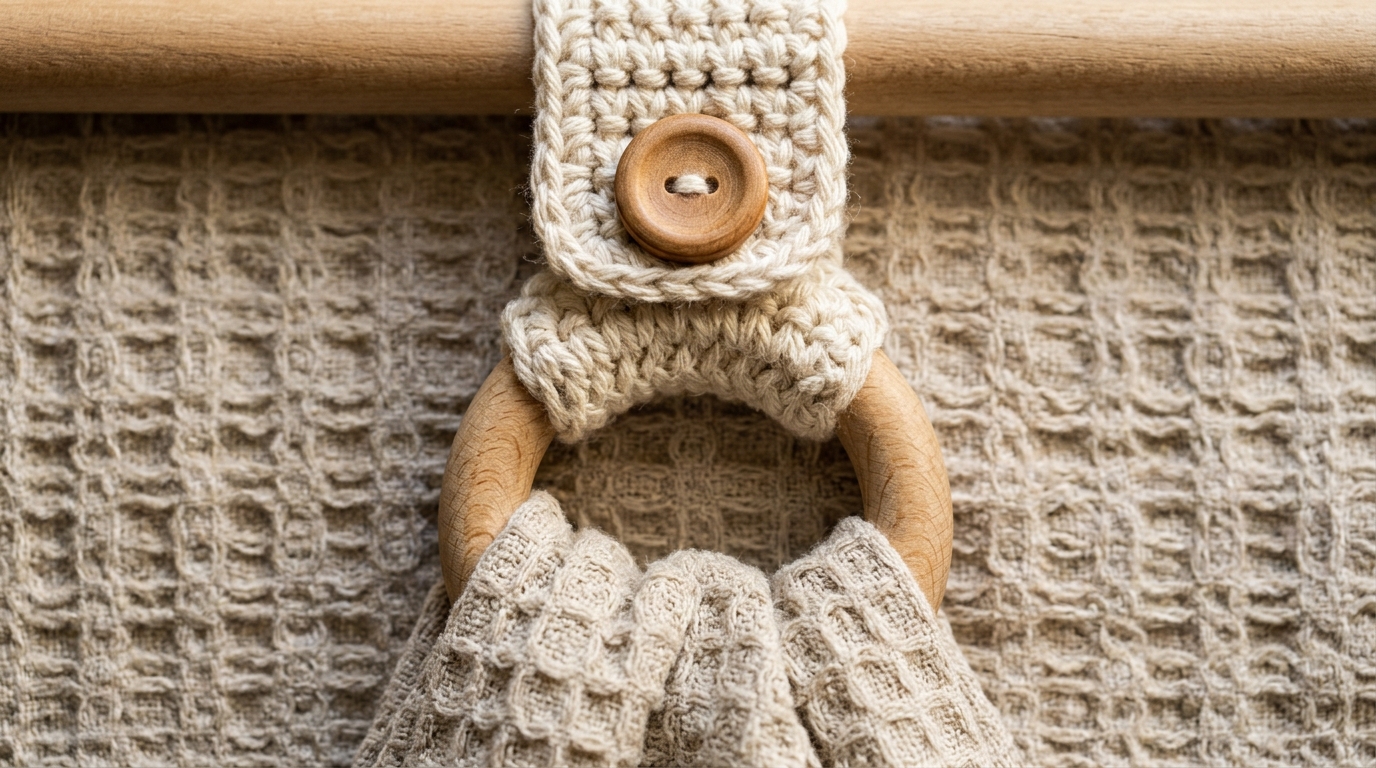
Unlike traditional fabric towel toppers that require sewing directly onto a kitchen towel, a ring towel holder acts as a permanent, reusable hanger. You simply fold any standard hand towel or linen tea towel in half, slide it through the wooden ring, and button the strap over your kitchen bar. When the towel needs washing, slide it out and replace it instantly—leaving your beautiful handmade holder right where you need it.
KITCHEN LINEN COORDINATE: Pair your wooden ring holder with our tested pattern on how to crochet a textured cotton kitchen towel with raised scrubbing ridges and border puff clusters.
Maker’s Project Blueprint: Ring Diameter, Cotton Yardage & Gauge
Before casting on, having your exact dimensions and gauge prepared ensures the hanging loop fits standard appliance bars without sagging:
- Skill Level: Confident Beginner (uses single crochet, chain, and working over an object).
- Finished Dimensions: 2.75 inches wide across the strap; approximately 8.5 inches total length from button fold to the base of the wooden ring.
- Wooden Ring Size: 2.5 inches (65 mm) outer diameter with a smooth sanded natural finish.
- Yarn Yardage: Approximately 35 to 40 yards of Medium Weight (Category 4) 100% unmercerized cotton yarn.
- Crochet Hook: Size 4.5 mm (US 7) or 4.0 mm (US G/6) to maintain dense, compact stitches that prevent the strap from stretching out under weight.
- Gauge: 16 single crochet stitches = 4 inches. Exact gauge is not critical, but firm tension is essential for structural stability.
Yarn & Ring Selection: Why Unmercerized Cotton & Natural Hardwood Win

Choosing the right raw materials is the difference between a towel holder that lasts for years and one that stretches into a floppy loop after two weeks:
- Unmercerized Worsted Cotton (Lily Sugar ‘n Cream, Paintbox Cotton Aran, or Lion Brand 24/7): Pure cotton fiber has virtually zero elasticity. This lack of bounce is ideal for weight-bearing kitchen crafts because the strap will not stretch longer under the weight of heavy, damp towels. Avoid acrylic yarns, which stretch permanently and can melt near hot oven doors.
- Unfinished Natural Beechwood or Birch Rings: Choose smooth, splinter-free wooden craft rings that have not been coated in synthetic chemical varnishes. The natural wood grain pairs seamlessly with neutral cotton and protects delicate linen towels from snagging.
- 1-Inch Natural Wooden Buttons (2-hole or 4-hole): A substantial wooden button anchors the strap securely and complements the rustic warmth of the beechwood ring.
- Tapestry Needle & Brass Scissors: A blunt steel yarn needle is necessary for weaving in ends firmly so the ring join remains invisible.
Step-by-Step Base Foundation: Enclosing the Wooden Ring Seamlessly
Working crochet stitches directly over a wooden ring can feel awkward for the first three stitches, but following this simple hand positioning makes the foundation completely seamless:

Foundation Setup:
Create a slip knot on your 4.5 mm hook, leaving a 6-inch yarn tail. Hold the wooden ring between your non-dominant thumb and middle finger. Place the working yarn behind the ring.
Row 1 (Joining to the Ring):
Insert your hook through the center of the wooden ring from front to back. Yarn over, pull the loop through the center of the ring up to the top edge (you now have 2 loops on your hook), yarn over again, and pull through both loops. You have just completed your first single crochet (sc) around the ring.
Work 11 more single crochets directly around the top arc of the ring in the exact same manner. You will have a total of 12 sc stitches neatly grouped along the upper curve of the wooden ring. Slide the stitches tightly together with your thumb so no wood peeks between them. Chain 1 and turn your work.
Building the Textured Hanging Strap & Functional Button Loop
The hanging strap needs to be thick and structured so it lies completely flat when wrapped around your oven handle:
Rows 2 to 24 (Strap Body):
Starting in the very first stitch, work 1 sc in each of the 12 stitches across. Chain 1, turn. (12 sc per row). Repeat this simple 12-stitch single crochet sequence for 24 total rows. At Row 24, your strap will measure approximately 6 inches from the wooden ring edge. This provides ample length to wrap around appliance handles with a clean, comfortable overlap.
Row 25 (Creating the Centered Buttonhole):
Work 1 sc in each of the first 4 stitches. Chain 4, skip the next 4 stitches (this creates the buttonhole opening), and work 1 sc in each of the remaining 4 stitches. Chain 1, turn.
Row 26 (Reinforcing the Buttonhole):
Work 1 sc in each of the first 4 stitches. Work 4 sc directly into the chain-4 space. Work 1 sc in each of the last 4 stitches. Chain 1, turn. (12 sc).
Row 27 (Tapered Top Edge):
Single crochet 2 together (sc2tog) across the first two stitches. Work 1 sc in each of the next 8 stitches. Work sc2tog across the last two stitches. (10 sc). Fasten off yarn, leaving an 8-inch tail for weaving.
Finishing Touches: Secure Button Attachment & Clean Invisible Joins
Attaching the wooden button securely prevents it from pulling loose under everyday kitchen use:
- Button Placement: Fold the strap in half to see how it hangs naturally. Position your 1-inch wooden button centered on Row 6 of the strap body (just above the wooden ring foundation).
- Thread with Matching Cotton: Split a strand of your worsted cotton yarn in half to create a thinner, high-strength thread, or use a matching heavy embroidery floss. Thread through your tapestry needle.
- Sew Through Multiple Passes: Pass the thread through the button holes and strap stitches at least 5 times. On the final pass, wrap the thread twice around the base behind the button to form a small thread shank before knotting off on the back side. This slight elevation allows the buttonhole to slide easily beneath the button without pulling the fabric tight.
- Weave In Tails Invisible: Thread both yarn tails onto your tapestry needle and weave them through the center core of the single crochet stitches for at least 2 inches in two opposite directions before trimming.
Care Instructions & Kitchen Styling (Oven Handles & Cabinet Knobs)

Because the wooden ring is natural unfinished hardwood, simple care keeps it looking pristine for years:
- Spot Cleaning: For minor kitchen splashes, dab the cotton strap with a damp cloth and mild dish soap. Avoid submerging the wooden ring in boiling water or dishwashers, which can cause natural wood to swell or crack.
- Hand Washing: When a deep clean is necessary, hand wash the strap in lukewarm water with gentle detergent, rinse thoroughly, and blot dry with a clean towel. Lay the holder flat on a countertop to air dry completely.
- Wood Conditioning: Once a year, rub a tiny drop of food-safe mineral oil or organic beeswax paste over the wooden ring with a soft cloth to protect the wood grain and enhance its natural honey glow.
- Coordinate Your Kitchen Fiber Arts: If you enjoy creating functional textile accents for your home, pair this towel holder with our crochet round cotton placemats pattern, our textured waffle stitch dishcloth pattern, our beginner-friendly modern crochet kitchen towel, or our elegant geo filet table runner pattern.
Maker Q&A: Ring Slippage, Strap Stretching & Sizing Adjustments
Can I use a larger or smaller wooden ring?
Yes! A 2.5-inch ring is the versatile sweet spot that fits both thin flour-sack tea towels and plush Turkish terry towels. If you only have 2-inch rings on hand, reduce your foundation row to 10 single crochets. For larger 3-inch rings, increase your foundation row to 14 single crochets.
My strap feels too stiff or tight when crocheting. Should I size up my hook?
While cotton can feel firmer in the hand than wool or acrylic, maintaining a firm hand prevents the strap from stretching out under the weight of wet towels. However, if your wrists ache, switch from a 4.0 mm to a 4.5 mm or 5.0 mm hook, but be sure not to loosen your tension excessively.
How can I make this pattern without a button?
If you prefer a buttonless slip-through version, continue crocheting the strap for 30 rows without creating a buttonhole. Fold the strap around your appliance bar, bring the top end down behind the wooden ring, and sew the top edge permanently to the foundation row using your yarn needle.
Pin This Tested Crochet Towel Holder Pattern to Pinterest
Ready to organize your kitchen in style?
Save this pin to your Pinterest crochet patterns or DIY home decor board so you have this tested wooden ring towel holder pattern ready for your next quick weekend craft session.

Made two of these over the weekend using leftover kitchen cotton from my stash. Stepping up half a hook size like you suggested kept my edges completely flat without curling into a bowl. Such a satisfying, modern project Julian!
My foundation chain feels a bit stiffer than the subsequent rows. Should I go up a full hook size just for the starting chain?
Spot on! Going up a half or full millimeter on just the foundation chain is a veteran maker trick. It gives the base stitches room to breathe so your bottom edge never pulls tight. Give that a try!