
There is a nostalgic warmth that fills the kitchen when a tray of freshly sliced citrus slowly bakes on a crisp autumn afternoon. Making dried orange slices in your home oven is one of the simplest, most rewarding natural craft projects of the season. As the moisture gently evaporates over several hours, the fleshy citrus pulp transforms into translucent stained-glass wheels of deep amber and burnt orange, fringed by firm, caramelized rinds that release a subtle, sweet aroma throughout your living spaces.
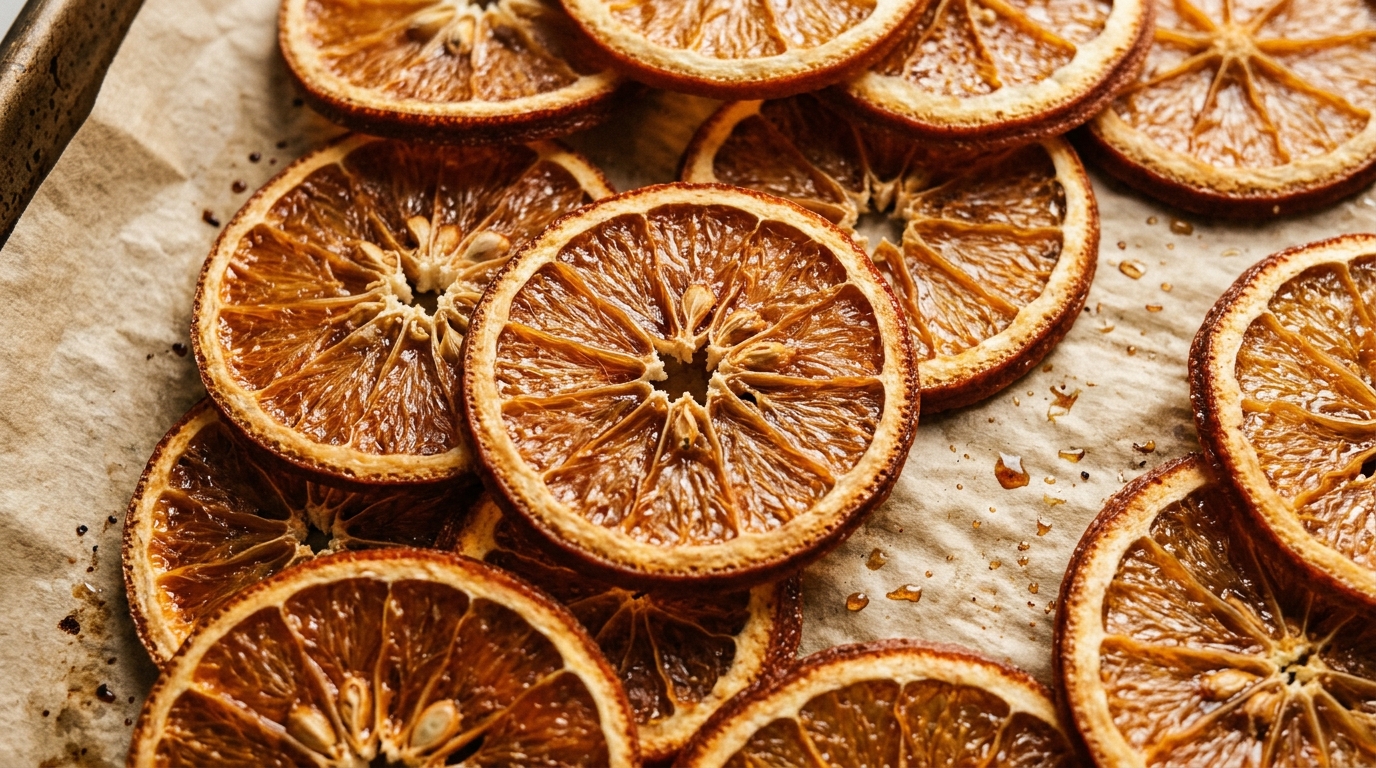
Unlike plastic holiday decor or synthetic potpourri, dehydrated orange slices offer a timeless, earthy aesthetic that connects your home to the changing seasons. Whether strung onto rustic jute twine for a fireplace mantel garland, tucked into botanical holiday wreaths, tied onto brown paper gift parcels, or simmered in a pot of spiced autumn water, these simple fruit wheels bring organic texture and warmth to every corner of your home. Here is our tested step-by-step oven method for achieving flat, perfectly dehydrated orange slices without burning.
Choosing the Best Citrus: Navel, Blood Orange & Mandarins
While any citrus fruit can be dried successfully, selecting the right variety influences the color depth, symmetry, and final appearance of your craft projects:
- Standard Navel Oranges: The most reliable choice for beginners. Navel oranges feature thick, sturdy rinds that hold their circular shape during baking, and they are seedless, ensuring clean, intact wheel spokes without gaping holes in the center.
- Blood Oranges: If you want dramatic, jewel-toned decor, blood oranges dehydrate into deep ruby and burgundy stained-glass disks. They look striking interspersed along neutral garlands alongside standard golden oranges.
- Cara Cara Oranges: These pink-fleshed navels dry into a warm coral-terracotta hue, offering a softer, muted earthy palette that complements minimalist home decor.
- Mandarins and Clementines: Smaller citrus fruits dehydrate approximately one hour faster than full-sized oranges. Their petite 1.5-inch diameter makes them ideal for cocktail garnishes, gift tags, and smaller wreath arrangements.
Slicing Thickness & The Parchment Paper Baking Setup
Consistent thickness is the single most critical factor in achieving evenly dried fruit wheels. If slices vary in thickness, thin edges will scorch while thicker centers remain moist and gummy:
- The Golden Thickness (1/8 to 1/4 Inch / 3 to 5 mm): Slices that are too thin (under 1/8 inch) curl upward at the edges and tear easily when threaded onto string. Slices thicker than 1/4 inch take upwards of six hours to dehydrate and risk harboring residual moisture that can spoil in storage.
- Using a Serrated Knife or Mandoline: A sharp serrated bread knife glides smoothly through citrus rind without crushing the delicate fruit segments or spurting juice. If using a mandoline slicer, use the safety guard and set the blade to 4 mm for effortless uniformity.
- The Double-Towel Blotting Technique: Before placing slices onto your baking sheet, arrange them in a single layer between two clean kitchen towels. Press firmly with your flat palms. Blotting absorbs surface juices upfront, cutting overall oven dehydration time by nearly 45 minutes.

Low-and-Slow Oven Dehydrating: Time & Temperature Rules
Dehydrating citrus is a gentle drying process, not high-heat roasting. Keeping your oven temperature low preserves the natural fruit sugars without browning them prematurely into dark molasses tones:
Oven Parameters for Translucent Slices
- Oven Temperature (175°F to 200°F / 80°C to 95°C): Set your oven to its lowest possible setting. If your oven’s lowest temperature is 200°F, prop the oven door open slightly with a wooden spoon handle to allow humidity to escape and maintain gentle airflow.
- Total Drying Duration (3 to 4.5 Hours): Slices require gradual drying. Baking too quickly darkens the fruit into brown disks instead of vibrant amber wheels.
- Wire Cooling Rack Method: For the most even airflow, place oven-safe wire cooling racks directly inside your rimmed baking sheets and arrange orange slices on top. This allows warm air to circulate beneath the slices, reducing the need for frequent flipping.

Step-by-Step Oven Drying & Mid-Bake Flipping Walkthrough
Follow these five sequential stages to make a batch of three to four dozen dehydrated citrus wheels:
1. Preheat and Prep Sheets: Preheat your oven to 200°F (95°C). Line two large rimmed baking sheets with unbleached parchment paper, or fit wire cooling racks inside the pans for optimal air circulation.
2. Slice and Blot: Using a sharp serrated knife, slice 4 to 5 firm navel oranges into uniform 1/8-inch wheels. Discard the stem and blossom ends. Lay slices across clean dish towels and press firmly with dry paper towels to remove excess juice.
3. Arrange Without Overlapping: Place orange wheels onto your prepared baking sheets in a single, neat layer. Ensure slices do not touch or overlap; direct airflow around each rim prevents edges from sticking together as they shrink.
4. Bake and Flip Every 45 Minutes: Slide pans onto the middle and upper oven racks. Every 45 minutes, carefully flip each slice using silicone tongs or clean fingers, and rotate the baking sheets top-to-bottom. Flipping prevents slices from curling and ensures even moisture evaporation from both surfaces.
5. The Doneness Test & Air Cure: Around the 3-hour mark, begin checking individual slices. Slices are done when the fruit pulp feels dry, leathery, and firm to the touch, with zero tacky juice when pinched between fingertips. Transfer finished slices to a wire cooling rack and let them air-cure at room temperature for 24 hours before crafting.

5 Mindful Autumn Crafts (Garlands, Wreaths & Simmer Pots)
Once your citrus wheels are completely cured, their versatile aesthetic lends itself to dozens of wholesome home projects:
- Rustic Mantel Garland: Using a large blunt embroidery needle, thread natural jute twine or baker’s twine through the top two pulp segments of each orange slice. Alternate with whole cinnamon sticks, dried bay leaves, and wooden craft beads. Hang across a fireplace mantel, bookshelf, or window frame.
- Autumn Stovetop Simmer Pots: Drop 4 to 5 dried orange slices into a small saucepan with fresh rosemary, a cinnamon stick, and two star anise pods. Simmer on low to fill your home with natural botanical scent. Explore our cinnamon orange simmer pot guide.
- Artisan Gift Wrapping Accents: Wrap gifts in plain brown kraft paper and tie with natural twine. Slip a single dried orange wheel and a sprig of dried lavender beneath the knot for an elegant botanical presentation. For more homemade gifting ideas, review our diy simmer pot gift kits.
- Botanical Wreath Embellishments: Use thin floral wire to attach clusters of three dried orange wheels to grapevine or dried floral wreaths. Combine with our tutorial on making diy beeswax wraps for a cozy afternoon of sustainable crafting.
- Holiday Tree Ornaments: Loop velvet ribbon through a single dried orange slice, tying a knot at the top. When hung near warm fairy lights, the amber citrus glow resembles stained glass. Make this part of your relaxing Sunday reset routine.
Long-Term Storage, Moisture Checks & Preventing Mold
How long will dried orange slices last?
When completely dehydrated and stored properly, dried orange slices will last between one to two years without spoiling. Because the water content has been removed, the fruit will not rot or mold as long as it remains sealed away from humidity.
How do I store them between holiday seasons?
Pack cured slices into an airtight glass mason jar or a metal tin with a tight-fitting lid. Slip a small food-safe silica gel packet into the jar to absorb any residual ambient humidity. Store the container in a cool, dark kitchen pantry cabinet away from direct sunlight.
Why did my dried oranges turn dark brown in the oven?
Browning happens when the oven temperature is too high (above 225°F) or when slices are left unattended without flipping. If your oven runs hot, lower the dial to 175°F and crack the door slightly to ensure gentle dehydration rather than baking.
Save This Dried Orange Slices Guide to Pinterest
Easy Oven Dried Orange Slices Tutorial
Save this autumn craft tutorial to your Pinterest DIY Crafts or Holiday Decor board. Learn how to dehydrate translucent dried orange slices in your oven for garlands, wreaths, and cozy simmer pots.
Leave a Comment