
Handmade kitchen textiles should do more than look charming folded next to the faucet; they need to withstand daily scrubbing, rinse out cleanly, and dry without sour odors. The waffle stitch is one of the most practical stitch architectures in crochet, combining raised front-post ridges with deep square pockets that trap lather and lift dried food residue effortlessly. Here is our tested, beginner-friendly pattern for an 8.5-inch square waffle stitch dishcloth that balances thick texture with quick-drying absorbency.
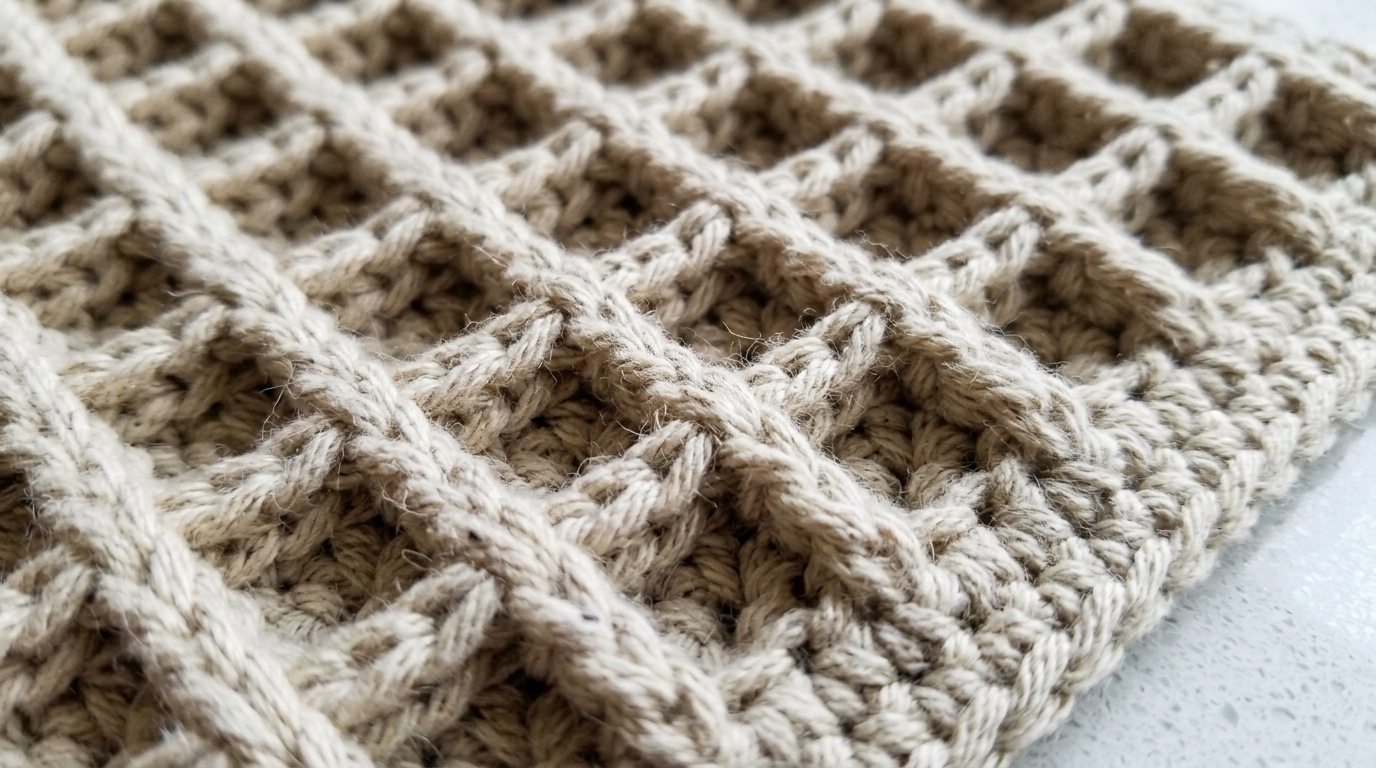
Unlike standard single-crochet cloths that can feel stiff and flat or open granny-stitch patterns that let lather slip through, the waffle stitch creates a three-dimensional honeycomb grid. By alternating standard double crochet stitches with front-post double crochet (FPDC), the fabric naturally builds double-thick ridges on one side while maintaining breathable recessed windows. It requires only basic stitches and a two-row repeat, making it an approachable weekend project that yields durable kitchen utility.
Why the Waffle Stitch Creates Exceptional Kitchen Scrubbing Power
The structural geometry of the waffle stitch provides several clear functional advantages over flat crochet stitches:
- Dual-Action Cleaning Surface: The raised structural ribs provide gentle mechanical friction for dislodging cooked-on sauces without scratching non-stick cookware or delicate ceramics.
- Micro-Reservoir Lather Pockets: The recessed square grid holds soapy foam close to the surface, creating richer suds with less dish soap during washing.
- Breathable Airflow Channels: Despite its thick texture, the waffle structure contains natural ventilation gaps within the recessed stitches, allowing the cloth to dry significantly faster than solid thermal stitch alternatives.
- Substantial Hand Weight: At approximately 45 grams of worsted cotton per cloth, the finished square feels substantial in hand and retains its shape through dozens of hot laundry cycles.
Maker’s Materials Blueprint: Hook Gauge, Yarn Yardage & Sizing

Selecting the proper yarn fiber and hook size is essential to ensure your cloth remains absorbent and supple rather than rigid like cardboard:
- Yarn Fiber (Non-Negotiable): Always choose 100% unmercerized kitchen cotton (such as Lily Sugar’n Cream, Dishie by KnitPicks, or Lion Brand 24/7 Cotton). Never use acrylic, polyester, or wool blends—synthetic fibers repel water, hold grease, and melt against hot cookware, while wool will felt in hot wash cycles. As we proved in our cotton vs acrylic yarn kitchen test, unmercerized cotton absorbs three times its dry weight in water.
- Yardage Needed: Approximately 85 to 90 yards (78 to 82 meters) of medium #4 worsted weight cotton per dishcloth. One standard 120-yard skein comfortably produces one dishcloth with leftover yarn for small coasters.
- Hook Size: A 5.0 mm (US Size H/8) ergonomic crochet hook. While cotton yarn labels often recommend a 4.5 mm hook, sizing up to 5.0 mm creates softer drape and allows post stitches to breathe without stiffening the fabric.
- Notions: Tapestry yarn needle with a blunt tip, sharp scissors, and a flexible tape measure.
- Finished Dimensions: Approximately 8.5 inches by 8.5 inches (21.5 cm x 21.5 cm) square after a simple single-crochet border.
- Gauge: 16 stitches and 10 rows in waffle stitch pattern = 4 inches (10 cm). Matching exact gauge is not critical for dishcloths, but maintaining consistent tension ensures clean square edges.
Step-by-Step Foundation Chain & Setup Rows Walkthrough
The waffle stitch requires a foundation chain in a multiple of 3 plus 4 extra chains (to account for the starting double crochet and edge turning chains). We will use a starting chain of 31 for an 8.5-inch cloth:
Foundation Chain:
Chain 31 loosely using your 5.0 mm hook. If you tend to work tight chains, consider chaining with a 5.5 mm hook and switching back to your 5.0 mm hook for Row 1 to prevent the bottom edge from bowing inward.
Row 1 (Setup Row):
Work 1 double crochet (dc) into the 3rd chain from your hook (the skipped 2 chains count as your first double crochet). Work 1 dc into each remaining chain across to the end. You should have exactly 29 double crochet stitches. Turn your work.
Row 2 (First Pattern Row):
Chain 2 (counts as first dc throughout). Skip the first stitch. *Work 1 front-post double crochet (FPDC) around the post of the next stitch, then work 1 regular dc into the top of each of the next 2 stitches.* Repeat from * to * across until 2 stitches remain. Work 1 FPDC around the next-to-last stitch, then work 1 regular dc into the top of the turning chain-2. Turn your work.

Row 3 (Second Pattern Row – Closing the Grid):
Chain 2. Skip the first stitch. *Work 1 regular dc into the top of the next stitch (which was the FPDC in the row below), then work 1 FPDC around each of the next 2 stitches.* Repeat from * to * across until 2 stitches remain. Work 1 regular dc into the next stitch, then work 1 regular dc into the top of the turning chain-2. Turn your work.
Rows 4 through 19:
Repeat Rows 2 and 3 sequentially until you have completed 19 rows total (or until the cloth measures approximately 8 inches square from the foundation edge). End on a Row 3 repeat to ensure a symmetrical top edge before starting the border.
Mastering Front-Post Double Crochet (FPDC) Ridges Without Gaps
If you have never worked post stitches before, the motion is straightforward once you visualize where the hook travels:
- Yarn Over First: Wrap yarn over your hook just like a standard double crochet.
- Insert Around the Post: Instead of inserting your hook into the top horizontal “V” of the stitch, insert your hook from the front of the fabric to the back, pass behind the vertical body (post) of the target stitch, and emerge back out through the front on the other side of the post.
- Pull Up to Height: Yarn over and pull a loop through. Critical note: Draw this loop up slightly so it matches the height of your hook. Pulling too tightly creates puckered holes along the base of your waffle columns.
- Complete the Stitch: Yarn over and pull through two loops; yarn over and pull through the remaining two loops.
Working a Clean Single-Crochet Border with Hanging Loop
Adding a crisp perimeter frame squares up row-end edges and provides an optional corner hanging loop:
- Border Round 1: Do not fasten off at the end of Row 19. Chain 1. Work single crochet (sc) evenly across the top edge. In the corner, work (1 sc, ch 2, 1 sc) to turn. Down the side edges, work approximately 2 single crochets into the raw edge of each double crochet row end (about 38 sc per side). In the next corner, work (1 sc, ch 2, 1 sc). Single crochet across the bottom foundation chain, corner turn, and single crochet up the remaining side. Join with a slip stitch to the first sc.
- Optional Hanging Loop: When you reach your final corner, slip stitch into the corner space, chain 10, and slip stitch back into the same corner space. Turn and work 12 single crochets directly over the chain loop for extra sturdiness, then fasten off.
- Weaving Tails: Thread your yarn tail onto a tapestry needle. Weave the end through the dense base of the single-crochet border for at least 1.5 inches, reverse direction for 1 inch, and snip clean. The friction of unmercerized cotton locks tails securely without unraveling.
Washing, Shrinkage & Everyday Kitchen Counter Styling

Proper home laundering keeps your handmade cotton textiles hygienic, fresh, and absorbent for years:
- Initial Wash Shrinkage: Unmercerized cotton naturally shrinks 5% to 8% during its first hot wash and dry cycle. This shrinkage is desirable—it tightens the waffle pockets, making the fabric denser and even more scrub-resistant.
- Skip Fabric Softener: Commercial liquid softeners coat cotton fibers in a hydrophobic silicone film that dramatically reduces water absorption. Wash dishcloths in warm or hot water with regular detergent, adding 1/2 cup of white distilled vinegar to the rinse cycle to strip hard water minerals naturally.
- Explore Coordinated Kitchen Projects: If you enjoy crafting functional home textiles, expand your kitchen collection with our tested double-thick textured crochet hot pads, review our empirical 15-wash dishcloth care guide, or master the ultra-dense thermal crochet stitch tutorial.
Maker Q&A: Edge Tension, Curling & Stitch Recovery
Why are the side edges of my waffle dishcloth pulling inward?
This almost always occurs when the turning chain-2 is pulled too tightly, or if post stitches are drawn too short. Ensure your chain-2 has gentle slack, and always pull your working loop up to full row height when yarning over for the FPDC.
Can I make this as a full-sized bath washcloth?
Yes! To make an 11-inch bath washcloth, chain 37 to start (or any multiple of 3 plus 4). Work the pattern repeat for 25 rows before adding the single-crochet border. Cotton waffle texture provides wonderful gentle skin exfoliation in the shower.
Do I need to wet-block this dishcloth before using it?
No formal blocking is required. Because kitchen cotton shrinks slightly in the dryer and blooms upon first washing, simply toss your finished cloth into your regular laundry cycle and pull it gently into a square shape while warm from the dryer.
Save This Tested Crochet Dishcloth Pattern to Pinterest
Ready to hook up your own kitchen dishcloth?
Save this pin to your crochet patterns board on Pinterest so you have the stitch counts, gauge notes, and border instructions ready for your next project.

Hooked this waffle stitch blanket for my niece’s nursery! Once the repeating rows clicked after row 4, it was the most relaxing project to work on in the evenings. The texture is so squishy and thick without being stiff at all. Thank you Julian!
Hi Julian! How many yards of yarn should I budget if I want to upscale this to a generous adult throw?
For a full 50×60-inch adult throw in waffle stitch (which is a bit of a yarn eater due to the front-post double crochets), you’ll want to budget around 2,800 to 3,200 yards of DK or worsted weight yarn. The cozy, squishy result is worth every yard!