
Handmade autumn decor often leans toward fussy novelty projects, but a minimalist ribbed crochet pumpkin brings warmth and tactile texture to open shelving, coffee tables, and dining vignettes without looking cartoonish. Instead of working complicated three-dimensional decreases in continuous spiral rounds, this project relies on a clever geometric secret: crocheting a simple flat rectangle using back-loop-only single crochet stitches, seaming the short edges into a cylinder, and gathering the top and bottom with sturdy cinching passes. In this maker tutorial, we share tested row counts, ideal yarn choices for firm stitch definition, and how to anchor a fragrant cinnamon stick stem with clean jute twine indentations.
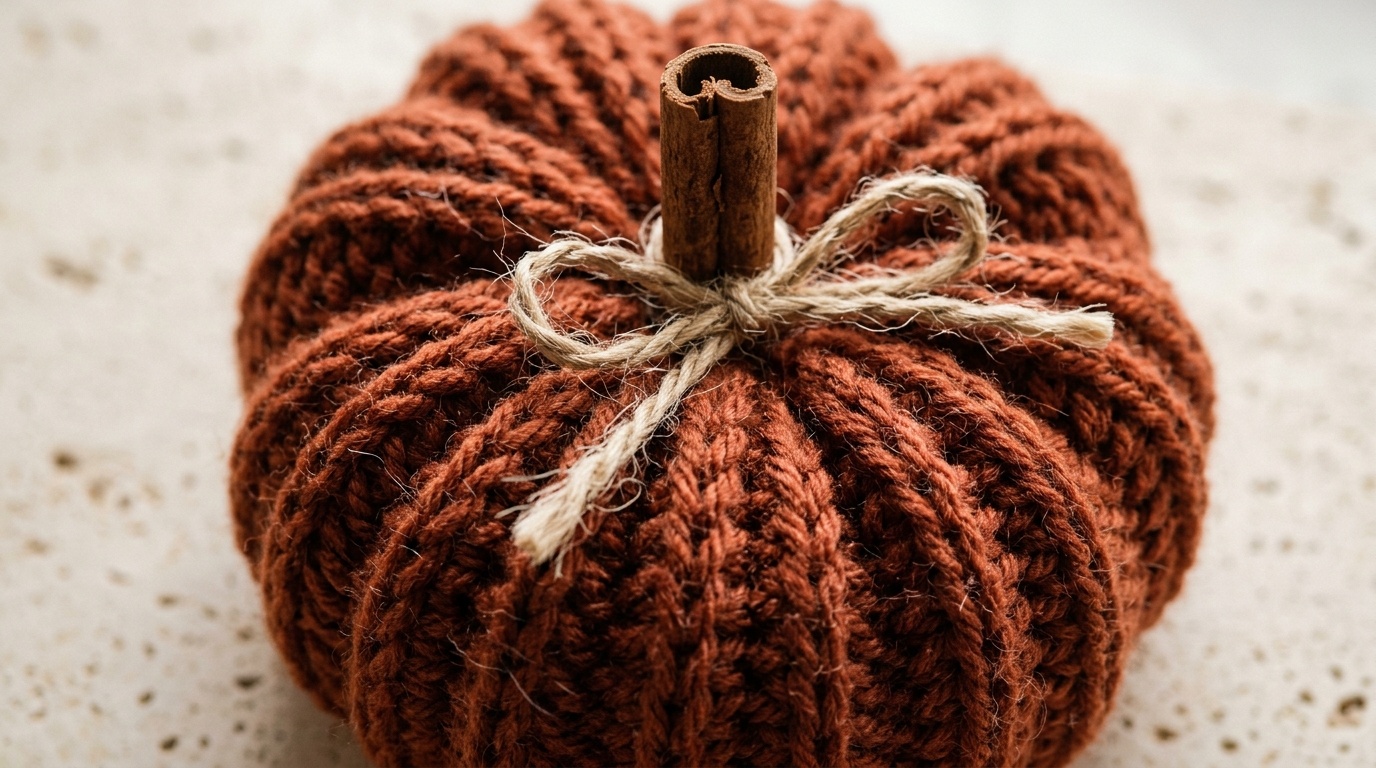
Working flat eliminates the need for stitch markers on every round and allows you to adjust the finished height and diameter simply by changing your starting chain length and total row count. Whether you are using up leftover worsted yarn from previous winter throws or crafting an earth-toned centerpiece trio for Thanksgiving, this tested pattern takes roughly ninety minutes from foundation chain to final stem knot.
Maker’s Project Blueprint: Dimensions, Gauge & Supplies

To produce a medium table pumpkin measuring approximately 6 inches in diameter and 3.5 inches in height (excluding the stem), gather the following tested materials:
- Yarn: 85 yards (approximately 45 grams) of medium weight category 4 worsted yarn. Warm terracotta, wheat cream, or sage green work exceptionally well for organic modern decor.
- Crochet Hook: 5.0 mm (US Size H/8). Using a hook slightly smaller than the yarn band recommendation produces dense, tight stitches that prevent polyfill from poking through the fabric ridges.
- Stem: 1 whole 3-inch natural cinnamon stick. Ceylon or cassia sticks offer natural woody texture and release a subtle autumn fragrance in warm living rooms.
- Stuffing: 1 to 1.5 ounces of polyester fiberfill. Avoid overstuffing, which flattens the distinct accordion ribs.
- Finishing Tools: Blunt steel tapestry needle, sharp brass embroidery scissors, and 18 inches of 2 mm natural jute twine or natural cotton cord.
- Gauge: 16 stitches and 14 rows in back-loop single crochet = 4 inches (10 cm). Exact gauge is not critical, but consistent tension keeps the cylinder edges neat.
Yarn Selection: Why Worsted Acrylic-Wool Blend Holds Deep Ribs
In our studio tests comparing pure unmercerized cotton, 100% standard acrylic, and an 80/20 acrylic-wool blend, the fiber blend produced the sharpest structural definition:
Studio Fiber Assessment for Pumpkin Decor
- Acrylic-Wool Blends (Editor’s Pick): Wool adds natural spring and loft that rebounds after cinching, while acrylic ensures the piece holds its spherical shape over multiple holiday seasons without sagging.
- 100% Cotton Yarn: As detailed in our studio comparison of cotton vs acrylic yarn for home crafts, cotton provides clean stitch definition but lacks elasticity, making the top and bottom gathering noticeably stiffer to cinch tightly.
- Chunky Chenille or Velvet Yarns: While delightfully soft, fluffy yarns obscure individual stitch loops and make identifying the back loop difficult for beginners. Save velvet for simple spiral rounds.
Step-by-Step Foundation Chain & Back-Loop Ribbing Sequence

Follow this exact stitch-by-stitch walkthrough to create the ribbed rectangle:
- Foundation Chain: Tie a slip knot, leaving a 24-inch starting yarn tail (you will use this tail later to cinch the base). Chain 25 loosely. The length of this chain determines the height of your finished pumpkin.
- Row 1: Insert your hook into the second chain from the hook. Work 1 single crochet in each chain across to the end. Turn. (24 single crochet).
- Row 2 (Establish Ribbing): Chain 1 (does not count as a stitch here or throughout). Working strictly into the back loop only (BLO) of each stitch across, work 1 single crochet in each of the 24 stitches. Turn.
- Rows 3 through 48: Repeat Row 2. As you turn your work back and forth, the unworked front loops form crisp accordion folds on alternating sides. After Row 48, your piece should measure approximately 6 inches tall by 13 inches wide.
- Fasten Off: Cut the working yarn, leaving a long 30-inch tail for seaming the tube and shaping the pumpkin segments. Do not weave it in yet.
Seaming the Tube & The Cinched Base Technique
Transforming the flat ribbed rectangle into a structured three-dimensional sphere is where the assembly technique comes together:
- Step 1: Join the Short Edges: Fold the rectangle in half with short edges touching, matching Row 1 to Row 48. Thread your yarn needle with the long 30-inch yarn tail. Slip stitch or whip stitch the two ends together through the back loops only. This creates a continuous ribbed tube where the seam blends invisibly into the existing ridge pattern.
- Step 2: Cinch the Bottom Opening: Thread your 24-inch starting tail onto the tapestry needle. Turn the ribbed tube so the base faces upward. Weave the needle in and out of every second row around the circumference of the lower edge (running a simple gathering basting stitch roughly 1/4 inch inward from the rim).
- Step 3: Pull Tight and Secure: Pull the yarn tail firmly like a drawstring bag until the opening closes completely into a tight, gathered puckered circle. Pass the needle through the center bundle two or three times to lock the gather, then knot securely on the interior. Push the remaining tail inside the tube.
Fiberfill Density, Cinnamon Stick Stem & Twine Indentations
The finishing steps give the pumpkin its squat, organic shape and charming vintage farmhouse profile:
- Step 1: Gentle Stuffing: Turn the piece right side out so the gathered base sits flat on your table. Tease small clumps of polyester fiberfill with your fingers and pack them gently into the tube. You want the pumpkin plump and supportive, but not so rock-hard that the stitches stretch and expose white stuffing.
- Step 2: Cinch the Top Around the Stem: Thread your long 30-inch working tail. Just like the base, weave a gathering running stitch around the top rim of the cylinder. Place your 3-inch cinnamon stick vertically into the center opening so that 1.5 inches sits recessed in the stuffing and 1.5 inches protrudes above the rim. Pull the drawstring firmly to cinch the fabric snug against the cinnamon stick. Knot the yarn securely at the base of the stick.
- Step 3: Sculpt the Segment Indentations: Take the remaining long yarn tail (or cut a fresh 36-inch strand of jute twine). Insert your needle down through the center hole beside the stem, exit through the center base, and wrap the yarn up around the outside of the pumpkin along a natural rib valley. Re-insert through the center and pull with moderate tension. Repeat this 5 to 6 times around the pumpkin to create deep, organic lobes. Knot and hide the yarn tail inside.
- Step 4: Jute Twine Bow Accent: Wrap a 10-inch piece of natural jute twine around the cinnamon stick stem and tie a simple shoestring bow for clean artisan appeal.
Washing, Reshaping & Living Room Coffee Table Styling Coordinates

Because these decorative pumpkins are made from acrylic and wool yarn, seasonal maintenance is straightforward:
- Spot Cleaning & Dusting: Keep your pumpkins fresh across the autumn season by giving them a gentle shake outdoors or using the soft brush attachment of your vacuum cleaner on low suction. If liquid spills occur, spot clean with a damp microfiber cloth and mild wool wash; never submerge the whole pumpkin in water, as wet cinnamon sticks can bleed tannins onto light yarn.
- Off-Season Storage: At the end of November, store your crochet pumpkins in breathable cotton storage totes with cedar balls. Avoid squishing them under heavy blankets so the fiberfill retains its loft for next year.
- Coordinating Table Decor: Pair your handmade pumpkin trio with other organic handcrafted accents. Complement your kitchen island with our crochet modern hanging fruit basket or protect table surfaces using our heat-resistant modern crochet farmhouse trivet.
- Texture & Blocking Guides: If your edges tend to pull tightly during back-loop stitching, review our tutorial on textured crochet stitches for home decor and our proven blocking guide on how to block crochet placemats flat.
- The Gathering Bridge: If you are hosting friends or family this fall, coordinate your pumpkin centerpiece with Claire Montgomery’s festive decorating blueprints in our budget natural autumn centerpiece ideas and moody candlelit fall dinner table setting guide.
Save This Modern Crochet Pumpkin Pattern to Pinterest
Pin This Autumn Craft Blueprint to Your Crochet Board
Create cozy, minimalist fall decor with simple flat-rectangle crochet techniques. Save this pattern to your Modern Crochet Patterns, Fall Decor DIY, or Autumn Home Crafts boards on Pinterest so you have the row counts, cinnamon stem tips, and shaping steps ready for your next cozy weekend project.
Leave a Comment