
Every autumn, luxury home decor brands like Pottery Barn, Anthropologie, and Crate & Barrel release stunning collections of handcrafted terracotta pumpkins that cost anywhere from to upwards of each. While their sun-baked texture and aged European patina are undeniably breathtaking, spending three figures on temporary seasonal decor simply is not necessary. With this viral DIY faux terracotta pumpkin makeover, you can transform cheap, neon-orange dollar store plastic or foam pumpkins into museum-worthy artisanal pottery for under .
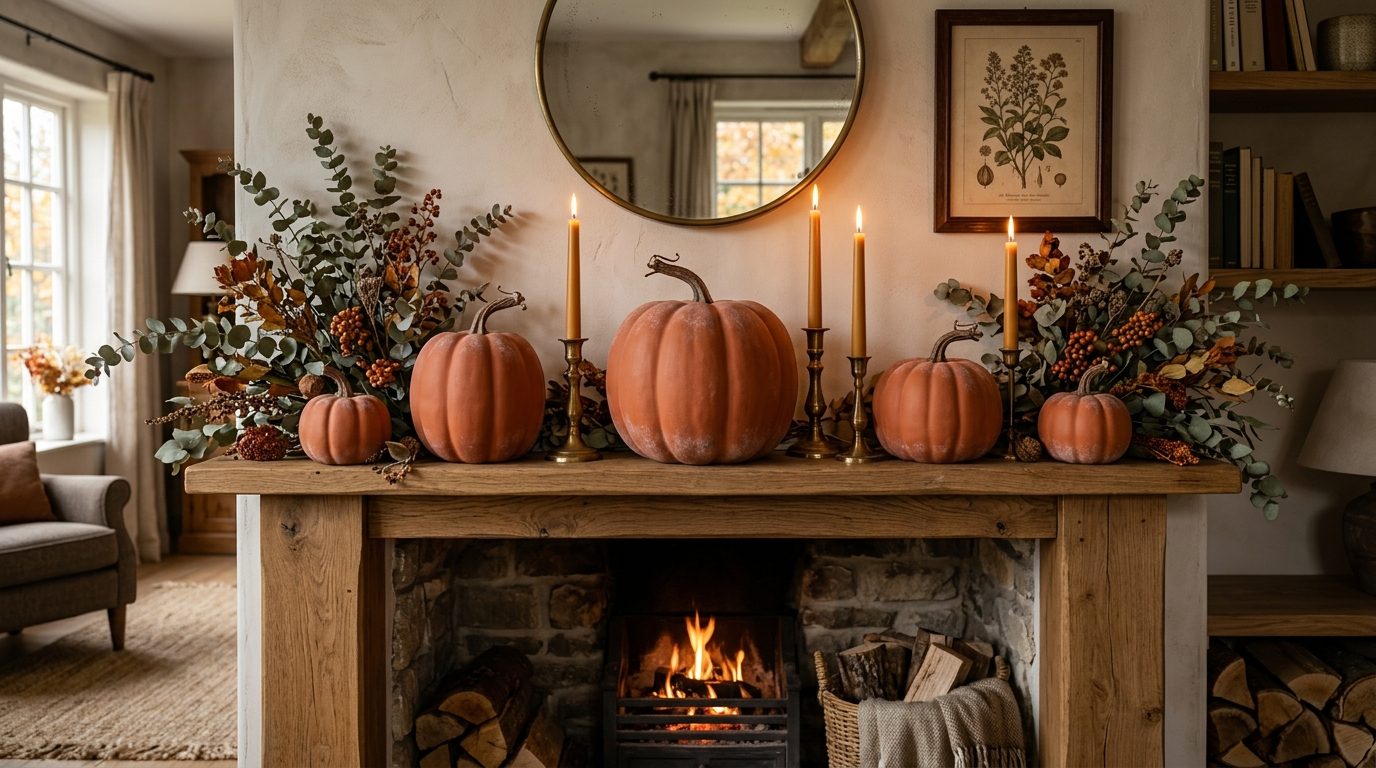
The secret lies in an ingenious household chemistry trick: combining flat matte acrylic paint with ordinary baking soda and a finishing dusting of flour. This creates a gritty, porous texture that perfectly mimics authentic kiln-fired earthenware clay. Here is the complete step-by-step masterclass, including exact ingredient ratios, brush techniques, and pro styling formulas.
The Master Supply Checklist & Golden Ratio
Before beginning, gather your supplies. You do not need expensive art materials—everything can be sourced from a craft store, dollar store, or your kitchen pantry:

The Golden Faux-Ceramic Ratio
- 1 Cup Ultra-Matte Acrylic Paint: Blend 2 parts terracotta orange, 1 part warm beige/taupe, and 1 drop of chocolate brown.
- 2 to 3 Tablespoons Baking Soda: Provides the micro-grit and volcanic foaming reaction that replicates porous clay.
- 1 Teaspoon Cornstarch (Optional Pro Hack): Enhances the velvety, chalk-like ultra-matte finish once completely dry.
- All-Purpose Flour (for finishing): Used to dust the damp surface for an authentic weathered, powdery mineral patina.
Step 1: Prep the Pumpkins & Remove Plastic Stems
Nothing gives away a cheap faux pumpkin faster than a shiny, injection-molded green plastic stem. Gently twist and pull the artificial plastic stem out of each pumpkin. Most foam pumpkins have stems held in by a short plastic peg that pulls out effortlessly.
If your pumpkins have a slick, glossy plastic sheen or glitter coating, give them a quick 30-second rubdown with 120-grit sandpaper. Lightly scuffing the surface creates microscopic grooves, ensuring the heavy baking soda paint mixture bonds permanently without flaking off down the road.
Step 2: Mix the Baking Soda Paint Slurry
In a small bowl, pour in your matte acrylic paint. Slowly sprinkle in the baking soda while stirring briskly with a craft stick. You will immediately notice a slight foaming reaction as the sodium bicarbonate aerates the paint emulsion.
Consistency Check: Your mixture should achieve the thick, velvety consistency of rich pancake batter. If it is too watery, it will pool in the pumpkin grooves and drip. If it becomes pasty like frosting, stir in a teaspoon of warm water until it glides smoothly on your brush.
Step 3: Apply with the “Cross-Hatch” Potter’s Technique
Using a coarse natural-bristle chip brush, apply your first generous coat across the entire pumpkin, starting from the top indentation down toward the base.

Rather than dragging the brush in long, flat strokes, use a dabbing and stippling motion. Leave intentional subtle ridges and texture peaks. Allow the first coat to dry for 30–45 minutes until completely matte to the touch. Then, apply a second thin coat using perpendicular cross-hatch strokes to ensure 100% opaque coverage of the original orange or white base.
Step 4: The Viral “Flour Dusting” Mineral Patina Hack
Real Mediterranean and Tuscan terracotta planters are famous for their white, powdery mineral bloom (efflorescence) that naturally develops over decades of weathering. Here is how you replicate that heirloom look in 60 seconds:
- While your second paint coat is roughly 80% dry (cool and tacky to the touch, but not wet), dip a clean, fluffy makeup blush brush into ordinary white kitchen flour.
- Lightly dust the flour into the deep crevices, ribs, and around the top crown of the pumpkin.
- Using your fingers or a soft dry paper towel, gently buff and blend the flour across the surface. The flour bonds with the micro-textured baking soda paint, leaving an authentic chalky white bloom that will never wipe away.
Step 5: Attach Foraged Organic Wood Stems
To finalize the high-end look, head outdoors with a pair of garden pruners. Forage short, gnarled tree branches, birch twigs, or grapevine stems that are roughly 0.5 to 1 inch thick. Cut them into 2- to 3-inch lengths with an angled pruning cut.
Add a generous dollop of hot glue into the top hole of the pumpkin and firmly seat your natural wood stem at a slight angle. The combination of genuine organic bark alongside the matte earthenware finish fools the eye every single time.
3 Ways to Style Faux Terracotta Pumpkins in an Earthy Home
Once your DIY terracotta pumpkins are fully cured (24 hours), display them throughout your home using these three designer styling formulas:

- The Modern Dining Table Centerpiece: Down the center of your table, lay a crinkled natural oatmeal linen runner. Cluster three pumpkins in staggered sizes (large, medium, small) along the center, woven through with dried eucalyptus branches and ribbed brass taper candlesticks.
- The Organic Fireplace Mantel: Balance your mantelpiece by placing your largest terracotta pumpkin on one end nestled beside a stoneware crock of branches, with two smaller pumpkins anchoring the opposite end next to stacked vintage books.
- The Welcoming Entryway Console: Arrange two pumpkins inside a shallow round travertine bowl or rustic wooden dough bowl on your front foyer credenza to greet guests with seasonal warmth.
Cost Breakdown: DIY vs. High-End Retailer
Here is the exact cost comparison of crafting a trio of faux terracotta pumpkins versus buying them at luxury home decor stores:
| Expense Item | Pottery Barn / Anthropologie (Set of 3) | DIY Baking Soda Hack (Set of 3) |
|---|---|---|
| Pumpkin Bases | .00 – .00 | .75 (Dollar Tree or thrift store) |
| Paint & Texturing Media | Included in purchase | .50 (Craft acrylic + kitchen baking soda) |
| Natural Twig Stems | Included in purchase | zsh.00 (Foraged from yard or park) |
| Shipping / Taxes | .00 – .00 | zsh.50 |
| Total Cost | .00 – .00 | .75 (Over 95% Savings!) |
Frequently Asked Questions
What type of paint works best for baking soda terracotta?
Always choose matte, chalk, or flat interior latex acrylic paint. Avoid satin, semi-gloss, or high-gloss paints, as their synthetic sheen will prevent the baking soda from creating an authentic, porous stone appearance.
Can you display DIY baking soda pumpkins outdoors on a porch?
Yes, but only on a covered porch protected from direct rain. If moisture touches the unsealed baking soda and flour mixture, it may soften. To make them water-resistant for an open patio, spray them with two light coats of an ultra-matte clear acrylic sealer (such as Krylon Matte Finish).
Does the flour smell or attract bugs over time?
No. Because you are only buffing a minute trace of flour into the semi-cured acrylic paint emulsion, the acrylic binders encapsulate the starch completely. Once dried and cured, it is completely odorless and will not attract insects.
📌 Save This DIY Autumn Craft to Pinterest
Planning your fall home decorating? Pin this tutorial to your Fall Crafts or DIY Home Decor board on Pinterest so you have the exact baking soda paint recipe ready when craft night arrives!
Save To PinterestBringing Artisanal Warmth Home
The beauty of this faux terracotta makeover is that it embraces imperfection. Real artisanal ceramics feature subtle texture ridges, varied tonal depth, and aged powdery blooms. By spending thirty minutes with simple pantry ingredients and dollar store pumpkins, you craft custom decor pieces with enduring charm that you will proudly display year after year.
Leave a Comment