
When brisk autumn mornings and chilly winter walks set in, a cozy twisted ear warmer is one of the most rewarding small projects you can make with a hook and a single skein of yarn. Worked flat in a stretchy half double crochet back-loop ribbing and finished with an interlocking four-layer twist seam, this tested beginner pattern creates an elegant, boutique-style headband that keeps ears comfortably warm without flattening your hair.
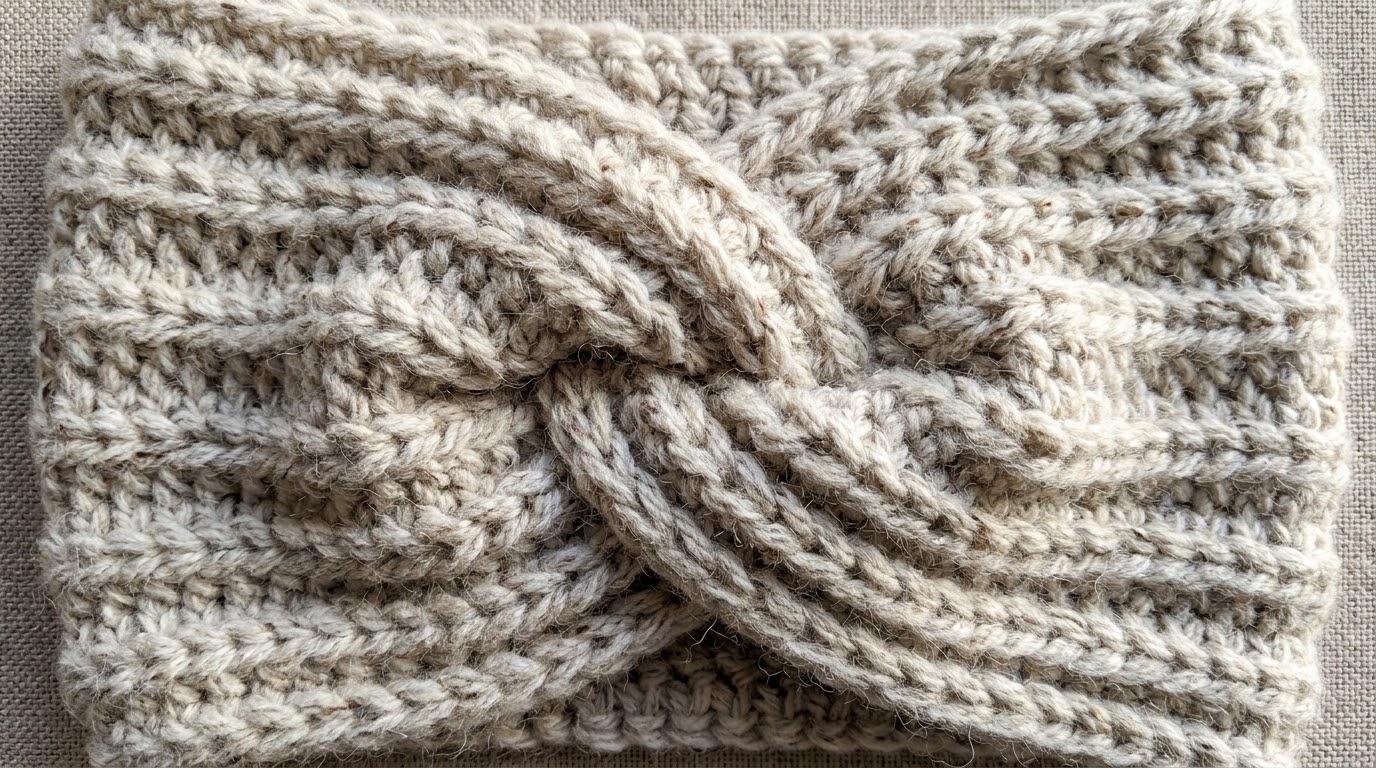
Unlike bulky winter beanies that require crown decreases or working in tight rounds, this ear warmer is worked entirely as a flat rectangle. By working your stitches strictly through the back loop of every row, the fabric naturally develops deep accordion ridges that mimic the elasticity of traditional knit ribbing. Once your rectangle reaches the correct circumference, a simple folded sandwich seam joins the ends into a clean center twist in under 90 minutes of relaxing crafting time.
Maker’s Project Blueprint: Hook Gauge, Yarn Yardage & Sizing
Before casting on your foundation chain, reviewing these project specifications ensures your ear warmer fits comfortably around the head with approximately 2 inches of negative ease:
| Pattern Parameter | Studio Specification (Adult Standard) | Adjusting for Other Sizes |
|---|---|---|
| Finished Width | 5 inches (12.5 cm) | Chain fewer/more foundation stitches in 1-inch increments |
| Finished Length (Flat) | 19.5 inches (49.5 cm) unseamed | Work fewer rows for child (17.5″) or more for large adult (20.5″) |
| Head Circumference | Fits heads 21 to 23 inches (53–58 cm) | Standard adult size with comfortable 2″ negative ease |
| Recommended Hook | 5.5 mm (US I-9) ergonomic hook | Drop to 5.0 mm if your tension runs very loose |
| Yarn Yardage | Approx. 110 to 125 yards (100–115 m) | Single 100g skein of worsted or aran weight yarn |
| Gauge Swatch | 14 sts x 10 rows in HDC BLO = 4 x 4 inches | Measure swatch relaxed on flat surface without stretching |
Yarn Fiber Comparison: Why Wool Blends Outperform 100% Acrylic

Selecting the right yarn fiber directly influences both the warmth and the shape retention of your ear warmer:
- Worsted Wool-Acrylic Blends (Recommended): Yarns with 20% to 50% wool blended with premium acrylic (such as Lion Brand Wool-Ease or Patons Classic Wool Worsted) provide the ideal balance. The natural wool crimp gives the headband thermal warmth and resilient bounce, while the acrylic fibers prevent scratchiness and make hand washing hassle-free.
- 100% Cotton Yarns (Avoid for Headbands): While unmercerized cotton is unbeatable for durable kitchen projects like our textured cotton kitchen towel or ring towel holder, cotton fibers lack natural elasticity. A cotton ear warmer will stretch out during wear and fail to snap back snugly over the ears.
- 100% Acrylic Yarns (Budget Option): High-twist anti-pilling acrylic works nicely if wool sensitivities are a concern. Look for soft, pliable worsted acrylics with clean stitch definition so the ribbing ridges stay crisp.
Step-by-Step Foundation Chain & Ribbing Sequence
Follow this exact stitch progression to crochet your rectangular headband body:
Foundation Chain:
Using your 5.5 mm hook and leaving an 8-inch tail for weaving, chain 18 loosely. (This creates a finished headband width of approximately 5 inches. For a narrower 4-inch headband, chain 15 instead).
Row 1 (Foundation HDC):
Half double crochet (HDC) into the third chain from the hook (the skipped 2 chains count as your turning chain). Work 1 HDC into each remaining chain across. Turn. [16 HDC total].
Row 2 (Back Loop Ribbing Setup):
Chain 1 (does not count as a stitch throughout). Looking directly down at the top of your row, notice each stitch has two horizontal strands: a front loop closest to you and a back loop farther away. Insert your hook only under the back loop (BLO) of the very first stitch and work 1 HDC. Work 1 HDC BLO into each stitch across, ending with 1 HDC BLO in the final stitch. Turn. [16 HDC].
Rows 3 through 50 (Building Accordion Ribbing):
Repeat Row 2 until your piece measures approximately 19 to 19.5 inches (48–50 cm) un-stretched, or until it wraps comfortably around your head. Fasten off, leaving a long 14-inch tail for assembling the twist seam.
The Interlocking Four-Layer Twist Seam in Action

The signature twisted knot looks intricate, but it is created through one ingenious folding technique:
- Step 1 (Lay Flat): Lay your finished crocheted rectangle flat horizontally on your work table with the right side facing up.
- Step 2 (Fold Each End in Half): Bring the left and right short ends toward the center so they meet. Pinch each short end in half lengthwise so they form two narrow “U” or “C” shapes facing each other.
- Step 3 (Interlock the 4 Layers): Slide the two folded ends together so their folds alternate like interlocking fingers: Layer 1 (Left fold outside), Layer 2 (Right fold inside), Layer 3 (Left fold inside), Layer 4 (Right fold outside). You now have an aligned four-layer sandwich.
- Step 4 (Sew Through All 4 Layers): Thread your 14-inch yarn tail onto a large-eye tapestry needle. Carefully whip-stitch or mattress-stitch through all 4 thicknesses, making sure your needle catches every layer on every pass so no interior edges slip out.
- Step 5 (Turn Right-Side Out): Weave in your yarn tail securely, trim excess yarn, and flip the headband right-side out. The seamed layers will naturally bloom into a clean, centered twist knot.
Julian’s Studio Tips for Even Tension & Straight Edges
Working in the back loops can sometimes cause edges to slant or curl if tension fluctuates. Here are three tested studio adjustments:
- Count Your Stitches Every 10 Rows: It is remarkably easy to accidentally skip the very first stitch or miss the subtle final stitch at the end of a back-loop row. Maintaining an exact 16-stitch count guarantees parallel sides.
- Catch Both Loops on the Final Stitch (Optional): If you find the outer edge of your headband looks loose or scalloped, work your final HDC of each row through both loops rather than just the back loop. This creates a firmer, cleaner border.
- Steam Block Lightly Before Seaming: Give your completed rectangle a gentle steam blocking on an ironing board (holding the iron 1 inch away without pressing). Steaming relaxes the fibers and ensures crisp, uniform accordion ridges.
Washing, Reshaping & Styling with Autumn Outerwear

Because wool-blend accessories sit directly against the forehead and hair, proper care keeps them fresh and pilling-free:
- Gentle Hand Washing: Submerge your ear warmer in a basin of cool water with a drop of no-rinse wool wash or gentle shampoo. Press soapy water through the fibers without wringing or rubbing.
- Towel Roll Drying: Roll the headband inside a clean terry bath towel to extract excess moisture, then lay it flat on a drying rack to air-dry overnight. Never hang to dry, as wet weight will elongate the ribbing.
- Coordinated Wardrobe Styling: Pair your ear warmer with warm wool trench coats, chunky knit scarves, and cozy denim for outdoor autumn strolls. For more cozy home textiles, explore our tested moss stitch blanket pattern or our chunky basketweave throw blanket.
Maker Q&A: Twisted Ear Warmer Troubleshooting
My twist knot has a gap or hole in the center. What happened?
A gap in the center twist occurs when the needle didn’t pass completely through all 4 layers during seaming. Unpick the seam, re-align the four-layer sandwich, and ensure your tapestry needle pierces through every single layer on each pass.
Can I make this ear warmer using bulky or chunky yarn?
Yes! If using bulky (weight 5) yarn, use a 6.5 mm hook and chain 12 to 14 stitches for a 5-inch width. Work approximately 36 to 40 rows to reach 19 inches, then seam using the same four-layer technique.
How do I adjust this pattern for children?
To fit a child (ages 4 to 10), chain 14 stitches for a 4-inch width and crochet rows until the rectangle measures 17 to 17.5 inches long before seaming.
Pin This Tested Crochet Ear Warmer Pattern for Later
Ready to crochet your next cozy accessory?
Save this pin to your Pinterest crochet patterns or DIY accessories board so you have this tested twisted ear warmer guide ready whenever chilly weather arrives.

Leave a Comment